background image

English

English-9

Note:

 Depending on the PC and Video card used, or when another Video signal cable is attached, this

function may not operate.

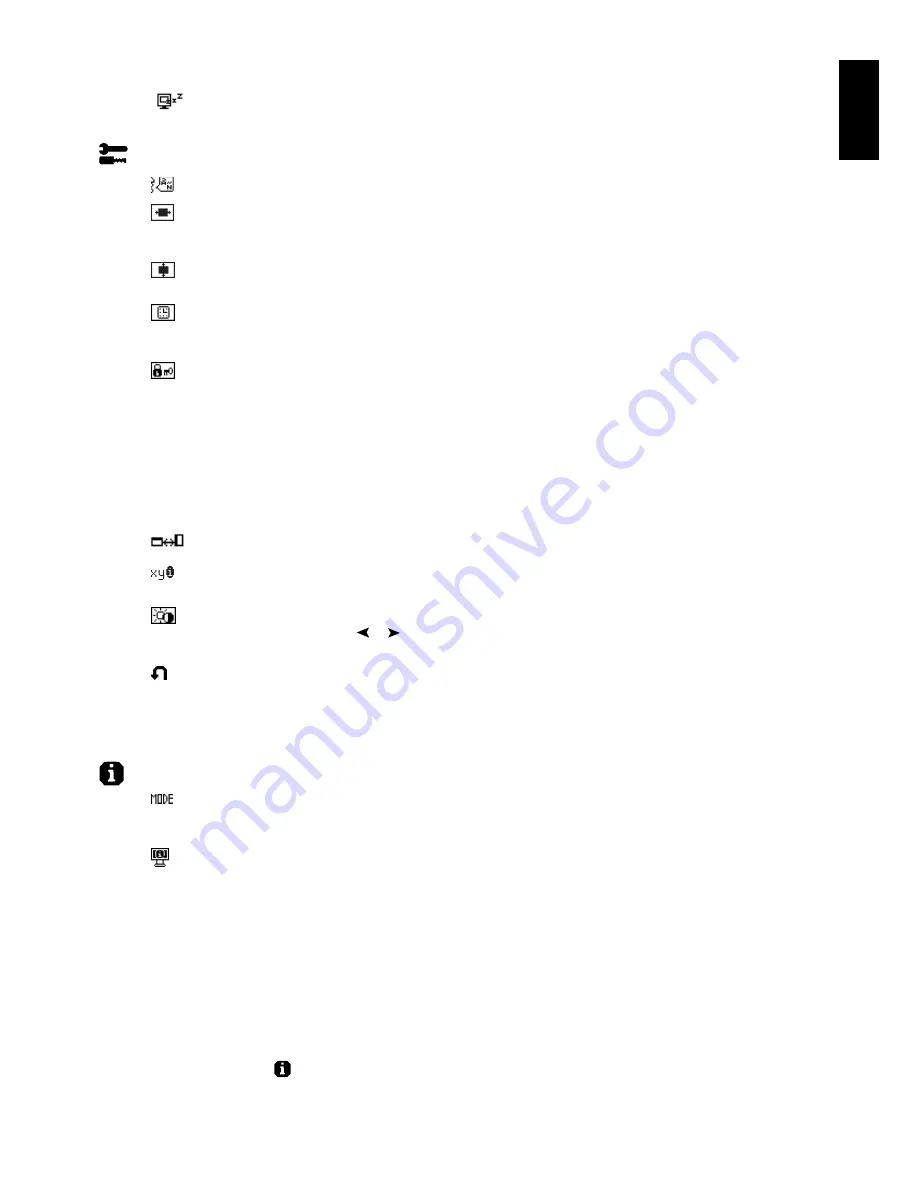
OFF TIMER: 

Monitor will automatically power-down when the end user has selected a pre-determined

amount of time.

Tools 2

LANGUAGE: 

OSM control menus are available in seven languages.

OSM LEFT/RIGHT:

 You can choose where you would like the OSM control image to appear on your

screen. Selecting OSM Location allows you to manually adjust the position of the OSM control menu
left or right.

OSM DOWN/UP:

 You can choose where you would like the OSM control image to appear on your screen.

Selecting OSM Location allows you to manually adjust the position of the OSM control menu down or up.

OSM TURN  OFF: 

The OSM control menu will stay on as long as it is use. In the OSM Turn Off submenu,

you can select how long the monitor waits after the last touch of a button to shut off the OSM control menu.
The preset choices are 10-120 seconds by 5 seconds step.

OSM LOCK OUT: 

This control completely locks out access to all OSM control functions. When attempting

to activate OSM controls while in the Lock Out mode, a screen will appear indicating the OSM controls are
locked out. There are two types of OSM LOCK OUT:
OSM LOCK OUT with BRIGHTNESS and CONTRAST control: To activate the OSM Lock Out function,
press SELECT, then “+” key and hold down simultaneously. To deactivate the OSM Lock Out, press
SELECT, then “+” key and hold down simultaneously. BRIGHTNESS and CONTRAST can be adjusted
while in the lock out mode.
OSM LOCK OUT with no control: To activate the OSM Lock Out function, press SELECT, then “>” key and
hold down simultaneously. To deactivate the OSM Lock Out, press SELECT, then “>” key and hold down
simultaneously. No controls can be adjusted while in the lock out mode.

OSM ROTATION: 

To rotate OSM between Landscape and Portrait modes.

RESOLUTION NOTIFIER: 

This optimal resolution is 1600 x 1200. If ON is selected, a message will appear

on the screen after 30 seconds, notifying you that the resolution is not at 1600 x 1200.

HOT KEY: 

You can adjust the brightness and contrast directly. When this function is set to ON, you can

adjust the brightness with 

 or 

, contrast with + or - key, while the OSM menu is off. The standard OSM

can be accessed with the EXIT button.

FACTORY PRESET: 

Selecting Factory Preset allows you to reset all OSM control settings (BRIGHTNESS,

CONTRAST, IMAGE CONTROL, COLOUR CONTROL SYSTEM, SHARPNESS, EXPANSION MODE, OFF
TIMER, OSM LEFT/RIGHT, OSM DOWN/UP, OSM TURN OFF, DISPLAY MODE) back to the factory
settings. Individual settings can be reset by highlighting the control to be reset and pressing the RESET
button.

Information

DISPLAY MODE: 

Provides information about the current resolution display and technical data including the

preset timing being used and the horizontal and vertical frequencies. Increases or decreases the current
resolution.

MONITOR INFO.: 

Indicates the model and serial numbers of your monitor.

OSM Warning

OSM Warning menus disappear with Exit button.

NO SIGNAL:

 This function gives a warning when there is no Horizontal or Vertical Sync. After power is

turned on or when there is a change of input signal, the 

No Signal

 window will appear.

RESOLUTION NOTIFIER:

 This function gives a warning of use with optimized resolution. After power is

turned on or when there is a change of input signal or the video signal doesn’t have proper resolution, the

Resolution Notifier

 window will open. This function can be disabled in the TOOL menu.

OUT OF RANGE:

 This function gives a recommendation of the optimized resolution and refresh rate. After

the power is turned on or there is a change of input signal or the video signal doesn’t have proper timing,
the 

Out Of Range

 menu will appear.

NOTE:

If “

 CHANGE DVI SELECTION” is displayed, switch to DVI SELECTION.

For advanced user menu see “Appendix”.

Summary of Contents for 130737 - 321 - 21.3" LCD Monitor

Page 1: ...LaCie 321 User s Manual ...

Page 2: ... use the power cord provided withthe monitor In the UK a BS approved power cord with a moulded plug has a Black five Amps fuse installed for use with this equipment If a power cord is not supplied with this equipment please contact your supplier When operating the LaCie 321 with a 220 240V AC power source in Australia use the power cord provided withthe monitor If a power cord is not supplied with...

Page 3: ...ipment does cause harmful interference to radio or television reception which can be determined by turning the equipment off and on the user is encouraged to try to correct the interference by one or more of the following measures Reorient or relocate the receiving antenna Increase the separation between the equipment and receiver Connect the equipment into an outlet on a circuit different from th...

Page 4: ...LaCie 321 monitor with tilt swivel pivot height adjust stand Power Cord Video Signal Cable 15 pin mini D SUB male to DVI A Video Signal Cable DVI D to DVI D cable CD ROM Cable Cover Remember to save your original box and packing material to transport or ship the monitor ...

Page 5: ...ble cover The cable cover can be attached on the front or back side of Tilt Stand Figure C 1 C 2 Please check Tilt Rise and Lower monitor screen and screen rotation when you manage cables 4 Connect one end of the power cord to the AC inlet on the back of the monitor and the other end to the power outlet Figure C 1 NOTE Please refer to Caution section of this manual for proper selection of AC power...

Page 6: ...ising or lowering the monitor screen Screen Rotation Before rotating the screen must be raised to the highest level to avoid knocking the screen on the desk or pinching with your fingers To raise the screen place hands on each side of the monitor and lift up to the highest position Figure RL 1 To rotate screen place hands on each side of the monitor screen and turn clockwise from Landscape to Port...

Page 7: ...necting the monitor to the stand Figure S 2 Turn the stand to 180 counterclockwise you will hear two clicks Remove the screws from the bottom Figure S 3 and lift off the stand The monitor is now ready for mounting in an alternate manner 5 Reverse this process to reattach stand tighten the two bottom screws turn stand 180 counter clockwise you will hear two clicks and tighten two top screws NOTE Us...

Page 8: ...T RIGHT Controls Horizontal Image Position within the display area of the LCD DOWN UP Controls Vertical Image Position within the display area of the LCD H SIZE Analog input only Adjusts the horizontal size by increasing or decreasing this setting If the AUTO Adjust function do not give you a satisfactory picture setting a further tuning can be performed using the H Size function dot clock For thi...

Page 9: ... this mode the resolution may be low and there may be blank areas This mode is for use with special video cards VIDEO DETECT Selects the method of video detection when more than one computer is connected FIRST DETECT The video input has to be switched to FIRST DETECT mode When current video input signal is not present then the monitor searches for a video signal from the other video input port If ...

Page 10: ...e OSM between Landscape and Portrait modes RESOLUTION NOTIFIER This optimal resolution is 1600 x 1200 If ON is selected a message will appear on the screen after 30 seconds notifying you that the resolution is not at 1600 x 1200 HOT KEY You can adjust the brightness and contrast directly When this function is set to ON you can adjust the brightness with or contrast with or key while the OSM menu i...

Page 11: ...een exposed to rain or water If the monitor has been dropped or the cabinet damaged If the monitor does not operate normally by following operating instructions Do not bend power cord Do not use monitor in high temperatured humid dusty or oily areas If glass is broken handle with care Do not cover vent on monitor If monitor or glass is broken do not come in contact with the liquid crystal and hand...

Page 12: ... cloth Case of persistent dirt wipe with cloth permeated by water ethanol isopropyl alcohol completely Avoid using any cleaning solution or glass cleaner ex Acid Alkali and Acetone Adjust the monitor s brightness and contrast controls to enhance readability Use a document holder placed close to the screen Position whatever you are looking at most of the time the screen or reference material direct...

Page 13: ... support 600 x 800 1 at 56 Hz to 85 Hz all modes listed 624 x 832 1 at 75 Hz 768 x 1024 1 at 60 Hz to 85 Hz 870 x 1152 1 at 75 Hz LaCie 321 cites 1024 x 1280 1 at 60 Hz to 85 Hz recommended resolution for optimal display 1200 x 1600 at 60 Hz performance Active Landscape Horiz 432 mm 17 0 inches Display Area Vert 324 mm 12 8 inches Portrait Horiz 324 mm 12 8 inches Vert 432 mm 17 0 inches Power Sup...

Page 14: ...oving screen saver at regular intervals whenever the screen is idle or turning off the monitor when not in use Message OUT OF RANGE is displayed screen is either blank or shows rough images only Image is displayed only roughly pixels are missing and OSM warning OUT OF RANGE is displayed Either signal clock or resolution is too high Choose one of the supported modes OSM warning OUT OF RANGE is disp...

Page 15: ...ent requires the image to have white portions Black Level Adjusts the black level Press or to select Analog input only Auto Brightness This function adjusts the brightness automaticaly for the best CONTRAST and BRIGHTNESS setting based on the white display area Tag2 R H position Adjusts the position of the red component of the image Press or to adjust Analog input only G H position Adjusts the pos...

Page 16: ...rformed using the Fine function It improves focus clearity and image stability by increasing or decreasing this setting For this a Moiré test pattern could be used If the Fine value is wrongly calibrated the result would look like on the left drawing The image should be homogeneous When FINE value is wrong When FINE value is correct Tag5 Gamma Selection Allows you to manually select the brightness...

Page 17: ... video input port If the video signal is present in the other port then the monitor switches the video source input port to the new found video source automatically The monitor will not look for other video signals while the current video source is present LAST DETECT The video input has to be switched to the LAST DETECT mode When the monitor is displaying a signal from the current source and a ne...

Page 18: ...mposite input signals Try this option if the FINE adjustment does not successfully eliminate the noise Sync On Green Adjusts the sensitivity of the Sync On Green input signals Adjusts the slice level when separating a synchronization from Sync On Green signal input Press or to select SOG Correction Shapes the waveform of the Sync On Green signals Try this option if the FINE Analog input only adjus...

Page 19: ...environmental demands for example in respect of the reduction of electric and magnetic fields physical and visual ergonomics and good usability Environmental Requirements Flame retardants Flame retardants are present in printed circuit boards cables wires casings and housings In turn they delay the spread of fire Up to thirty percent of the plastic in a computer casing can consist of flame retarda...

Page 20: ... LaCie monitor please contact one of the following organizations Sweden www el retur se http www el retur se Germany www recyclingpartner de http www recyclingpartner de Holland www mirec nl http www mirec nl Japan www diarcs com http www diarcs com Energy Saving This monitor features and advanced energy saving capability When a VESA Display Power Management Signalling DPMS Standard signal is sent...

Reviews: