LACAVA
4
Installation Instructions/Instrucciones de Instalación
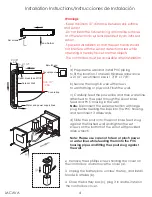
1.
a) Prepare the wall and install PVC piping
to fit the location. Total wall thickness allowance
is 2 1/4”, escutcheon size is 1 7/8” x 1 7/8”.
b) Secure the rough-in well with screws
to wall framing or plywood. Finish the wall.
c) Carefully feed the power line and then water line
attached to the spout through the spout brass
feed and PVC housing in the wall.
Note:
Disconnect the sensor extention with large
plug before feeding the lines into the PVC housing,
and reconnect it afterwards.
d) Slide the spout onto the spout brass feed snug
against the finished wall and tighten the set
screws on the bottom of the spout with provided
allen wrench.
Note: Please use care not to tear or pinch power
or water lines while feeding them into the PVC
housing pipes and fitting the spout snug against
the wall.
2. Remove the 4 phillips screws holding the cover on
the control box and remove the cover (a).
3. Unplug the battery box, uncrew the top, and install
four AA batteries (b).
4. Close the battery box (c), plug it in and re-install in
the control box cover.
Ceramic Wall
Escutcheon
Faucet spout
Countertop
0 - 2 1/4”
0-55
2 3/8”
60
Water and power supply lines
Spout brass feed Ø 7/8”
a
b
c
see below
Set screws
Warnings:
-Do not install the fixture facing a mirror-like surfaces
or other electronic systems operated by an infra-red
sensor
-Space for installation so that the user hands should
not interfere with the sensor detection area while
operating a nearby faucet or other objects
-The control box must be accessible after installation
- Keep minimum 10” distance between sink surface
and sensor
Min 10”
255


