background image

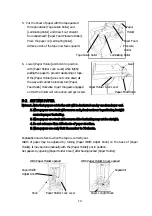
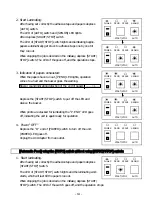
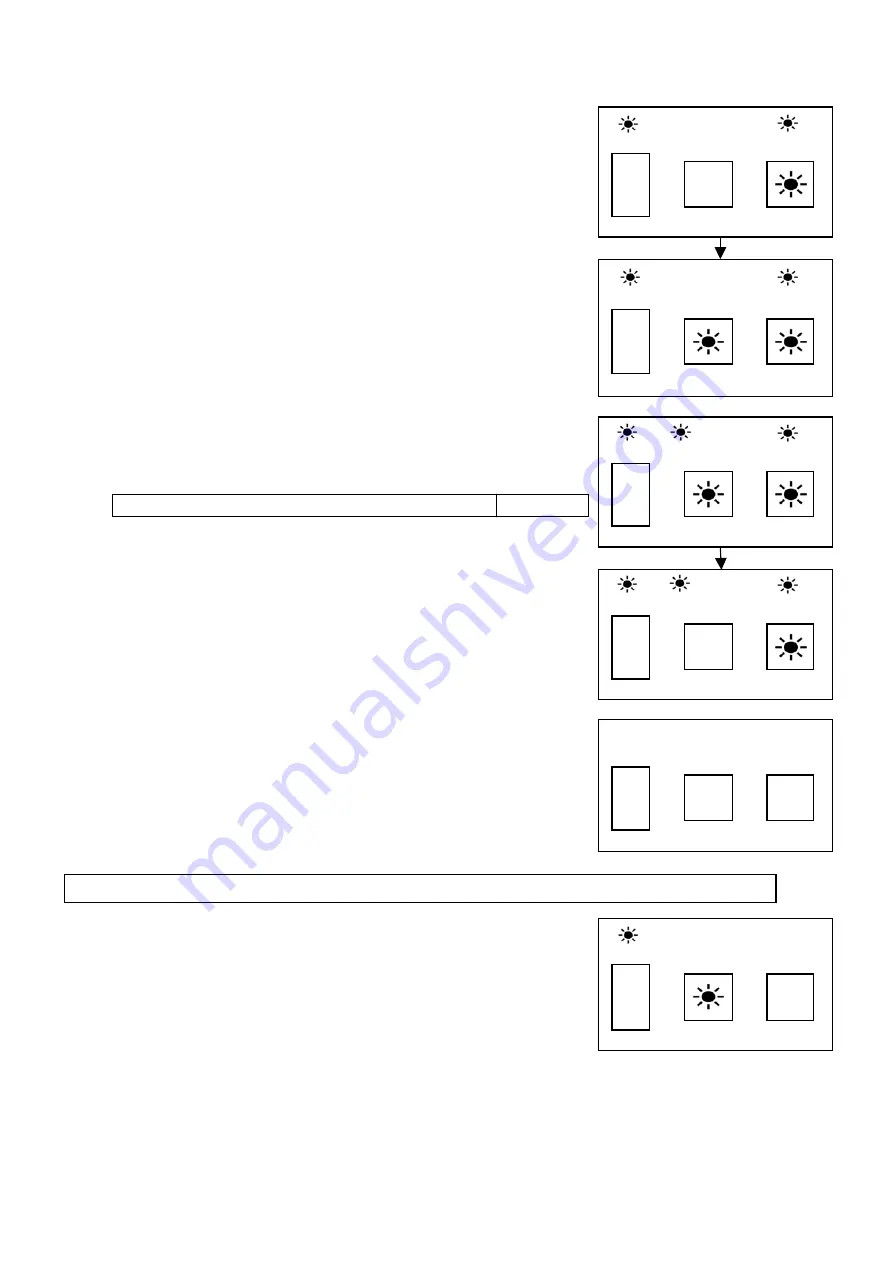
After having set correctly the adhesive tape and papers depress

[AUTO] switch. 

The LED of [AUTO] switch and [SEN.ON] LED lights.

The LED of [START/STOP] switch lights and laminating begins.

they run out.

When stopping the job is desired on the midway, depress [START/
STOP] switch. The LED of the goes off, and the operation stops.

When the papers have run out, [P.END] LED lights, operation 

Buzzer sound indicating detection of the end of papers   ―― ――  

silence the buzzer.

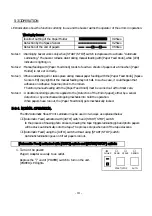
Depress the “O” end of [POWER] switch to turn off the unit.

[POWER] LED goes off. 

Unplug the AC Adapter from an outlet.

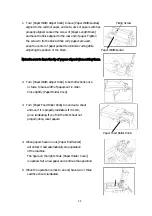
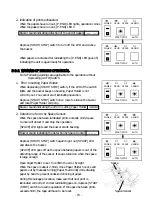
After having set correctly the adhesive tape and papers depress

The LED of [START/STOP] switch lights and the laminating work

When stopping the job is desired on the midway, depress [START/

- 14 -

START/STOP

AUTO

P.END

SPACE

SEN.ON

AUTO

After depress [SRART/STOP] switch.

1.

POWER

P.END

SPACE

SEN.ON

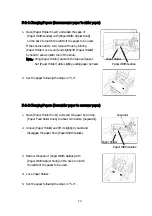
When prints are stacked for laminating the “P. END” LED goes 
off, indicating the unit is again ready for operation

POWER

P.END

SPACE

START/STOP

Depress the [START/STOP] switch to put off the LED and  

POWER

P.END

SPACE

POWER

P.END

START/STOP

2.

4.

comes to a halt and the buzzer gives the warning.

[Automatic Feed] using the [AUTO] switch without using [START/STOP] switch:

 Power “OFF”

 Start laminating.

[START/STOP] Switch.

Start Laminating:

Indication of papers exhausted:

papers automatically get stuck to adhesive tape one by one till 

POWER

STOP] switch. The LED of the switch goes off, and the operation stops.

starts, which will last till the papers run out.

POWER

SPACE

START/STOP

START/STOP

P.END

SPACE

START/STOP

SEN.ON

AUTO

SEN.ON

AUTO

AUTO

SEN.ON

SEN.ON

AUTO

3.

Summary of Contents for LABOKEY 802

Page 1: ...Instruction Manual SHEET PRINT LAMINATOR...

Page 2: ...anual book and warning labels WARNING Do not perform without our approval any modification assembly or the unspecified parts or removal of any parts from the equipment It may happen to injury yourself...

Page 3: ...ALLATION 8 4 1 UNPACKING AND CONFIRMATION THE CONTENTS 8 4 2 LOCATION AND ENVIRONMENT 8 4 3 REMOVING PROTECTIVE TAPES 8 5 OPERATIONS 9 5 1 SETTING LAMINATING TAPE 9 5 2 SETTING PAPER 10 5 2 1 Changing...

Page 4: ...s Precautions Label Reference to Location Manual Book Setting of Be careful not to have 5 1 Setting Laminating Tape Paper Holder your fingers pinched W 1 5 2 Setting Paper 5 3 Operation 1 2 LOCATION O...

Page 5: ...of the equipment WARNING Used for the urgently critical situation which will inevitably cause a death or serious injury if the situation is not avoided CAUTION Used for the critical situation which ma...

Page 6: ...ic stop by Paper End Sensor Control method By microcomputer Laminating Tape Dedicated Laminating tape 85mm wide 100m long for 89mm wide paper 98mm wide 100m long for 102mm wide paper 124mm wide 100m l...

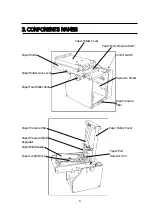
Page 7: ...re Roller Paper Holder Control Switch Paper Holder Lock Lever Tape Core Holder Paper Feed Roller Knob Tape Pressure Plate Paper Pressure Plate Paper Holder Cover Paper Pressure Block Separator Paper W...

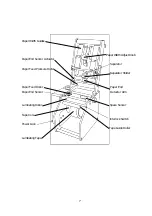
Page 8: ...Paper End Sensor Actuator Separator Paper Feed Pressure Roller Separator Holder Paper Feed Roller Paper End Paper End Sensor Detector Arm Laminating Roller Space Sensor Tape Core Interlock Switch Powe...

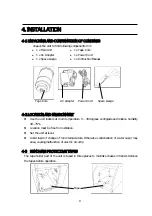
Page 9: ...D ENVIRONMENT z Use the unit indoors at room temperature 5 30 degrees centigrade and relative humidity 30 75 z Location must be free from vibration z Set the unit at level z Avoid rapid of change of r...

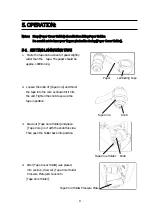
Page 10: ...ong Paper Laminating Tape 2 Loosen the knob of Tape Core and thrust the tape into the core as shown till it hits the end Tighten the knob to secure the tape in position Tape Core Knob 3 Draw out Tape...

Page 11: ...wn and get locked Paper Feed Knob 5 2 SETTING PAPER Notes 1 Note that papers set in the unit will be laminated one by one from lower end 2 When papers are stack with uneven ends front and rear in part...

Page 12: ...ers aligned when setting them 2 Turn Paper Width Adjust Knob to both directions once or twice to have width of papers set in order Close tightly Paper Holder Cove 3 Turn Paper Feed Roller Knob to send...

Page 13: ...lder Set Paper Holder while slightly pulling paper by hand Paper Width Guides 2 Set the paper following the steps in 5 2 5 2 2 Changing Papers from wider paper to narrower paper 1 Open Paper Holder Co...

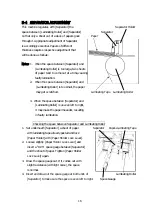
Page 14: ...em is applied to the Detection of the End of paper either by a sensor detection or by a mechanical stopping mechanism to hold the operation When papers have run out the Paper Feed Knob gets mechanical...

Page 15: ...g the job is desired on the midway depress START 14 START STOP AUTO P END SPACE SEN ON AUTO After depress SRART STOP switch 1 POWER P END SPACE SEN ON When prints are stacked for laminating the P END...

Page 16: ...eed Knob while drawing paper by hand to prevent undesired sticking of paper During this salvage procedure make sure that next print is laminated correctly If correct laminating goes on depress START S...

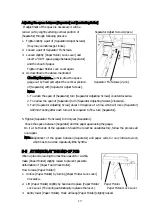
Page 17: ...tched Laminating Tape Laminating Roller 3 When the space between Separator and Laminating Roller is uneven left to right it may make the paper meander resulting in faulty lamination Checking the space...

Page 18: ...ing Screws clockwise 3 Turn Separator Adjusting Screw about 10 degrees at a time which will move Separator 0 02mm Testing after each turn will be required to fine tune Separator 5 Tighten Separator Fi...

Reviews: