background image

9

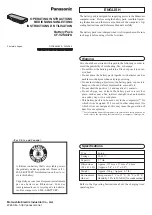
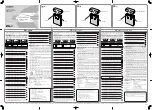
CHARGING AND EXTERNAL POWER

A

 Make sure that the input supply voltage of the used charger does not  

exceed 50V.

To charge the BP-500 battery pack, connect a DC 13-50V power supply to the  

DC 5.5×2.5 connector of the pack. The recommended power supply current is 3A.  

V+

5.5 мм 2.5 мм

GND

The BP-500 will not charge if an external power source is connected to the TX-500. 

If the battery pack is active, it will provide backup power if the transceiver's external 

power supply is undervoltage (below battery pack voltage) or if external power is lost.
Solar panel cells can be used as a charging source, providing an output voltage in 

the range of 13 to 50 V.

External power connection options:

BP-500

DC IN

DC 13-50V

DC 13-50V

TX-500

DC IN

BP-500

DC IN

DC 13-50V

BP-500

DC IN

TX-500

DC IN

DC 9-15V

DC 9-15V

A

 Do not connect external power sources to the transceiver and battery pack  

at the same time.

Summary of Contents for BP-500

Page 1: ...USER MANUAL v1 0 03 2023 Battery Pack LAB599 BP 500...

Page 2: ...2 Table of contents Description and Specifications 3 Appearance and controls 4 Maintenance 6 Connection and control 7 Safety and operating conditions 10...

Page 3: ...transceiver screen BP 500 FEATURES Direct attachment to the Lab599 Discovery TX 500 transceiver without the need for additional cabling Interchangeable Li Ion 18650 batteries Ability to use 3 or 6 ba...

Page 4: ...4 Top view 5 6 7 1 4 8 3 2 Bottom view 9 4 Left view 10 Appearance and controls...

Page 5: ...S 1 The device enclosure 2 Top cover 3 Kickstands 4 Battery heatsink 5 Power button 6 Operating indicator 7 Battery level check button 8 Battery level indication 9 Contact pads 10 DC charger socket 5...

Page 6: ...e battery pack 1 by loosening the 6 M3 screws 2 with the 2 mm hex wrench provided 1 2 3 4 2 Install the Li Ion 18650 batteries 3 into the battery holders observing the polarity 3 If necessary replace...

Page 7: ...the contact pads of the battery pack while the battery pack is active can cause device damage 1 Remove the rubber feet that cover the through mounting holes on the back of TX 500 transceiver 2 Accordi...

Page 8: ...HARGE LEVEL CONTROL To check the battery level press the button 3 Fig 1 the four segment display 4 will show the charge level corresponding to in percent 25 50 75 100 When the battery pack is connecte...

Page 9: ...cted to the TX 500 If the battery pack is active it will provide backup power if the transceiver s external power supply is undervoltage below battery pack voltage or if external power is lost Solar p...

Page 10: ...nded with the power supply connected to it Do not use the device while connected to the TX 500 transceiver during a lightning storm Avoid getting moisture inside the product Immediately turn off the p...

Page 11: ...sed in accordance with its technical purpose The product is suitable for operation at ambient temperature from 5 C to 35 C and humidity up to 100 The product is designed for both indoor and outdoor us...

Page 12: ...Lab599 inc www lab599 com...

Reviews: