background image


15

  Installation of the handle 


1

 GASKET 

2

 SCREW 

3

 DOOR 

4

 HANDLE 


1.  OPEN THE DOOR 
2.  TAKE OUT A PART OF GASKET 
3.  ALIGN THE TWO HOLES OF THE HANDLE WITH THE HOLE ON THE DOOR 
4.  INSTALL THE TWO SCREWS 
5.  FINISHED 


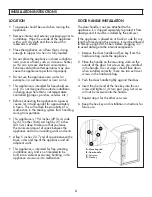
  Electrical Connection 


This appliance should be properly grounded for your safety.   
 
This appliance requires a standard 220 Volt AC / 50Hz electrical ground outlet. Have the wall outlet 
and circuit checked by a qualified electrician to make sure the outlet is properly grounded.  
 
The cord should be secured behind the appliance and not left exposed or dangling to prevent 
accidental injury. 
 
The appliance should always be plugged into its own individual electrical outlet which has a voltage 
rating that matches the rating label on the appliance. This provides the best performance and also 
prevent overloading house wiring circuits that could cause a fire hazard from overheated. Never 
unplug the appliance by pulling the power cord.  Always grip the plug firmly and pull straight out from 
the receptacle. Repair or replace immediately all power cords that have become frayed or otherwise 
damaged. Do not use a cord that shows cracks or abrasion damage along its length or at either end. 
When moving the appliance, be careful not to damage the power cord. 

Warning


Improper use of the grounded plug can result in the risk of electrical shock. If the power cord is 
damaged, have it replaced by an authorized service center. 


Summary of Contents for LS40

Page 1: ...1 NOTICE D UTILISATION Mod le LS40 Cave de service AVANT TOUTE UTILISATION VEUILLEZ LIRE ATTENTIVEMENT LA NOTICE...

Page 2: ...2 COMPOSITION DE VOTRE CAVE 1 Corps de la cave 2 Clayettes 3 Pieds 4 Charni re 5 Porte vitr e 6 Poign e...

Page 3: ...3...

Page 4: ...port bois en bas de cave ainsi que le coffret du sommelier offert Nettoyez l int rieur de l appareil avec de l eau ti de en utilisant un tissu doux Installation de votre cave Cette cave n est pas con...

Page 5: ...doute sur votre installation lectrqiue contacter un professionnel Cet appareil se branche sur une tension de 220 240V et une fr quence de 50Hz Le cordon d alimentation ne doit pas rester apparent afi...

Page 6: ...sont bien d verrouill es Vous pouvez choisir la temp rature en appuyant sur ou Le voyant Red est allum quand la temp rature choisie correspond plus une temp rature de conservation du vin rouge Le voya...

Page 7: ...ques heures Dans ce cas laissez la porte de votre cave ferm e jusqu au r tablissement de l lectricit cela aidera au maintien de la temp rature DEPLACER VOTRE CAVE Videz votre cave puis enlevez les cla...

Page 8: ...ant 3 secondes et attendez le BIP de d blocage La cave ne fait pas assez de froid V rifiez la temp rature de r glage L environnement ext rieur peut n cessiter un r glage plus lev La porte est ouverte...

Page 9: ...enfants S curit g n rale ATTENTION Cet appareil est con u pour fonctionner dans un foyer domestique et dans les environnements de type suivant locaux de cuisine et quipements vendus dans le commerce e...

Page 10: ...domestiques traditionnelles selon les consignes livr es avec le syst me L appareil est lourd Soyez prudent lorsque vous le d placez N utilisez jamais le socle les tiroirs les portes et autres l ments...

Page 11: ...11 INSTRUCTION MANUAL LS40 Cellar BEFORE USE PLEASE READ AND FOLLOW ALL SAFETY RULES AND OPERATING INSTRUCTIONS...

Page 12: ...12 PARTS FEATURES 1 BODY 2 SHELVES 3 FEET 4 HINGE 5 GLASS DOOR 6 HANDLE...

Page 13: ...13...

Page 14: ...the following parts 2 wooden shelves and 1 wooden bottom support Clean the interior surface with lukewarm water using a soft cloth Installation of Your cellar This cellar is designed to be free standi...

Page 15: ...uld always be plugged into its own individual electrical outlet which has a voltage rating that matches the rating label on the appliance This provides the best performance and also prevent overloadin...

Page 16: ...ease 1 F or 1 C if you push the button once The indicator Red is lit when the set temperature is more like a storage temperature of red wine The indicator White is lit when the set temperature is more...

Page 17: ...emperature of your appliance if you minimize the number of times the door is opened If the power is going to be off for a longer period of time you need to take the proper steps to protect your conten...

Page 18: ...user manual carefully including its hints and warnings To avoid unnecessary mistakes and accidents it is important to make sure that all people using the appliance are thoroughly familiar with its ope...

Page 19: ...mes and sources of ignition Thoroughly ventilate the room in which the appliance is situated It is dangerous to alter the specifications or modify this product in any way Any damage to the cord may ca...

Page 20: ...ore connecting the appliance to allow the oil to flow back in the compressor Adequate air circulation should be around the appliance lacking this leads to overheating To achieve sufficient ventilation...

Page 21: ...missions acoustiques dans l air Airborne acoustical noise emissions Luftschallemission 42 DB A Int grable Built in Einbaubar NON Cat gories d appareils de r frig ration m nagers Household refrigeratin...

Reviews: