background image


10

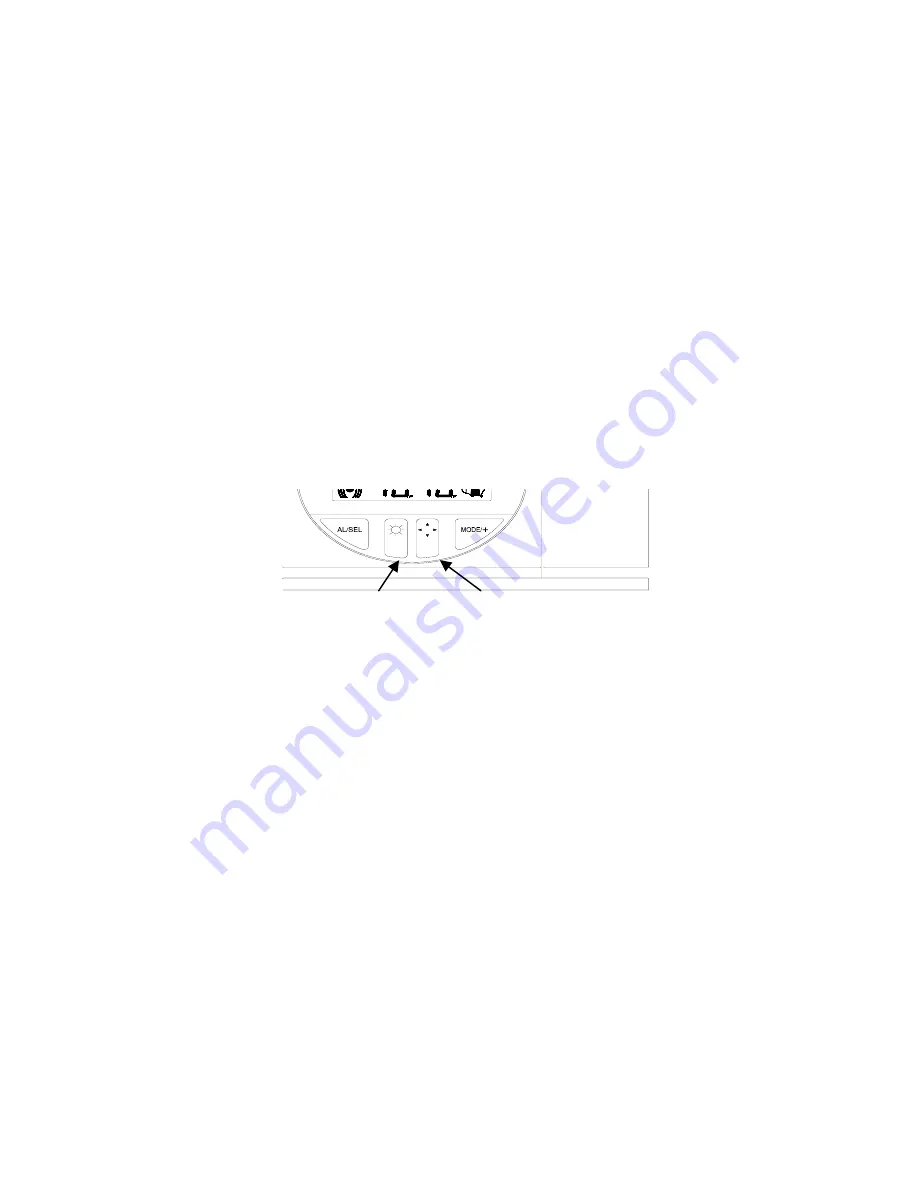
Light Intensity

Projection 
Direction

C.


PROJECTION OF TIME


1.


When plugged into an AC outlet, the projection alarm can continuously 
project the time.


2.


When operating on batteries alone, the Projection Alarm will only project 
when a button is pressed. 

3.


The projection will auto-focus for display from three to six feet away. A 
dark surrounding will be necessary to clearly see the projection. 

4.


The direction of the display can be rotated 360

°

 in 90

°

 increments by 

pressing the directional button. There is no display on the LCD that 
signifies the direction. 

5.


The projector case can be rotated 180

°

 to further help orient the projected 

display. 

6.


The intensity of the projection can be adjusted to three different settings as 
well as turned “off” by pressing the Light Intensity button. When turned off, 
the projection will only come on when a button is pressed. The intensity 
cannot be set for the projected display when set to “off”. When only 
batteries are used, the intensity setting is set to “off” with no other options. 


D.


LCD LIGHT 

1.


The Projection Alarm has an LCD light designed for night viewing. This 
will light up for 2 seconds whenever a button is pressed.


2.


The LCD light cannot be turned on constantly; this would drain the batteries 
and burn out the light. 


E.


TIME ALARM. 

 
1.


SETTING THE ALARM 

a.


Press and hold “AL” for two seconds until the alarm time is flashing.


b.


Press the “MODE/+” button to select the hour. 


NOTE:

 When setting the hour, “PM” will appear to the left of the alarm 

time display.  If it is set for “AM” nothing will appear.


c.


Press the “AL” button to advance to the minute setting.


d.


Press the “MODE/+” button to select the minutes.


e.


Press the “AL” button to confirm the alarm setting and return to the 
display mode. 


Summary of Contents for WT-5600

Page 1: ...WT 5600 Radio Controlled Projection Alarm Instruction Manual PROJECTION ...

Page 2: ...ing Sequence 6 Function Buttons 6 Time Zone Setting 6 7 Time Setting 7 Date Setting 8 12 24 Hour Mode 8 DST Daylight Saving Time Setting 8 Features Operations Features 8 9 Radio Controlled Time 9 Projection 10 LCD light 10 Time Alarm 10 11 Changing Display Mode 12 Maintenance Care 12 Troubleshooting 13 Specifications 13 Warranty and Contact Information 14 ...

Page 3: ...ch for a signal every night when reception is best The WWVB radio station receives the time data from the NIST Atomic clock in Boulder Colorado A team of atomic physicists is continually measuring every second of every day to an accuracy of ten billionths of a second per day These physicists have created an international standard measuring a second as 9 192 631 770 vibrations of a Cesium 133 atom ...

Page 4: ...ime and date instructions in the Program Mode 4 Program the settings 5 Mount the WT 5600 in a suitable location where WWVB signal can be received 6 The projector will activate and remain on if the alarm clock is plugged in If only batteries are used the projector will only be activated when a button is pressed 7 See the Features section for instructions on projection direction etc ...

Page 5: ...ill be displayed and the time will appear as The WWVB search is automatically initiated and a tower icon appears and flashes with the time colon no tower icon will appear if the WWVB is too weak to be detected and the time display will remain on While the WWVB search is being conducted various numbers will appear in the time display After 10 minutes the Projection Alarm will either display the WWV...

Page 6: ...tely 15 seconds for the Projection Alarm to automatically return to normal operation A PROGRAMMING SEQUENCE 1 Time Zone Setting 2 Hour Setting 3 Minute Setting 4 Year Setting 5 Month Setting 6 Day Setting 7 12 24 hour Mode 8 Daylight Saving Time On Off B FUNCTION BUTTONS There are 5 function buttons located on the front of the Projection Alarm The function buttons are labeled AL light intensity ic...

Page 7: ...hes in the time LCD 2 Press the MODE button to select the hour 3 Press the AL button to move to the minute setting a Note When setting the hour PM will appear to the left of the hour display if it is AM nothing will appear 4 Press the MODE button to select the minutes 5 Press the AL button to confirm the time setting and advance to manually set the date or press the SNOOZE button to confirm the ti...

Page 8: ...n the time display 2 Press the MODE button to toggle between 12 and 24 hour time display 3 Press the AL button to confirm the time display setting and move to the Daylight Saving Time setting or press the SNOOZE button to confirm the time display setting and return to the display mode G DAYLIGHT SAVINGS TIME Note The DST default is On meaning that the WWVB will automatically change the time accord...

Page 9: ...ery night when reception is best 6 The WWVB radio station receives the time data from the NIST Atomic clock in Boulder Colorado A team of atomic physicists is continually measuring every second of every day to an accuracy of ten billionths of a second per day These physicists have created an international standard measuring a second as 9 192 631 770 vibrations of a Cesium 133 atom in a vacuum 7 Fo...

Page 10: ... the Light Intensity button When turned off the projection will only come on when a button is pressed The intensity cannot be set for the projected display when set to off When only batteries are used the intensity setting is set to off with no other options D LCD LIGHT 1 The Projection Alarm has an LCD light designed for night viewing This will light up for 2 seconds whenever a button is pressed ...

Page 11: ...e the alarm is set to below the time display 3 TURNING ALARM OFF WHILE SOUNDING Note The alarm will sound for 23 seconds and then increase in volume and speed for another 62 seconds 85 seconds total If no button is pushed it will shut off and be active for the next day a While the alarm is sounding press the SNOOZE bar to disable the alarm for six minutes b After the SNOOZE bar is pressed the alar...

Page 12: ...lay will now show month date MAINTENANCE CARE B Extreme temperatures vibrations and shock should be avoided to prevent damage to the units C Clean displays and units with a soft damp cloth Do not use solvents or scouring agents they may mark and damage the displays and casings D Do not submerge in water E Immediately remove all low powered batteries to avoid leakage and damage F Replace with new b...

Page 13: ...olled clocks 4 Remove batteries for five minutes reinsert and leave the unit alone overnight without pressing buttons 5 If problems persist contact La Crosse Technology Problem Hour is incorrect minute and date are correct Solution 1 Be sure correct time zone and daylight saving time are selected Note For any questions not answered please contact La Crosse Technology s Technical Support with the c...

Page 14: ...Ltd authorized service center La Crosse Technology Ltd will pay ground return shipping charges to the owner of the product to a USA address only Your La Crosse Technology Ltd warranty covers all defects in material and workmanship with the following specified exceptions 1 damage caused by accident unreasonable use or neglect including the lack of reasonable and necessary maintenance 2 damage occur...

Page 15: ...m warranty work sales lacrossetechnology com information on other products web www lacrossetechnology com FCC ID OMO 01RX receiver THIS DEVICE COMPLIES WITH PART 15 OF THE FCC RULES OPERATION IS SUBJECT TO THE FOLLOWING TWO CONDITIONS 1 THIS DEVICE MAY NOT CAUSE HARMFUL INTERFERENCE AND 2 THIS DEVICE MUST ACCEPT INTERFERENCE RECEIVED INCLUDING INTERFERENCE THAT MAY CAUSE UNDESIRED OPERATION ...

Reviews: