background image


  P a g e

| 29  

FCC STATEMENT 

Statement according to FCC part 15.19: 

This device complies with part 15 of the FCC rules.  Operation is subject to the following two 
conditions: 
(1) 

This device may not cause harmful interference. 

(2) 

This device must accept any interference received, including interference that may 

cause undesired operation. 

Statement according to FCC part 15.21: 

Modifications not expressly approved by this company could void the user's authority to 
operate the equipment. 

Statement according to FCC part 15.105: 

NOTE: This equipment has been tested and found to comply with the limits for a Class B digital 
device, pursuant to Part 15 of the FCC Rules. These limits are designed to provide reasonable 
protection against harmful interference in a residential installation. This equipment generates, 
uses and can radiate radio frequency energy and, if not installed and used in accordance with 
the instructions, may cause harmful interference to radio communications. 
However, there is no guarantee that interference will not occur in a particular installation. If 
this equipment does cause harmful interference to radio or television reception, which can be 
determined by turning the equipment off and on, the user is encouraged to try to correct the 
interference by one or more of the following measures: 


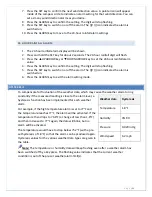
Reorient or relocate the receiving antenna. 


Increase the separation between the equipment and receiver. 


Connect the equipment into an outlet on a circuit different from that to which the 
receiver is connected. 


Consult the dealer or an experienced radio/TV technician for help. 


Summary of Contents for WS-2810U-IT

Page 1: ...WS 2812U IT Wireless Professional Weather Center Operations Manual Revision 5 ...

Page 2: ...y 11 UP ARROW key 12 DOWN ARROW key 12 ALARM Key 12 MIN MAX key 12 Mode 1 display 12 Mode 2 display 13 Date or seconds display mode 13 LCD SCREEN 13 MANUAL SETTINGS 14 LCD contrast 14 Manual Time 14 12 24 hour time 15 Date 15 F C temperature unit 15 Wind speed unit 16 Rainfall unit 16 Relative air pressure unit 16 Relative pressure reference value 16 Weather tendency sensitivity 17 Storm warning t...

Page 3: ...icator 26 AIR PRESSURE HISTORY GRAPH 27 WIND DIRECTION AND WIND SPEED MEASUREMENT 28 RAINFALL MEASUREMENT 28 VIEW THE MIN MAX WEATHER DATA 29 Reset the MIN MAX weather data 29 Reset Total Rainfall 29 CARE AND MAINTENANCE 30 SPECIFICATIONS 30 Indoor temperature 30 Indoor humidity 30 Outdoor temperature dew point 31 Outdoor humidity 31 Wind speed gust 31 Wind chill 31 Rainfall 32 Outdoor Data Recept...

Page 4: ... wireless weather station via a proprietary USB device that was provided with the 2800 series weather station Monitor and record a variety of data collected by the weather station including both indoor and external values sampled by the various weather station sensors Review weather history data and analyze trends and tendencies over time using the software s charts and graphing features or export...

Page 5: ...tteries not included Airflow cover Wall mount adapter Mounting screws Plastic anchors for screws Requires 2 C alkaline batteries not included Foldout stands Requires 3 C alkaline batteries not included USB wireless interface for PC Wind Sensor also Protected under U S Patent 6 761 065 All items including Wind Sensor are Protected under U S Patents 5 978 738 6 076 044 6 597 990 INSTANT TRANSMISSION...

Page 6: ...ate of recording Relative air pressure reading in inHg hPa preset range 27 10 to 31 90 inHg 24h 72h selectable pressure history graph Wind speed displayed in mph km h m s knots and Beaufort scale 0 to 111 8 mph Wind speed direction with LCD compass display 16 steps 22 5 degree MAX records for wind gust with time date of recording Rainfall display in inch mm from 0 to 393 6 Rainfall data for total ...

Page 7: ...in the setup room and the solar panel is facing a 60W light bulb or brighter Ensure the panel is not covered and remove the black protective foil on the solar panel Remove the tape covering the reset hole Use the provided plastic reset rod to gently press the reset button once in the hole on the bottom of the sensor 2 Insert two AA size batteries into the rain sensor with the correct polarity 3 In...

Page 8: ...ranges equate to an open air scenario with no obstructions Each obstruction roof walls floors ceilings etc will reduce the range The thermo hygro sensor measures outdoor temperature humidity and collects the data from the wind and the rain sensors It sends all outdoor weather data to the wireless display so the thermo hygro sensor must be within the 200 foot wireless range of the wireless display ...

Page 9: ...r DOES NOT have replaceable batteries it consumes solar power and charges the internal battery pack automatically Note Do not open the wind sensor This will void the warranty RAIN SENSOR The rain sensor should be mounted on a level surface in an open area within the 200 foot wireless range of the thermo hygro sensor and on the same side of the house Mount the rain sensor at least 6 feet off the gr...

Page 10: ...r Mode 2 o Mode 1 Wind speed outdoor temp 24 hr pressure history graph o Mode 2 Gust Dew Point temp 72 hr pressure history graph In the weather alarm setting mode press to switch the weather alarm On Off In the weather alarm setting mode press and hold to adjust the weather alarm value Stop the weather alarm when ringing UP ARROW KEY Press to toggle between the display of seconds or date in the ti...

Page 11: ... the outdoor section Wind gust displayed in the wind section DATE OR SECONDS DISPLAY MODE Press the UP ARROW key to toggle between display of the date or seconds LCD SCREEN When the signal from an outdoor transmitter is successfully received by the Weather Station the corresponding icon will be switched on If not successful the icon will not be shown on the LCD The user can see whether the last re...

Page 12: ... contrast can be set within 8 levels from Lcd 1 to Lcd 8 default setting is Lcd 5 1 Press and hold the SET key for 3 seconds the contrast level digit will start flashing 2 Press the UP ARROW key or DOWN ARROW key to adjust the level of contrast 3 Press the SET key to confirm and to enter the MANUAL TIME SETTING MANUAL TIME SETTING The time will be updated automatically with the time from the compu...

Page 13: ...ll flash 4 Press the UP ARROW key or DOWN ARROW key to set the month 5 Press the SET key to confirm the month and enter the date setting mode The date digit will flash 6 Press the UP ARROW key or DOWN ARROW key to set the date 7 Press the SET key to confirm and to enter the F C TEMPERATURE UNIT SETTING F C TEMPERATURE UNIT SETTING The temperature can be displayed in F or C default F 1 The temperat...

Page 14: ...erence pressure value is 29 91 inHg The relative air pressure can be manually set to another value within the range of 27 17 to 31 90 inHg 920 to 1080 hPa for a better reference 1 The current relative pressure value will flash 2 Press the UP ARROW key or DOWN ARROW key to increase or decrease the value Continually holding the key will allow the value to increase faster 3 Press the SET key to confi...

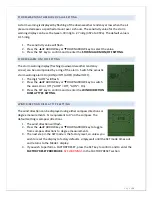
Page 15: ...F Default OFF 1 The digit AOFF will flash 2 Press the UP ARROW key or DOWN ARROW key to switch the alarm On or Off AOFF Off AON On 3 Press the SET key to confirm and to enter the WIND DIRECTION DISPLAY TYPE SETTING WIND DIRECTION DISPLAY TYPE SETTING The wind direction can be displayed using either compass directions or degree measurements N is equivalent to 0 on the compass The default setting is...

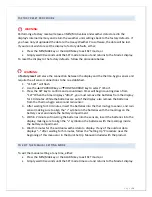
Page 16: ...ting down from 127 When the timer displays dOnE you must remove the batteries from the display for 10 minutes While the batteries are out of the display also remove the batteries from the thermo hygro sensor and rain sensor 4 After waiting for 10 minutes insert the batteries into the thermo hygro sensor and rain sensor making sure to align the symbol on the batteries with the markings on the batte...

Page 17: ...g mode press the MIN MAX key or wait for about 30 seconds and the display will return to normal display mode automatically Press the ALARM key to enter ALARM mode Subsequent presses of the ALARM key will advance to the next weather alarm section Note Weather alarms can also be set from the Heavy Weather Pro software Consult the Heavy Weather Pro Software User s Guide for instructions THE FOLLOWING...

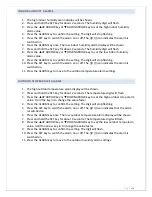
Page 18: ...or off The icon indicates the alarm is switched on 11 Press the ALARM key to move to the indoor temperature alarm settings INDOOR TEMPERATURE ALARMS 1 The high indoor temperature alarm display will be shown 2 Press and hold the SET key for about 2 seconds The temperature digit will flash 3 Press the UP ARROW key or DOWN ARROW key to set the high indoor temperature alarm value Hold the key in to ch...

Page 19: ...ARM key to move to the outdoor temperature alarm settings OUTDOOR TEMPERATURE ALARMS 1 The high outdoor temperature alarm display will be shown 2 Press and hold the SET key for about 2 seconds The temperature digit will flash 3 Press the UP ARROW key or DOWN ARROW key to set the high outdoor temp alarm value Hold the key in to change the value faster 4 Press the ALARM key to confirm the setting Th...

Page 20: ...s the UP ARROW key or DOWN ARROW key to set the wind gust alarm value 4 Press the ALARM key to confirm the setting The digit will stop flashing 5 Press the SET key to switch on or off the alarm The icon indicates the alarm is switched on 6 Press the ALARM key to move to the wind direction alarm settings WIND DIRECTION ALARM Multiple wind direction alarms can be set simultaneously if desired 1 The ...

Page 21: ...ed on 6 Press the ALARM key to exit the alarm setting mode HYSTERESIS To compensate for fluctuation of the weather data which may cause the weather alarm to ring constantly if the measured reading is close to the alarm level a hysteresis function has been implemented for each weather alarm For example if the high temperature alarm is set to 77 F and the temperature reaches 77 F the alarm will be a...

Page 22: ...eather in terms of getting better or worse and not necessarily sunny or rainy as each icon indicates For example if the current weather is cloudy and the rainy icon is displayed it does not mean that the product is faulty because it is not raining It simply means that the air pressure has dropped and the weather is expected to get worse but not necessarily rainy Note After set up readings for weat...

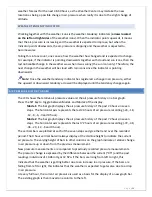
Page 23: ... history on a bar graph Press the SET key to toggle between Mode1 and Mode2 of the display Mode 1 The bar graph displays the air pressure history of the past 24 hours in seven steps The horizontal axis represents the last 24 hours of air pressure recording 24 18 12 8 6 3 and 0 hour Mode 2 The bar graph displays the air pressure history of the past 72 hours in seven steps The horizontal axis repres...

Page 24: ...nd data Wind direction Wind chill in F or C Wind gust in mph km h bft knots or m s RAINFALL MEASUREMENT The 1hour 24 hour week month or total rainfall measurement is displayed on the LCD in the unit of inch or mm Press the DOWN ARROW to select the rainfall display from the following modes 1 Total rainfall reset manually see RESET THE MIN MAX WEATHER DATA 2 Last 1 hour rainfall updates every four m...

Page 25: ...infall amount will be reset to 0 and the time is updated to current time Note Until the first rainfall total reset is performed the time and date of the total rainfall are displayed as After the rainfall total is reset the rainfall total display will indicate the date and time of the last rainfall total reset CARE AND MAINTENANCE Extreme temperatures vibration and shock should be avoided as these ...

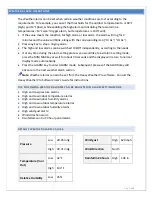
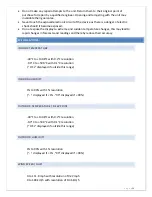
Page 26: ...id changes in forecasts and readings and thereby reduce their accuracy SPECIFICATIONS INDOOR TEMPERATURE 40 F to 139 8 F with 0 2 F resolution 9 9 C to 59 9 C with 0 1 C resolution OF L displayed if outside this range INDOOR HUMIDITY 1 to 99 with 1 resolution displayed if 1 99 displayed if 99 OUTDOOR TEMPERATURE DEW POINT 40 F to 139 8 F with 0 2 F resolution 9 9 C to 59 9 C with 0 1 C resolution ...

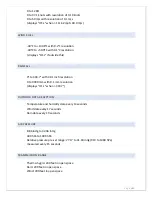
Page 27: ...393 7 with 0 01 inch resolution 0 to 9999 mm with 0 1 mm resolution displays OF L when 393 7 OUTDOOR DATA RECEPTION Temperature and humidity data every 13 seconds Wind data every 17 seconds Rain data every 19 seconds AIR PRESSURE 8 86 inHg to 32 46 inHg 300 hPa to 1099 hPa Relative pressure pre set range 27 17 to 31 90 inHg 919 to 1080 hPa measured every 15 seconds TRANSMISSION RANGE Thermo hygro ...

Page 28: ... recycling and recovery of the electrical and electronic waste The unrestricted disposal of electronic waste may do harm on public health and the quality of environment As stated on the gift box and labeled on the product reading the User manual is highly recommended for the benefit of the user This product should not be thrown in general rubbish collection points The manufacturer and supplier can...

Page 29: ...ovide reasonable protection against harmful interference in a residential installation This equipment generates uses and can radiate radio frequency energy and if not installed and used in accordance with the instructions may cause harmful interference to radio communications However there is no guarantee that interference will not occur in a particular installation If this equipment does cause ha...

Page 30: ...nter La Crosse Technology Ltd will pay ground return shipping charges to the owner of the product to a USA address only The La Crosse Technology Ltd warranty covers all defects in material and workmanship with the following specified exceptions 1 damage caused by accident unreasonable use or neglect including the lack of reasonable and necessary maintenance 2 damage occurring during shipment claim...

Page 31: ...P a g e 31 La Crosse Technology Ltd 2817 Losey Blvd S La Crosse WI 54601 Customer Support www lacrossetechnology com support For more information www lacrossetechnology com 2812 ...

Reviews: