La Crosse Technology
Page 6
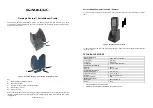
Button
Press and Release Functions
Hold 3-5 seconds
SET
Move through program menu Confirm
setting.
Enter program menu, set time,
date, etc.
ALARM
View Alarm
Activate/Deactivate Alarm
Alarm set
+/RCC
1 step forward (setup)
Search for WWVB signal
Fast advance (setup)
-/°C/°F
Select temperature in °C/° F
1 step backward (setup)
Fast backward (set)
MIN/MAX
1-time MAX values
2-times MIN values
Resets all MIN / MAX values
HEAT/DEW
1-time Heat Index
2-times Dew Point
CH
Switch channels
(when using multiple transmitters)
Search for remote transmitter
LIGHT HI/LO HOLD
ON/OFF
Dim backlight for night time.
Turn continuous backlight
ON or OFF (a/c adapter)
LIGHT/SNOOZE (top)
Activates backlight when using only
batteries.
Trigger snooze alarm
Program Menu
The SET button will moves through the items in the program menu. The +/RCC or -/°C/°F button will
change these values.
WWVB reception ON or OFF
Time Zone (Seven Time Zones)
Daylight Saving Indicator
12/24 hour time format
Manual time set (Hour, Minutes)
Calendar set (Year, Month, Date)
WWVB Reception ON/OFF
The WWVB time reception defaults to ON. To turn the WWVB reception OFF:
1. Hold the SET button for 5 seconds.
2. WWVB and ON will flash.
3. Press and release the +/RCC or -/°C/°F button to turn this OFF.
4. Confirm with the SET button and move to the Time Zone.
Time Zone
This station offers seven time zones listed in letter format (default is EST):
AST Atlantic Time
EST Eastern Time
CST Central Time
MST Mountain Time
PST Pacific Time
AKT Alaskan Time
HAT Hawaiian Time
1. EST will flash.
2. Press and release the +/RCC or -/°C/°F button to select a different Time Zone.
3. Confirm with the SET button and move to Daylight Saving Indicator.
WWVB
ON
TIME
ZONE
EST