background image

BASICS

•  

Ensure the sensor is mounted level with the Solar Panel facing

    directly to the south. This will help optimize battery life and transmit 

    correct wind direction readings. 

•  

Ideally, the Breeze Pro Sensor should be mounted on the tallest 

    object in your area. Avoid positioning the sensor in line with or  

    below eaves, rooflines, trees, or other objects that may obstruct 

    wind readings. 


•  

Make sure all screws on the Mounting Bracket, Winds Cup, Wind 

    Vane, and Battery Compartment are securely fastened. 

•  

The sensor should be mounted with the Wind Cups on top.

•  

The Breeze Pro sensor has a transmission range of 330 feet from 

    sensor to display.

Positioning the Breeze Pro Sensor

For Accurate Measurements

5

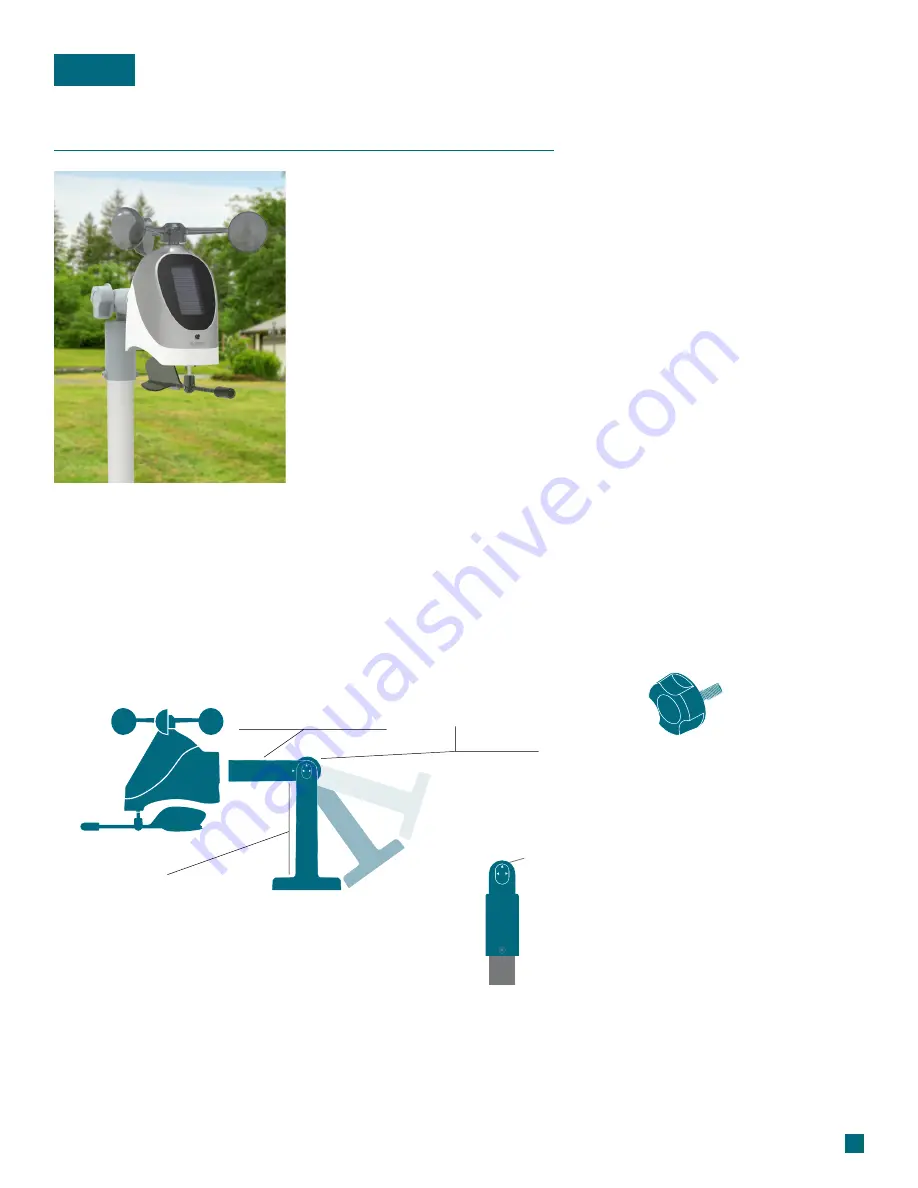
Included Mounting Accessories

The horizontal conduit 

where the sensor attaches. 

This piece will connect to 

either the Adjustable Base 

or the Pole Adapter.

Mast:

The main bracket used for mounting

onto flat surfaces or with added U-bolts 

(sold seperately). The grooves and Hand 

Screw allow the bracket to secure to

angled surfaces while still ensuring the 

Mast and sensor are level.

Adjustable Base:

Used to lock down and 

secure the Mast to the 

Adjustable Base or Pole 

Adapter.

Hand Screw:

These Arrows provide exact 90 or 

180 degree angles when aligned 

with the arrow on the Mast.

Alignment Arrows:

Used in place of the Adjustable 

Base for mounting on top of 

cylindrical conduits. 

1-Inch Maximum Pole Diameter

Pole Adapter

Summary of Contents for 79400

Page 1: ...port connected features and will not connect to WiFi Some of the on screen elements may not apply Please disregard the following items and messages WiFi Icon SEE APP TO CONNECT LOST WIFI CONNECT TO WI...

Page 2: ...ata History Records and Alerts Feels Like Temp Seasonal Trees Forecast Icons Relative Pressure Specifications Warranty Recycling Disposal Cautions Statements Add On TH Sensor Additional Add On Sensors...

Page 3: ...om your station s Battery Compartment Bottom of Breeze Pro Sensor Model No LTV WSDTH01 Back of Station Model No 79400 Station Settings Use the buttons on the top of the station to adjust the values Pr...

Page 4: ...Wind Alert on off 2 WIND Press to view Wind Speed History While viewing hold the MINUS button to delete the history reading 3 TEMP Press to view Temperature and Humidity History While viewing hold MI...

Page 5: ...uring preselected times Press the buttons to turn the Auto Dim feature on or off Press LIGHT to confirm Press the buttons to adjust the starting hour Press LIGHT to confirm Press the buttons to adjust...

Page 6: ...feet from sensor to display Positioning the Breeze Pro Sensor For Accurate Measurements 5 Included Mounting Accessories The horizontal conduit where the sensor attaches This piece will connect to eith...

Page 7: ...and tighten the provided screws on the sides 3 Use the Hand Screw to attach the Mast to either the Adjustable Base or Pole Adapter Ensure the sensor is level facing south and securely fastened at all...

Page 8: ...icates if the station is receiving data from the sensor 8 TOP WIND SPEED The top wind speed in the past 60 minutes 3 LOW BATTERY ICON Appears when the sensor battery needs to be replaced 6 NOW WIND SP...

Page 9: ...he LCD The alert is defaulted to be off When the armed alert value is reached the Alert Icon will flash and your station will beep five times each minute until the value moves out of the alert range P...

Page 10: ...Temperature Humidity History and Alerts Viewing History Records Press the TEMP button to toggle through indoor outdoor temperature humidity records with time and date stamps History Records Viewing Or...

Page 11: ...6 forecast scenes below Forecast Icons Please Note The Forecast Icons may not represent your current weather They are a future prediction of the weather to come over the next 12 hours Sunny Clouds T...

Page 12: ...Outdoor Temperature and Humidity section light up on screen ID WTH 123 and TWH SENSOR will appear below 4 5 Install new batteries into the add on sensor and press the TX button inside its battery com...

Page 13: ...e displayed on the LCD The Auto Scroll Icon will appear if activated Follow La Crosse Technology on Youtube Facebook Twitter and Instagram Factory Reset Stay in Touch If you re still experiencing issu...

Page 14: ...cket 6 21 L x 8 25 W x 6 67 H 15 77cm L x 20 96cm W x 16 94cm H WARNING KEEP BATTERIES OUT OF REACH OF CHILDREN Swallowing may lead to serious injury in as little as 2 hours or death due to chemical b...

Page 15: ...io frequency energy and if not installed and used in accordance with the instructions may cause harmful interference to radio communications However there is no guarantee that interference will not oc...

Reviews: