background image

03

04

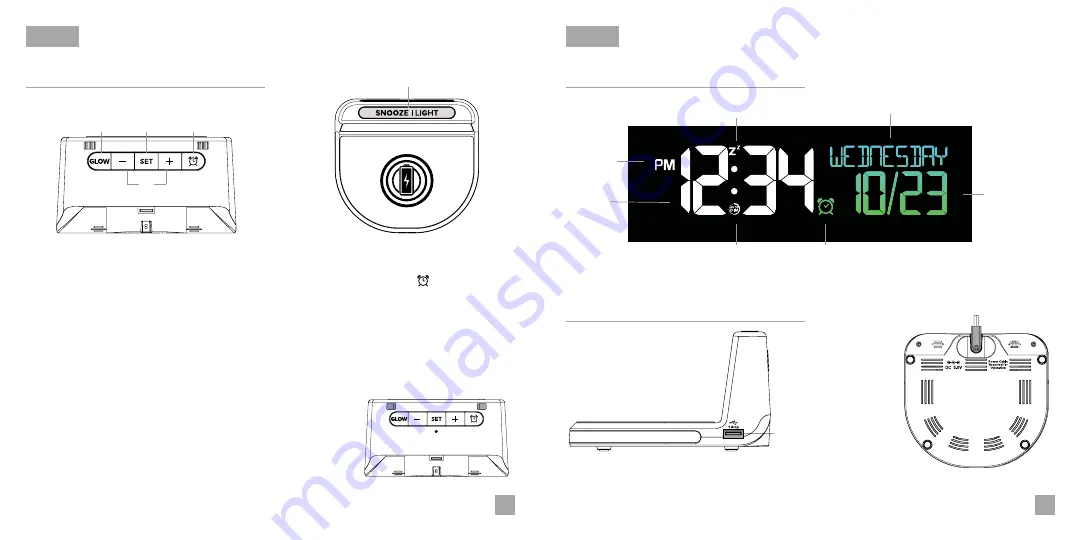
Buttons

LCD Display

Ports

BASICS

BASICS

1.  GLOW

4. PLUS/MINUS (+/-) 

2.  SET

3. ALARM

6. RESET

Press to change the Glow 
Light color. Hold to turn Glow 
Light off. 

Press to activate/deactivate or 
hold to enter alarm settings.

Press to increase/decrease 
Glow Light Brightness. Press 
to increase/decrease values in 
Settings Menu, hold to change 
values quickly.

Tap to snooze sounding alarm, 
adjust backlight, or hold for 
Auto-Dim settings.

Press to change Display 
Modes. Hold to enter 
Settings Menu.

Note:

 To enter the Settings Menu after the initial setup, hold the SET button on the 

back of the clock.

Top View

5

1

4

3

2

Back View

Press to factory reset 
your clock

6

RESET

5. SNOOZE/BACKLIGHT

Right View

1 Amp USB

Charging Port

Bottom View

Power Jack

Snooze 

Indicator

AM/PM

Indicator

Auto Dim

Indicator

Time

Alarm

Indicator

Weekday

Calendar or 

Temperature

Summary of Contents for 617-148v2

Page 1: ...SET UP GUIDE MODEL NUMBER 617 148v2 WIRELESS CHARGING ALARM CLOCK...

Page 2: ...Month Date Month Date or Date Month Fahrenheit Celsius You may exit the Settings Menu at any time by tapping the SNOOZE LIGHT button 02 03 04 04 05 05 06 06 12 13 13 APPENDIX Specifications Warranty R...

Page 3: ...ld to change values quickly Tap to snooze sounding alarm adjust backlight or hold for Auto Dim settings Press to change Display Modes Hold to enter Settings Menu Note To enter the Settings Menu after...

Page 4: ...Hold the SNOOZE BACKLIGHT button to enter the Auto Dim Settings Menu Program your LCD display to automatically dim during preselected times Press the buttons to turn the Auto Dim feature on or off Pre...

Page 5: ...e snooze time reaches 0 the alarm will sound again Setting the Alarm ALARM ALARM Your sound alarm is now activated indicated by the icon on the LCD Hold the button on the back of the clock to enter th...

Page 6: ...n off the Glow Light CHARGING 5W Wireless Charger Charging your Phone Phone Compatibility Place your phone on the platform Your phone should sit flush and centered on the charging pad The blue Chargin...

Page 7: ...ur phone must be Qi Enabled to charge A If the phone has a large thick case it may interfere with charging A Foreign objects on the charging pad may make the light blink Q Why is the table surface get...

Page 8: ...nd corrections are included in subsequent editions We disclaim any responsibility for any technical error or printing error or their consequences All trademarks and patents are recognized La Crosse Te...

Page 9: ...sult the dealer or an experienced radio TV technician for help FCC Radiation Exposure Statement This device complies with FCC radiation exposure limits set forth for an uncontrolled environment and it...

Reviews: