La Cornue CornuFe 44 User Manual Download Page 13

10

Overheat Function

This function identifies when the temperature of the pan rises 

rapidly and works to maintain a safe level of pan temperature. 

It should not interfere with normal cooking.
Cookware with bases that become distorted

 (Fig. 2.2)

 when 

heated may interfere with the operation of the Overheat 

Function. This may result in damage to your cookware or 

Induction Glass Cooktop.

 

Please remember not to leave the cooktop 

unattended. Care should be taken to not allow your 

cookware to boil dry. Damage to your cookware and 

Induction Glass Cooktop may result.

Please read and follow the manufacturers’ instructions 

carefully before using cookware on your induction cooktop.
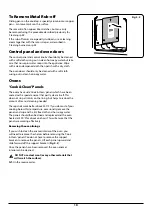
The ovens

References to ‘left-hand’ and ‘right-hand’ ovens apply as 

viewed from the front of the appliance. 
The left-hand oven is a multi-function oven, while the right-

hand oven is a fan oven. 

IMPORTANT: 

Before using the ovens for the first time, to 

dispel manufacturing odors, turn the oven to 200 °C (395 °F) 

in Convection Assisted mode and run for one hour. To clear 

the smell make sure the room is well ventilated to the outside 

air, by opening windows or turning on your ventilation hood. 
During use the appliance becomes hot. Care should be taken 

to avoid touching the heating elements inside the oven. 

Multi-function Ovens

Multi-function ovens have an oven fan and oven fan element, 

as well as two extra heating elements (

Fig. 2.10

). One 

element is in the top of the oven and the second is under the 

oven base. Take care to avoid touching the top element and 

element deflector when placing or removing items from the 

oven.
The multi-function oven has 3 main cooking functions: 

fan

fan assisted

 and 

conventional 

cooking. These functions 

should be used to complete most of your cooking needs. 
The 

browning element 

and 

base heat

 can be used in the 

latter part of the cooking process to fine tune the results to 

your particular requirements. 
Use

 fanned broiling

 for all your broiling needs and 

defrost


to safely thaw small items of frozen food.
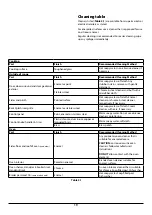
Table 2.4

 gives a summary of the multi-function modes. The 

multi-function oven has many varied uses. We suggest you 

keep a careful eye on your cooking until you are familiar with 

each function. Remember, not all functions will be suitable 

for all food types.

Function

Use

Defrost

To thaw small items in the oven without 
heat

Fan oven

A full cooking function, even heat 
throughout, great for baking

Fanned broiling

Broiling meat and fish with the door closed

Fan assisted

A full cooking function good for roasting 
and baking

Conventional 

oven

A full cooking function for roasting and 
baking in the lower half of the oven

Browning 

element

To brown and crisp cheese topped dishes

Base heat

To crisp up the bases of quiche, pizza or 
pastry

Table 2.4


B

A

C

A – Grill elements,    B – Convection elements, C – Base heat elements

ArtNo.280-117 - MF Knob Symbols

F

E

D

C

B

A

G

A – Defrost,  B – Fan oven,  C – Fanned broiling,  D – Fan assisted oven, 

E – Conventional oven,   F – Browning element,   G – Base heat

Fig. 2.10


Fig. 2.11


Summary of Contents for CornuFe 44

Page 1: ...1136 02 w w w l a c o r n u e c o m This book contains many important safety messages Always read and obey all safety messages Installer Leave these instructions with the appliance Important Save the...

Page 2: ...S TO CHILDREN OR ADULTS Meaning Description Symbol WARNING CAUTION An appropriate safety instruction should be followed or caution to a potential hazard exists DANGEROUS VOLTAGE To indicate hazards ar...

Page 3: ...llation Instructions 22 8 Service and parts 23 9 Installation safety instructions 24 10 Installation 25 Positioning the Range 26 Moving the Range 27 Fitting the Flue Grille 27 Lowering the Two Rear Ro...

Page 4: ...the oven bottom or cover an entire rack with materials such as aluminum foil Doing so blocks airflow through the oven and may cause carbon monoxide poisoning Aluminum foil linings may also trap heat...

Page 5: ...ause burns During and after use DO NOT touch or let clothing touch or other flammable materials contact the cooktop or areas near the cooking area until they have had enough time to cool These areas i...

Page 6: ...n cook top n Only certain types of glass glass ceramic earthenware or other glazed containers are suitable for hotplate cooking others may break because of the sudden change in temperature NEVER cook...

Page 7: ...local electricity supply company requirements This appliance is designed for domestic cooking only Use for any other purpose could invalidate any warranty or liability claim The range should be servi...

Page 8: ...use the top of the flue the round holes along the back of the range for warming plates dishes drying dish towels or softening butter When using an electrical appliance near the cooktop be sure that th...

Page 9: ...lease check carefully before purchasing any cookware The controls for the induction cooktop are shown in Fig 2 2 Pans made of copper aluminium or ceramic are not suitable for use on an induction cookt...

Page 10: ...and diameters Fig 2 5 each with a pan detector and residual heat indicator and a cooktop control display The cooktop control display Fig 2 6 informs you of the following induction cooktop functions Pa...

Page 11: ...el selected When the Automatic Heat up function is activated the cooktop control display will flash alternately between the A setting and the chosen power level Once the Automatic Heat up time has end...

Page 12: ...allows additional power to be made available for each of the cooking zones This is useful to bring a large pan of water to the boil quickly The Power Boost function operates for a maximum of 10 minute...

Page 13: ...2 10 One element is in the top of the oven and the second is under the oven base Take care to avoid touching the top element and element deflector when placing or removing items from the oven The mult...

Page 14: ...heat this function before cooking For best results we recommend that the grill pan is not located on the uppermost shelf Fan Assisted Oven This function operates the fan circulating air heated by the...

Page 15: ...he oven temperature knob to the temperature required Fig 2 13 The oven indicator light will glow until the oven has reached the temperature you selected Fig 2 13 It will then cycle on and off during c...

Page 16: ...tton to turn on the oven lights Fig 2 24 If the oven light fails turn off the power supply before changing the bulb See the Troubleshooting section for details on how to change the bulb Storage The bo...

Page 17: ...k the front of the runner onto the same rung Push to clip under the bottom rung Fig 2 26 The front of the shelf runners can be identified by the bracket Fig 2 28 Ensure that the shelf runners are fitt...

Page 18: ...be pushed firmly to the back of the oven Baking trays with food cooking on them should be placed level with the front edge of the oven s wire shelves Other containers should be placed centrally Keep a...

Page 19: ...utes Pork veal 300 2 300 35 40 minutes per 1 lb 35 40 minutes 375 2 375 25 30 minutes per 1 lb 25 30 minutes Poultry Chicken 300 2 300 20 25 minutes per 1 lb 20 25 minutes 375 2 375 15 20 minutes per...

Page 20: ...le cooking turn off the unit and wipe the area surrounding the hot zone with a clean paper towel If a spill other than a sugary substance is on the hot zone do not clean until the unit has completely...

Page 21: ...k Clean panels which have been coated with a special enamel that partly cleans itself This does not stop all marks on the lining but helps to reduce the amount of manual cleaning needed These panels w...

Page 22: ...teel cleaner respectively if necessary Back Splash rear grille Enamel or stainless steel Hot soapy water soft cloth Cream cleaner with care if necessary Control panel Paint enamel or stainless steel W...

Page 23: ...oker immediately from the power supply and arrange for its repair Do not use the cooker until after the repair My hob is scratched Always use the cleaning methods recommended in this guide and make su...

Page 24: ...the glass with your fingers as oils from your hands can cause premature failure Push click in the replacement bulb Screw back the bulb cover Turn on the circuit breaker and check that the bulb now li...

Page 25: ...E THE ANTI TIP DEVICE IF THE RANGE IS MOVED FAILURE TO DO SO CAN RESULT IN DEATH OR SERIOUS BURNS TO CHILDREN OR ADULTS Meaning Description Symbol WARNING CAUTION An appropriate safety instruction sho...

Page 26: ...klet especially the problem solving section first to check that you are using the appliance correctly Please note For warranty information or to register your CornuFe range please contact the National...

Page 27: ...f local codes in accordance with the National Electrical Code NFPA 70 latest edition n DO NOT install your range on a substrate that cannot withstand 180 F 82 C n DO NOT install your range directly on...

Page 28: ...lat oven racks Anti tip location bracket Anti tip device Storage drawer mat in base of storage drawer Side extension kit ArtNo 351 0001 Side extension panel USA Toe kick 2 sets of oven door knob parts...

Page 29: ...onsibility for damage caused by normal use of the range to any material that de laminates or discolours at temperatures less than 65 C above room temperature If the range is near a corner of the kitch...

Page 30: ...wo screws from the upper rear corners of the range Fig 10 6 These will be used to secure the grille The flue grille is packed separately There are four screws supplied fitted to the underside of the g...

Page 31: ...corners of the range To set the front turn the feet bases to raise or lower Fitting the stability bracket We recommend using a stability bracket first attach the bracket location device to the rear o...

Page 32: ...t the power cord is routed so that it cannot become damaged during the installation This appliance must be supplied with the proper voltage and frequency and connected to an individual properly ground...

Page 33: ...de terminals Fig 11 3 Fitting a 4 Wire Power Cord Disconnect the supplied power cord from the terminal block and ground post Keep the terminal block parts you will need them Insert the new power cord...

Page 34: ...at you DO NOT scratch or damage the first end piece and confirm the two end pieces are lined up correctly The Allen screws should be on the underside Fig 12 6 Installing the door handle Attach the doo...

Page 35: ...INSTALLATION Check the appliance is electrically safe when you have finished 32 Removing the drawer Fitting the drawer...

Page 36: ...Left Rear 2 Centre 5 Right Rear 3 Right Front 4 6 way connector 6 way connector br br br br br br bk br g r r bk bk Interface board x1 x5 x3 x4 x2 x6 5 4 3 1 2 E Cooktop Display Center Code Color b B...

Page 37: ...ription X05 Left Hand Oven Thermostat X06 Left Hand Oven Multifunction Switch X08 Left Hand Oven Base Element X09 Left Hand Oven Fan Element X10 Left Hand Oven Top Outer Element X11 Left Hand Oven Top...

Page 38: ...A Dimensions Overall height minimum 361 32 915 mm maximum 373 32 942 mm Overall width 43 1092 mm see Positioning of Range Overall depth 28 19 32 720 mm Minimum space for cooktop 311 2 800 mm Weight u...

Page 39: ...with local electrical codes or plumbing codes or improper storage of the appliance 4 Repairs due to other than normal home use 5 Service labor during limited warranty period 6 Travel fees and associat...

Page 40: ...idential 4960 Golden Parkway Buford GA 30518 770 932 7282 www lacornueusa com CANADA AGA Marvel SOFA Galleries 6900 Airport Road Suite 205 Mississauga ONT L4V 1E8 Canada T 855 213 2785 F 905 678 4854...

Reviews: