


0UG61070427
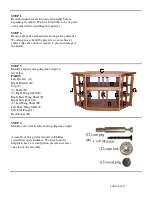
STEP 15
Using same technique as in Step 13, attach first
Right Wing Shelf (E) to Right Divider (B) Repeat
for other Right Wing Shelf (E). Attach Right Base
Wing (F) to Right Divider (B) using same technique
as in Step 14.
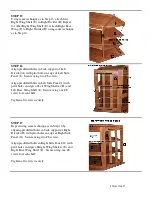
STEP 16
Align predrilled holes in back support of Left
Divider (A) with pilot holes in edge of Left Side
Panel (J). Secure using two #8 screws.
Align predrilled holes in Left Side Panel (J) with
pilot holes in edges of Left Wing Shelves (H) and
Left Base Wing Shelf (I). Secure using one #8
screw for each shelf.
Tighten all screws securely.
STEP 17
Repeat using same technique as in Step 16 by
aligning predrilled holes in back support of Right
Divider (B) with pilot holes in edge of Right Side
Panel (G). Secure using two #8 screws.
Align predrilled holes in Right Side Panel (G) with
pilot holes in edges of Right Wing Shelves (E) and
Right Base Wing Shelf (F). Secure using one #8
screw for each shelf.
Tighten all screws securely.


