background image


57 


Play Button (

Press this button to start playing the recorded video/audio with the selected search time 
and video/audio type.   

If there’s no camera in playback mode, up to 4 cameras in the 

current split window will be set to playback mode.


Copy Button (

)  

Press this button to 

backup (copy)

 the selected type of recorded video/audio starting from 

the 

Search Time

 (described below) in the HDD to the connected backup device 

without 

playback

.    The Backup display (described in Section 8.4) will be shown.   

Please note 

that this kind of backup is performed in the background, and the user can still do 
almost all the operations.


Note: For internal DVD, please open the front door in order not to block the tray from 

ejecting, esp. while it’s in backup process.  Blocking the tray from ejecting 
may damage the DVD writer. 


Following is a brief description for each item and its specific operations: 


Search Time

 – (

Year

Month

Date

Hour

Minute

) for the recorded video/audio.    The 

playback (or backup) will start from the time entered here when the user press the 
playback buttons (or Copy button) later.    Press 

+/-

 buttons to modify each item. 


Video/Audio

 – (

Alarm

Motion

Video Loss

Normal

).  Check the types of the 

recorded video/audio you want to search for playback.    Press 

ENTER

 to check/uncheck 

each item. 


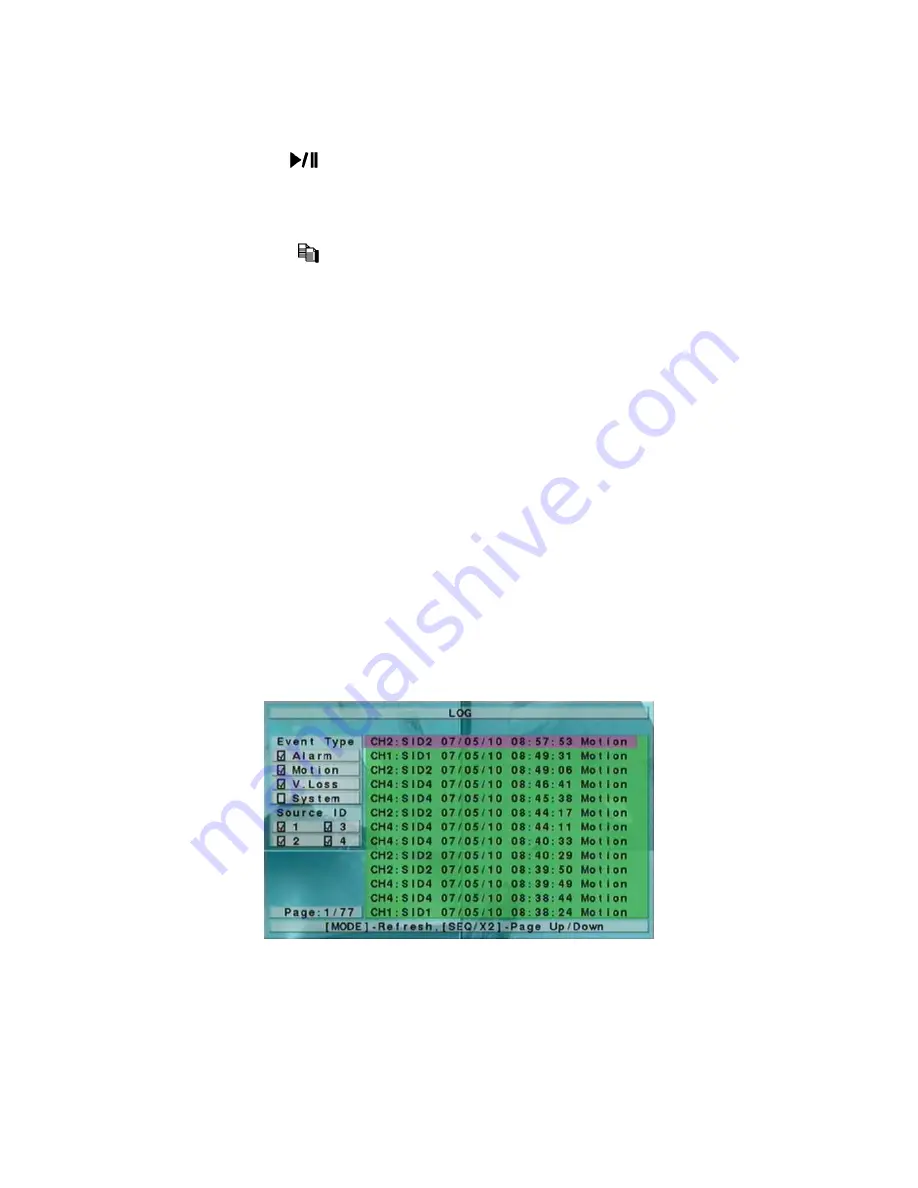
8.2 Search By Event / Log Display 


The screen for Search By Event - Log display, is shown below: 


There are four different types of event logs, including Alarm, Motion, Video Loss, and 
System. Up to 3000 most recent event logs can be stored in the system. 


Summary of Contents for 16-CH

Page 1: ...H 264 Digital Video Audio Recorders User s Manual Models 16 CH 9 CH Before attempting to connect or operate this product please read these instructions carefully and save this manual for future use...

Page 2: ...th the instruction manual may cause harmful interference to radio communications Operation of this equipment in a residential area is likely to cause harmful interference in which case the users will...

Page 3: ...INTENANCE OF THE PRODUCT FOR THE CASES INCLUDING BUT NOT LIMITED TO THE FOLLOWINGS ANY DAMAGE OR LOSS INCLUDING BUT WITHOUT LIMITATION DIRECT OR INDIRECT SPECIAL CONSEQUENTIAL OR EXEMPLARY ARISING OUT...

Page 4: ...produce heat Protect the power cord from being stepped on or pinched particularly at plugs convenient receptacles and the points where they exit from the apparatus Do not drop metallic parts through...

Page 5: ...ment 5 4 VGA Display 5 5 Backup Device 5 6 Software Upgrade Administrator 5 7 System Shutdown Administrator 6 Setup Administrator 6 1 Pre Camera Setup 6 2 Camera Setup 6 2 1 Video Loss Setup 6 2 2 Mot...

Page 6: ...8 5 Playback Archive For Search By Event 8 6 Playback For Archived Files 8 7 Playback Procedures 9 PC Remote Access 10 2G 3 5G PDA Mobile Phone Remote Access Appendix A MS Windows HEM player Appendix...

Page 7: ...ck backup control remote access Record capabilities Full D1 up to 60 NTSC 50 PAL IPS for 16 9 CH models Half D1 up to 120 NTSC 100 PAL IPS for 16 9 CH models CIF up to 240 NTSC 200 PAL IPS for 16 9 CH...

Page 8: ...ler to control up to 4 sets of digital video audio recorders 4 Alpha numeric Buttons 1 9 0 Press these buttons for camera selection in most circumstances These buttons can also be used to enter text a...

Page 9: ...ecording Net Link and Net Active 13 Copy Button Press this button to copy the playback images to the storage device connected to the USB port Press this button again to stop copying 14 REC Button Pres...

Page 10: ...tton Press this button to stop the playback 24 Single Step Button Press this button to play the recorded images frame by frame 25 Fast Forward Button Press this button for fast forward playback 26 Vol...

Page 11: ...to external devices such as speakers Recorded audio will be supplied from AUDIO OUT during playback 5 75 termination Set each of the DIP switches to ON unless the corresponding video output terminal...

Page 12: ...es 14 Alarm Output Connectors ALARM OUT 1 4 Connect these connectors to 2 Normally Closed NC alarm outputs 1 2 and 2 Normally Open NO alarm outputs 3 4 15 Ethernet Connector Connect this unit to a 10...

Page 13: ...without any obstacle 1 DVR ID Selection Buttons DVR 1 4 Press these buttons to select the DVR to be controlled by the remote controller The remote controller can control up to 4 sets of DVRs Please m...

Page 14: ...nect the camera video input connectors to the video outputs from system cameras or other composite video sources via coaxial cables Main monitor Connect the main monitor output connector BNC or S vide...

Page 15: ...r be Normally Open NO or Normally Closed NC Those with 3 wires will allow the user to choose Connect two of those wires to the alarm input connector in the pairs indicated in the diagram Direction doe...

Page 16: ...Section 6 4 for call monitor PTZ Cameras Connect the RS 232 connector or the RS 422 485 connector to PTZ camera s via the appropriate cable The system supports a variety of different PTZ cameras inclu...

Page 17: ...input connector of another digital video audio recorder The MAIN AUX monitor if enabled has the same output display as the main monitor and is typically used with RS 485 keyboard controller for dista...

Page 18: ...o a surveillance TV monitor or the CALL AUX monitor input connector of another digital video audio recorder The CALL AUX monitor if enabled has the same output display as the call monitor and is typic...

Page 19: ...vent occurs on the lower corner The system state from right to left are described as the followings 1 Normal recording percentage 2 Alarm recording percentage 3 X2 state X1 X2 or X4 4 Manual record ON...

Page 20: ...cursor position 7 In text editing mode internal code box and mark list press ENTER to exit and save changes press ESC to exit without making changes 4 2 Login And Logout There are three password leve...

Page 21: ...ayback mode for the focus window and the other windows that form a rectangle on the screen Please note that the rectangle can contain at most 16 9 split windows SEQ Press this button to switch to or r...

Page 22: ...Press these buttons to circulate up down among the available split window displays 4 4 Digital Zoom The system supports X2 X4 Digital Zoom function To use this function press X2 button in full screen...

Page 23: ...lay press MENU to call up Menu display as shown There are a variety of displays under Menu display In Menu display and all the subsequent displays the items enabled are shown in black colored text and...

Page 24: ...and then press ENTER to call up Volume Control display as shown The general operations are as below Press these buttons to select the items ESC Press this button to escape from this screen and return...

Page 25: ...ow Press these buttons to select the items ENTER Press these buttons to change the camera Press these buttons to adjust the selected item SEQ Press this button to reset the settings for this camera to...

Page 26: ...Hue and Saturation The operations are as below Press these buttons to select the items Press these buttons to adjust the selected item MODE Press this button to restore Brightness Contrast Hue and Sat...

Page 27: ...ad the tray and connect for Internal DVD only Connect Disconnect If the specific backup device is disconnected as shown in Current Status please plug the USB device in one of the USB ports of the syst...

Page 28: ...Enclosures 5 25 Macpower s Alumni Prefect USB 2 0 PF U2MS USB Disk Storage Adata C801 8G C702 16G classic series 4GB Transcend s JetFlash 150 V60 Series Apacer s Handy Steno AH220 Pretec s i Disk Wav...

Page 29: ...r each item and its specific operations USB Device press ENTER to call up USB Device dialog if there s no USB device connected Disk Storage to select the disk storage to upgrade Press buttons to selec...

Page 30: ...safely when the power off message is shown 6 Setup Administrator In Menu display press to change the highlighted option to Setup and then press ENTER to call up Setup Menu display as shown To enter Se...

Page 31: ...ay relate one camera to the others for all the installed cameras The general operations are as below Press these buttons to select the items The display will scroll up down if the selected item is not...

Page 32: ...it s not a PTZ camera Group the group which the camera belongs to if its record resolution is 360x240 or 360x288 It s used to maximize the record capacity of the system Please refer to the table below...

Page 33: ...umeric ENTER Press these buttons to select the camera COPY Press this button to copy all the settings excluding detailed Motion settings Video Loss settings Title Audio of the focus camera to all the...

Page 34: ...s to adjust the value 3 60 seconds discrete Audio the AUDIO IN corresponding to this camera The audio data for the selected AUDIO IN will be recorded with the video data for this camera Press buttons...

Page 35: ...turn to Camera Setup display If the Save dialog is shown press ENTER to exit and save ESC to exit without saving Following is a brief description for each item and its specific operations Duration res...

Page 36: ...to remote station or not The e mail will be sent to the predefined receivers at the moment when the event is triggered Press ENTER to check uncheck this item The default setting is unchecked 6 2 2 Mot...

Page 37: ...n is detected this camera shall be intensively recorded at Event Record IPS Press buttons to adjust the value 0 second 60 minutes discrete Alarm Out to define which Alarm Output will be triggered when...

Page 38: ...on to set reset the whole video area SEQ Press this button to decrease the sensitivity from 10 1 for the motion detection of this camera CALL Press this button to increase the sensitivity from 1 10 fo...

Page 39: ...o copy the settings of the focus alarm input to all the following alarm inputs EX focus alarm input is 5 its settings will be copied to those of alarm inputs 6 16 ESC Press this button to escape from...

Page 40: ...total size of the pre record pictures exceeds the pre record buffer size of the system Post record to define how long after this alarm input is triggered the Focus Camera shall be intensively recorde...

Page 41: ...select the items ESC Press this button to escape from this screen and return to Setup Menu display If the Save dialog is shown press ENTER to exit and save ESC to exit without saving Following is a br...

Page 42: ...hted Following is a brief description for the operations Press these buttons to move the focus window Numeric ENTER Press these buttons to change the camera for the focus window Press these buttons to...

Page 43: ...from this screen and return to Setup Menu display If the Save dialog is shown press ENTER to exit and save ESC to exit without saving Following is a brief description for each item and its specific op...

Page 44: ...ear each HDD set Alarm Record size and Normal Record size of each HDD and define the behaviors for Alarm Record and Normal Record if it reaches the end of the last HDD in the system The general operat...

Page 45: ...ing triggered after the corresponding partition Alarm Record or Normal Record is full Press buttons to adjust the value 3 seconds 60 minutes discrete for Forever Alarm Out to define which Alarm Output...

Page 46: ...ecord If it has been formatted before it will be formatted according to the Alarm REC Size and Normal REC Size displayed on the screen but the previously recorded contents within the new size won t be...

Page 47: ...t for information Alarm Record Alarm Record Size in percentage for this HDD Please follow the Text Input method described in Section 4 1 to change the value Normal Record Normal Record Size in percent...

Page 48: ...nit can slide out Please slide out the top to install hard drive To replace the hard drive in the removable hard drive unit disconnect the power and data cable and reconnect them to the new hard drive...

Page 49: ...An asterisk will be shown preceding the number for the default login user And this login name password will be the default one each time the login dialog is shown so the user doesn t need to enter the...

Page 50: ...s specific operations Time Zone press buttons to select the time zone for the system Please refer to Appendix C for the time zone table Daylight Saving Time press ENTER to check uncheck this item The...

Page 51: ...to call up RS 232 422 485 Setup as shown The RS 232 422 485 Setup allows the administrator to setup RS 232 control port and RS422 or RS 485 control port Please refer to the manuals for the connected...

Page 52: ...out saving Following is a brief description for each item and its specific operations Net Type Static IP PPPoE or DHCP DHCP can only be used for intranet LAN access while Static IP and PPPoE can be us...

Page 53: ...described in Section 4 1 to modify this item DDNS Username DDNS username for the system if PPPoE is used Please follow the Text Input method described in Section 4 1 to modify this item DDNS Password...

Page 54: ...Password password if the SMTP mail server requires authentication Please follow the Text Input method described in Section 4 1 to modify this item Mail From the e mail address of this DVR unit i e the...

Page 55: ...default values i e 67 68 7 PTZ Control The digital video audio recorder supports a variety of PTZ cameras The user can easily control the PTZ cameras through the operations described in this Chapter i...

Page 56: ...re described in the following table Miscellaneous function specific operations Active function Operations Descriptions Focus ENTER focus far near auto focus Iris Iris increase decrease Auto Pan 3 ENTE...

Page 57: ...scape from Search Menu display and return to split window display 8 1 Search By Time The screen for Search By Time is shown on the right side The Status field will show the Recorded from time based on...

Page 58: ...ront door in order not to block the tray from ejecting esp while it s in backup process Blocking the tray from ejecting may damage the DVD writer Following is a brief description for each item and its...

Page 59: ...the log list Source ID the source which triggered the event For Alarm it s the alarm input number for Motion and Video Loss it s the camera number It s used to filter the events to be shown in the lo...

Page 60: ...the disk storage to search the archived files Press buttons to select the available storage Archived File List the archived files in the selected Disk Storage Please select the file and then press EN...

Page 61: ...press this button again to resume playing Note that audio can only be played at forward speed 1X Stop Button Press this button to stop playing the recorded video audio If the user press button later t...

Page 62: ...n to cancel and return to the previous display The description for each item and its specific operations is as below Backup Device the backup device connected to the system Press ENTER on the left but...

Page 63: ...All the other buttons are the same as in Section 4 3 Basic Operations 8 6 Playback For Archived Files In Search Archived Files display press ENTER to enter Archived File Playback display of the select...

Page 64: ...back by 1ch Mode Search by Time by Event by Archived Files Play move to the channel you want to playback Will playback the channel only the other channels are real time You may change to any channel d...

Page 65: ...or install it from the corresponding directory in the CD This package is a bug fix for Windows XP SP2 4 The domain name or IP address of the digital video audio recorder has been set as trusted web si...

Page 66: ...tor password for the PC otherwise the process will fail and an error dialog will be shown For some PCs it may be necessary to click in the window with the message in red color but outside the Login Di...

Page 67: ...ra and live playback mode The user may also click on the Print button to print the video to the printer or Snapshot the video Click on these icons for 1 4 9 16 25 36 49 64 Window display Click on this...

Page 68: ...opy from left to right Please note that the Copy function can be used to archive both live and playback streams Please check uncheck the cameras to be archived when the Copy Dialog is shown and then c...

Page 69: ...ns to play the recorded video audio Click on this icon to call up Search by event dialog The event logs will be shown on the screen Please select the DVR device event type and source ID to search for...

Page 70: ...ions Besides the user can download upload the configurations from to the connected DVR or open save the configurations from to the designated directory Click on this icon to call up remote Software Up...

Page 71: ...with SP4 or Windows Vista Monitor 1024 x 768 or above Memory DRAM 512MB or 1024MB for Windows Vista Network Interface Ethernet 10 100 Base T Web Browser MicroSoft Internet Explorer 6 0 or above Direct...

Page 72: ...nd password for the digital video audio recorder to login the system and the screen will be shown as below Following is a brief description for each item and its specific operations Click on this butt...

Page 73: ...e followings 1 DirectX End User Runtime 9 0 or above has been installed in your PC successfully If not please logon to http www microsoft com to get the free download of it 2 Please go to Start Setup...

Page 74: ...lease select Start Programs Hyper Electronics Mappers M4V2AVI or double click on the file AVI_Converter EXE and the screen will be shown as below Please select the source files M4V H264 files archived...

Page 75: ...nstall channel of camera put the mouse and move the direction press left key of mouse and can immediately turn to move The diagram object function and the front panel key or the remote control key fun...

Page 76: ...e cursor to screen below the icons of motion detection will be displayed Set Reset highlighted area Set Reset whole area Sensitivity Test B 2 PTZ setup and control Set up the PTZ in RS485 first Menu s...

Page 77: ...on icons For each set up field submenu you may find these icons for operation Up Down Enter Code Switch Left Right Escape Options selection Confirmed Space Mark Symbol s Close Window Page up Page down...

Page 78: ...77 Click the it will appear the following symbol table for selection Text input Digital input 123 abc AB C input switch...

Page 79: ...720 480 120 720 240 240 360 240 PAL 50 720 576 100 720 288 200 360 288 Mode Manual Schedule Alarm Motion Pre record time 0 60 seconds Record Post record time 0 60 minutes Resolution NTSC 720 480 PAL...

Page 80: ...mote stations PC I R 1 I R remote controller to control up to 4 DVRs Mouse port For mouse to control OSD with GUI operations RS 232 1 D type female connector for PTZ Control RS 485 RS 422 1 RJ 45 conn...

Page 81: ...30 Apr 1st Sun 2 00 Oct last Sun 2 00 Brasilia GMT 03 00 Oct 3rd Sun 2 00 Feb 3rd Sun 2 00 Buenos Aires Georgetown GMT 03 00 Oct 3rd Sun 2 00 Feb 2nd Sun 2 00 Greenland GMT 03 00 Mar last Sun 1 00 Oct...

Page 82: ...Oct last Sun 3 00 Beijing Chingqing H K Urumqi GMT 08 00 Kuala Lumpur Perth Singapore GMT 08 00 Taipei GMT 08 00 Osaka Seoul Tokyo GMT 09 00 Yakutsk GMT 09 00 Mar last Sun 2 00 Oct last Sun 3 00 Adela...

Page 83: ...8 12 3 33 75 151 301 452 903 7 10 5 41 88 176 353 529 1058 6 9 2 52 101 201 403 604 1208 5 7 0 61 132 265 529 794 1587 4 5 7 75 162 325 650 975 1949 3 3 9 111 237 475 950 1425 2849 2 2 8 146 331 661 1...

Page 84: ...21 6 10 7 52 104 208 415 649 1298 5 9 2 61 121 242 483 755 1510 4 7 4 75 150 300 601 938 1877 3 5 0 111 222 444 889 1389 2778 2 3 7 146 300 601 1201 1877 3754 1 2 4 231 463 926 1852 2894 5787 360x288...

Page 85: ...7 160 IDE HITACHI HDT722516DLAT80 160 IDE HITACHI HDT722525DLAT80 250 IDE HITACHI HDS728080PLAT20 80 IDE HITACHI 0A36523 MAR 2008 500 SATA HITACHI 0A35155 MAR 2008 1000 SATA Maxtor 6L080P0 80 SATA Max...

Page 86: ...te ST37500330AS Barracuda 7200 11 750 SATA Seagate ST380815AS Barracuda 7200 10 80 SATA Seagate ST3500320AS Barracuda 7200 11 500 SATA Seagate ST31000340AS Barracuda 7200 11 1000 SATA SAMSUNG HA200JC...

Reviews: