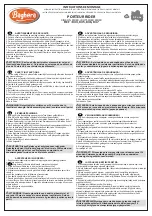
background image

13

23

/ Radio / RC-Anlage

Radio / Equipo de Radio

Im Lieferumfang der Fernsteuerung enthalten.
Livr  avec la radio-commande.
Tornillo incluido en el equipo de radio.

/ Supplied with radio.

Servohorn / Palonnier de servo
Horn servo

/ Servo Horn

2mm

Steering Servo
Lenkservo
Servo de direction
Servo de direcci—n

Ensure that the servo is set at neutral before fitting the servo Hom. Refer to 

  page 3 (Radio Preparation) or your radio's instructions for details.

Nicht Verdrehen! Siehe Seite 3, falls der Fahrtenregler versehentlich verdreht worden ist.

Ne pas faire pivoter. Si cette pi ce a  t  pivot e par erreur, 

  se r f rer page 3 pour un bon r ajustement.

No giralo, si lo hace por descuido, vea la p‡gina 3.

90¡

Cut off shaded portion.
Schneiden Sie die schraffierten FlŠchen heraus.
Coupez la partie gris e. 
Corte la zona oscurecida.

Drill holes with the specified diameter.
Bohren Sie Lšcher im angegebenen ¯.
Percez des trous dans le ¯ indiqu .
Perfore agujeros con la medida indicada.

2mm

Pay close attention here!
Vorsicht!  Wichtiger Hinweis!
Attention! Avis important!
Preste atenci—n.

Included with "readyset" version.
Im Readyset enthalten.
Livr  dans la version Readyset.
Incluido en el Readyset.

70

69

69

(For ARR) Undo the screws (shown left) to temporarily remove the 
  Fuel Tank and Radio Box.
Lšsen Sie die im Bild gezeigten Schrauben und entfernen Sie den 
  Tank und die R/C-Box.
Retirer les vis comme indiqu  et ™ter le r servoir ainsi que le boitier radio.
Afloje los tornillos mostrados, desmonte el dep—sito y la caja de radio.

Remove the radio box cover.
Entfernen Sie die Abdeckung der R/C-Box.
Ouvrir le couvercle du boitier radio.
Abra la tapa de la caja de radio.

22

/ Radio Plate

Die Radioplatte / Platine radio / Bandeja de Radio

Please be careful not to lose the screws you take 
  out here.
Bewahren Sie alle Schrauben gut auf, die Sie hier 
  demontieren.
Attention ˆ ne pas  garer les vis retir es ici.
Tenga precauci—n de no perder los tornillos aflojados.

Entfernen Sie die Schrauben wie gezeigt. / Retirer la vis. / Afloje los tornillos indicados.

/ (For ARR) Temporarily remove the screws shown.

Underside of chassis.
Unterseite vom Chassis.
Unterseite vom Chassis
Parte inferior chasis.

Radio Box
RC Box
Bo”tier radio
Caja de radio

Fuel Tank
Tank
R servoir
Deposito

3x8mm(TP F/H)

13~14mm

3x8mm

3x8mm
     (TP)

3x8mm
(TP)

プロポ

ステアリングサーボ

プロポに付属

サーボホーン

この部分を回さない。回した場合は、

3

ページ

(

プロポの準備

)

の調整をもう

1

度行なう。

readysetには付属。

    をカットする。

2mm

の穴をあける(例)。

注意して組立てる所。

左図を示すビスを取り外し、メカボックスと燃料タンク
(チューブも取り外す)を取り出します。

メカボックスのフタを取り外す。

メカプレート

ここで取りはずしたビスをなくさないように注意する。

図のビスをはずす。

シャシー裏面

メカボックス

燃料タンク

Summary of Contents for PureTen GP Alpha 2 4WD SERIES

Page 1: ...da dieses je nach verwendeter Karosserie unterschiedlich sind Pneus et jantes peuvent varier en fonction des modeles Los neumaticos y llantas de los dibujos cambian segun el tipo de carroceria PureTen GP Alpha 2 4WD SERIES 安全のための注意事項 この無線操縦模型は玩具ではありません 小さい部品があるので 組立て作業は幼児の手がとどかない所で必ずおこなっ てください 動かして楽しむ場所は 万一の事故を考えて安全を確認してから 責任をもっ てお楽しみください 組立てた後も 説明書がいつでも見られるように大切に保管してください この商品は高い性能を発揮するように設計されています...

Page 2: ... tipo AA SPRAY CO LOR R KY O SH O SPRAY CO LOR R KY O SH O 2 readysetには付属 Supplied with readyset version Im Readyset enthalten Livr dans la version Readyset Incluido en el Readyset このサーボでも一部使用で きない場合があります Fit only servos of a suitable size as indicated left Bitte beachten Sie das ausschlie lich Servos der Grš e Standard im Modell eingebaut werden kšnnen V rifier que les servos utilis s soient adap...

Page 3: ...te los interruptores de inversi n de la direcci n y gas 5 4 3 8 ON OFF 10 電池ボックス Battery Box Batteriehalter Bo tier ˆ piles Portapilas 1 2 3 4 5 6 7 8 9 10 11 12 始める時 終わる時 送信機に単3乾電池をセットする 送信機のアンテナをのばす 電池ボックスに単3乾電池を セットする 電池ボックスのコネクター をつなぐ 受信機のアンテナをのばす トリムを中央にセットする 送信機のスイッチを入れる 受信機のスイッチを入れる ハンドル トリガーを動かし てサーボが動いているか確認 受信機のスイッチを切る 送信機のスイッチを切る 送信機のアンテナを縮める 1 2 3 4 5 6 7 8 9 10 11 12 START FINISH Inse...

Page 4: ... la hora de apretar Tornillos Autorroscantes TP Apri telos firmemente en la pieza donde corresponda No intente apretarlos demasiado ya que podr an deformar la pieza 説明書の見かた How to read the instruction manual So funktioniert die Bauanleitung Comment lire les instruction C mo leer el manual de instrucciones 2 No 4 No 5 No 6 メタル Metal Bushing Metallager Palier m tal 4 キングピン King Pin Achsschenkelbolze...

Page 5: ...ots Ziehen Sie die Gewindestifte auf die ab geflachten FlŠchen fest Vissez les vis type BTR sur les m plats Apriete los prisioneros firmemente en las partes planas del eje Differential Gear Differential Diff rentiel Diferencial Apply threadlocker screw cement Verwenden Sie Schraubensicherungslack Appliquer du frein filet Aplique l quido fijatornillos 7 7 94 8 6 10 9 11 12 9 10 6 3x16mm 3x12mm 4x4m...

Page 6: ...ten Notez le sens F jese en el dibujo 3 Front Suspension Vordere AufhŠngung Suspension avant Suspensi n Delantera Top Oben Haut Arriba Note the direction Einbaurichtung beachten Notez le sens F jese en el dibujo 13 100 1 2 Assemble in the specified order In der angegebenen Reihenfolge zusammenbauen Assemblez dans lÕordre indiqu Realice el montaje en el orden indicado 3x8mm 3x8mm 3x8mm 5 Front Susp...

Page 7: ... Kugelschraube silber Rotule argent 5 8mm R tula 5 8mm Plateado Achsschenkelbolzen Vis ˆ fus e King Pin King Pin 24 5 x 10mm Metal Bushing Lager Bague M tal 5x10mm Casquillo Met lico 5x10mm 9 4 Marked ÒRÓ R echts markiert Marqu ÒRÓ R derecha Marked ÒRÓ R echts markiert Marqu ÒRÓ R derecha Marked ÒLÓ L links markiert Marqu ÒLÓ L derecha Marked ÒLÓ L links markiert Marqu ÒLÓ L derecha Left Links Gau...

Page 8: ... la vis Asegœrese que la pieza se mueve suavemente Pay close attention here Vorsicht Wichtiger Hinweis Attention Avis important Preste atenci n 37 3 x 16mm TP Screw LK Treibschr Vis TP 3x16mm Tornillo 3x16mm TP 2 9 Front Suspension Vordere AufhŠngung Suspension avant Suspensi n Delantera For Front Vorne Avant Delanteros 3x16mm Assemble left and right sides the same way Bauen Sie eine linke und ein...

Page 9: ... 51 48 7 50 52 53 50 49 54 95 3x16mm 3x16mm Firmly tighten the set screws onto the flat spots Ziehen Sie die Gewindestifte auf die ab geflachten FlŠchen fest Vissez les vis type BTR sur les m plats Apriete los prisioneros firmemente en las partes planas del eje 1 53 2 x 11mm Pin Stift Axe 2x11mm Pasador Insert Brake Disc between Brake Pads as shown FŸgen Sie Nr wie auf dem Bild dargestellt ein Ins...

Page 10: ...dicado 5mm Washer Scheibe Rondelle 5mm Arandela 5mm Marked ÒBÓ B links markiert Marqu ÒBÓ B derecha 2 62 Rear Upper Rod Oberer Querlenker hinten Biellette sup rieure arri re Trapecio Superior 4 3 x 12mm TP Screw LK Treibschr Vis TP 3x12mm Tornillo 3x12mm TP 3 x 10mm F H Screw SK Schraube Vis F H 3x10mm Tornillo 3x10mm F H 3mm Flanged Nut Stoppmutter Ecrou paul Tuerca con collar n 9 3 x 8mm TP F H ...

Page 11: ...ption avec les pi ces en option N Rodamientos opcionales disponibles Ensure smooth non binding movement when assembling Das Teil mu sich leicht bewegen lassen La pi ce doit pouvoir pivoter autour de la vis Asegœrese que la pieza se mueve suavemente Assemble left and right sides the same way Bauen Sie eine linke und eine rechte Seite Assemblez le c t gauche comme le c t droit Realice el montaje de ...

Page 12: ...te los tornillos colo cando un trozo de papel entre la corona y el pinon 66 67 19 Rear Suspension Hintere AufhŠngung Suspension arri re Suspensi n Trasera 3 x 16mm TP Screw LK Treibschr Vis TP 3x16mm Tornillo 3x16mm TP 2 For Rear Hinten Arri re Traseros Assemble left and right sides the same way Bauen Sie eine linke und eine rechte Seite Assemblez le c t gauche comme le c t droit Realice el montaj...

Page 13: ... en el Readyset 70 69 69 For ARR Undo the screws shown left to temporarily remove the Fuel Tank and Radio Box Lšsen Sie die im Bild gezeigten Schrauben und entfernen Sie den Tank und die R C Box Retirer les vis comme indiqu et ter le r servoir ainsi que le boitier radio Afloje los tornillos mostrados desmonte el dep sito y la caja de radio Remove the radio box cover Entfernen Sie die Abdeckung der...

Page 14: ...io 24 Radio RC Anlage Radio Equipo de Radio 8 3 x 8mm TP Screw LK Treibschr Vis TP 3x8mm Tornillo 3x8mm TP 1 72 Kugelpfanne Chape R tula Ball End 4 5mm 3x8mm 3x8mm 3x8mm Steering Servo Lenkservo Servo de direction Servo de direcci n Throttle Control Servo Gasservo Servo de gaz Servo de Gas 36mm 72 73 Insert leads into the radio box as shown Verlegen Sie die Anschlu kabel in die R C Box Connecter l...

Page 15: ...Vis TP 3x8mm Tornillo 3x8mm TP Antenne Antenne Antena Antenna Antenna Pipe Antennenrohr Tube dÕantenne Tubo Antena 74 Be careful not to trap the radio leads when re fitting the radio box cover Montieren Sie die Abdeckung der R C Box Refermer le couvercle du boitier radio Coloque la tapa 69 69 75 3x8mm 3x8mm 3x8mm TP F H 3x8mm TP F H 3x8mm TP F H 3x8mm TP 3x8mm 3x8mm TP 69 Hook Pin Karrosserieklamm...

Page 16: ...x8mm TP F H 2 Keep a space in between Fuel Tank and Muffler Achten Sie auf ausreichend Abstand zwischen dem Tank und dem SchalldŠmpfer Veiller ˆ pr server un espace entre le r servoir et l chappement Mantenga un espacio entre Deposito de Combustble y el Escape 93 136 93 136 93 136 93 136 Front View Ansicht von vorn Vue de devant Vista frontal 139 136 93 140 136 137 138 3x8mm 4x4mm 1 4 x 4mm Set Sc...

Page 17: ...vo comme indiqu Instale el horn de servo tal y como se indica Kurz Courte Corto Short 77 Lang Longue Largo Long Pay close attention here Vorsicht Wichtiger Hinweis Attention Avis important Preste atenci n Tentatively tighten VorlŠufig festziehen Vissez temporairement Apriete de manera provisional Cut off shaded portion Schneiden Sie die schraffierten FlŠchen heraus Coupez la partie gris e Corte la...

Page 18: ...lter montiert Après contrôle monter Una vez comprobado instale 83 83 83 Spring is compressed when Throttle is closed and Brake is actuated Justieren Sie die Feder Ressort legèrement comprimé El muelle se comprime Brake Bremse Frein Freno Neutral Neutral Neutre Neutro Full Throttle Vollgas Plein gaz Máximo Gas approx 1mm ca 1mm environ 1mm aprox 1mm approx 1mm ca 1mm environ 1mm aprox 1mm Adjust th...

Page 19: ...e left and right sides the same way Bauen Sie eine linke und eine rechte Seite Assemblez le c t gauche comme le c t droit Realice el montaje de igual forma en ambos lados 3x12mm 3x12mm Adjust the ride height Justierung der Hšhe Ajuster la garde au sol Ajustar la altura Up Nach oben D visser Arriba Down Nach unten Visser Abajo サスペンション TPビス フロント リヤ 左右同じように組立てる 車高を下げる場合 上がる 下がる ...

Page 20: ...eck all screws nuts etc on a regular basis for looseness Bedienen Sie Ihr Auto nur wenn die Karrosserie montiert ist Vermeiden Sie GelŠnde das mit Gras Ÿberwachsen ist schlammig sandig oder steinig ist berprŸfen Sie regelmŠ ig alle Schrauben Muttern usw auf festen Sitz NÕop rez votre voiture que lorsque la carrosserie est mont e NÕop rez pas votre voiture sur du terrain recouvert dÕherbe boueux sa...

Page 21: ...s peut entra ner la perte de votre mod le et avoir des cons quences fatales Quand les piles de la radio sont d charg es Si les piles sont insuffisamment charg es lÕ mission et la r ception de la radio deviennent faibles LÕutilisation de votre mod le avec des piles insuffisamment charg es peut entra ner la perte de votre mod le ainsi que des accidents graves Quand le fonctionnement de votre mod le ...

Page 22: ... Ihre Finger in bewegende oder sich drehende Teile Nach dem Fahren fassen Sie niemals den Verbrennungs motor und den SchalldŠmpfer an Verbrennungsgefahr Zum sicheren Gebrauch von Kraftstoff 1 Kraftstoff nur drau en gebrauchen 2 Nur Kraftstoff fŸr RC Modelle gebrauchen 3 Kraftstoff niemals drinnen oder in der NŠhe von Feuer und Hitzequellen gebrauchen 4 Kraftstoff niemals schlucken Vorsicht auch vo...

Page 23: ...か また 確実に固定されていますか サーボ リンケージはスムーズで正確に動作しますか 走行場所は安全ですか 近くで同じバンドで無線操縦模型をしている人はいませんか Ensure all screws are securely tightened Ensure all moving parts move without binding Are they greased for non binding movement Install an air cleaner Ensure it is clean and not clogged Ensure the fuel lining is proof with no cracks Ensure it is not clogged Ensure the muffler and exhaust are damage free Ensure the ra...

Page 24: ... control and trim and disconnect the glow plug heater 10 Sekunden nach dem Anspringen des Motors kann der GlŸhkerzenakku entfernt werden Quand le r gime moteur se stabilise baissez le stick de gaz et d connectez le chauffe bougie スロットル Throttle GasknŸppel Stick de gaz スロットルトリム Throttle Trim Gastrimmung Stick de gaz キャブレターに燃料が入ったら リコイルスターターを2 3回 引くと エンジン内に燃料が行きわたり 始動しやすくなる Engine starting becomes e...

Page 25: ...s compl tement pour obtenir un r glage normal du moteur D autres r glages peuvent entrainer une surchauffe du moteur 5 走行させながらブレークインを続ける エンジンをいたわる つもりで走行させ 10 20 ずつニードルをしめこむ Next continue performing the break in while running the car Always screw in the needle valve 10 to 20 at a time in order not to damage the engine Lassen Sie nun den Motor beim Betrieb des Modells weiter einlaufen Schlie en Sie...

Page 26: ...nde de gaz en position neutre 1 2 1 2 1 2 そこからさらにしめこむと エンジンの排気が見えなくなったり スピードが途中から落ちてきます そのまま走行を続けると エ ンジンが壊れてしまいます すぐにニードルをゆるめてください ニードルの最良位置から10 20 ゆるめた位置が 通常走行の位 置です When screwing the needle valve further in exhausts become in visible and rpm decrease Running the engine with this setting damages the engine Immediately unscrew the needle valve Note that for normal running the needle valve is scre...

Page 27: ...ly pull the recoil starter to expel excess fuel Schrauben Sie die GlŸhkerze heraus und ziehen Sie den Anrei starter krŠftig durch damit ŸberschŸssiger Treibstoff austritt Enlevez la bougie et tirez le d marreur pour expulser l exc dent Replace with a new recoil starter Tauschen Sie den Anrei starter aus Remplacez la tirette Fill in fuel Betanken Sie das Modell Remplissez se r servoir Clean the fue...

Page 28: ...R THE FINEST RADIO CONTROL MODELS 京商株式会社 243 0034 神奈川県厚木市船子153 ユ ザ 相談室直通 電話 046 229 4115 お問い合わせは 月曜 金曜 祝祭日を除く 10 00 18 00 PRINTED IN KOREA 68430207 1 メーカー指定の純正部品を使用して 安全にR Cを楽しみましょう 36 ...

Reviews: