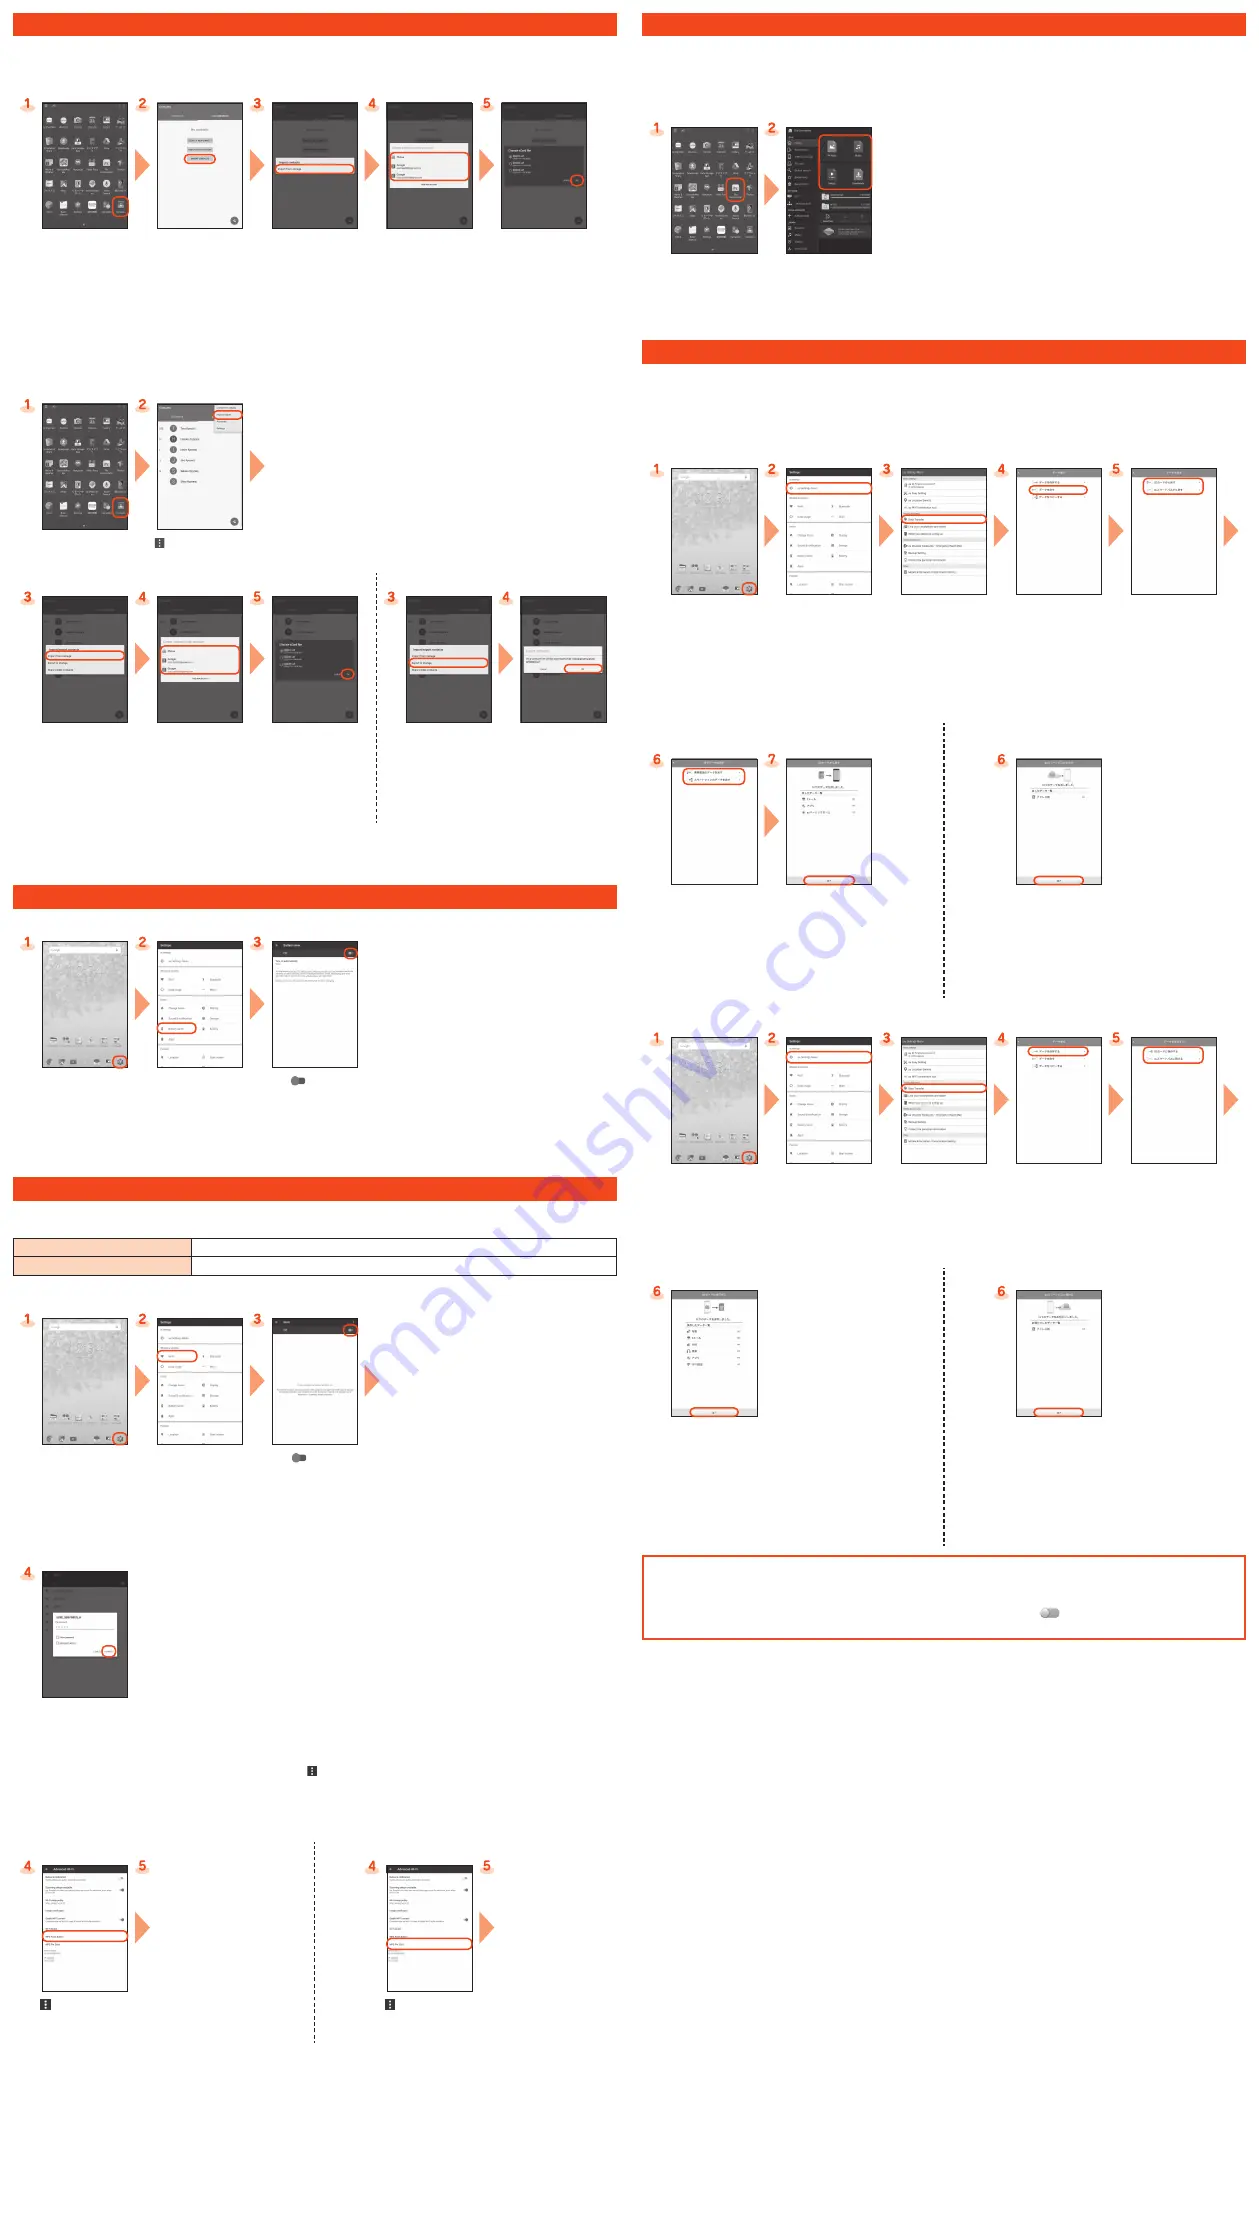
Importing/Exporting Contacts
You can import/export contacts from the internal storage.
•
Depending on the contact, data may not be completely imported/exported.
■
Importing (First Import after Purchase)
Apps list
→
[Contacts]
[IMPORT CONTACTS]
[Import from storage]
*1*2
Select account
to import to
To add a new account,
select "Add new account".
Follow the onscreen
instructions.
Select number of vCard
files to import
→
[OK]
→
Choose vCard files
→
[OK]
*1 If only one file to import (vCard file) is saved, importing starts.
*2 To import contacts on a microSD™ memory card, use "File Commander" or similar application to move the vCard files to the internal storage
beforehand.
■
Importing/Exporting (Entries Already Registered to Contacts)
Apps list
→
[Contacts]
[
]
→
[Import/export]
Importing
Exporting
[Import from storage]
*1*2
Select account
to import to
To add a new account,
select "Add new account".
Follow the onscreen
instructions.
Select number of vCard
files to import
→
[OK]
→
Choose vCard files
→
[OK]
[Export to storage]
[OK]
*1 If only one file to import (vCard file) is saved, importing starts.
*2 To import contacts on a microSD™ memory card, use "File Commander" or similar application to move the vCard files to the internal storage
beforehand.
Saving Battery Power
Use "Battery saver" to lower battery usage by limiting location services and background data.
Home screen
→
[Settings]
[Battery saver]
Tap "
" to turn "On"
You can tap "Turn on
automatically" and set a
battery level to switch
Battery saver "On" at.
Setting Wi-Fi
®
Use your home Wireless LAN (Wi-Fi
®
) or public wireless LAN to connect internet.
Main settings are as follows.
Select Wi-Fi
®
network for connection
Search for and connect to an available Wi-Fi
®
network.
WPS system
Use for registration of access point compatible with Wi-Fi Protected Setup™ with WPS mark.
* If you turn on wireless LAN (Wi-Fi
®
) function, battery consumption increases. You are recommended to turn wireless LAN (Wi-Fi
®
) function to OFF
when not using wireless LAN (Wi-Fi
®
) function.
Home screen
→
[Settings]
[Wi-Fi]
Tap "
" to turn "On"
Available Wi-Fi
®
networks
are detected automatically
and their SSIDs appear in
the Wi-Fi
®
networks.
■
Selecting and Connecting to a Wi-Fi
®
Network
Select the Wi-Fi
®
network to connect to
*1
→
[CONNECT]
*2
*1 If the Wi-Fi
®
network you want to connect to cannot be detected, tap [
]
→
[Add network] and add the network manually.
*2 To connect to a protected Wi-Fi
®
network, enter the password (security key) and tap "CONNECT". The password (security key) is set with the Wi-Fi
®
network. For details, contact with the network administrator.
■
Using a WPS System Access Point
WPS button
WPS Pin Entry
[
]
→
[Advanced]
→
[WPS Push Button]
Keep pressing WPS
button of access point
to set to WPS mode.
An access point is
automatically detected
and registration starts.
[
]
→
[Advanced]
→
[WPS Pin Entry]
Enter displayed PIN
code for access point,
then registration starts.
Viewing/Playing Data
By transferring data from a previously used au terminal to a microSD™ memory card, you can view or play
*
still images, videos, and other
data with "File Commander" on the product. The first time you start up the product, terms and conditions appear. Follow onscreen
instructions.
* Copyrighted data on the previously used au terminal cannot be transferred to the product.
■
Viewing/Playing Data
Apps list
→
[File Commander]
Tap a category to be
displayed
→
Tap data
Data is played.
How to Transfer Data with the au Settings Menu
You can return or store data from a previously used au terminal to the product using a microSD™ memory card or au
スマートパス
(au
Smart Pass) server.
•
To return/store data using an au
スマートパス
(au Smart Pass) server, you must set an au ID.
•
To return data using a microSD™ memory card, save the data from the previously used au terminal to the microSD™ memory card
beforehand.
■
Returning Data with the au Settings Menu
Home screen
→
[Settings]
[au Settings Menu]
[Data Transfer]
[
データを戻す
(Return data)]
Select method for
returning data
To return data from
"au
スマートパスから戻す
(Return from au Smart Pass)"
(data stored on an au Smart
Pass server), you must set
an au ID.
"SD
カードから戻す
(Return from SD card)" selected
"au
スマートパスから戻す
(Return from au Smart Pass)"
selected
Select type of previously
used au terminal
Checkmark the data to
return
→
[
戻す
(Return)]
*
→
[
完了
(Done)]
Shown screen is for when
"
スマートフォンのデータ
を戻す
(Return smartphone
data)" is selected.
Checkmark the data to
return
→
[
戻す
(Return)]
*
→
[
完了
(Done)]
* If a confirmation screen appears, follow onscreen
directions.
■
Saving Data with the au Settings Menu
Home screen
→
[Settings]
[au Settings Menu]
[Data Transfer]
[
データを保存する
(Save data)]
Select where to save
To save data from "au
スマー
トパスに預ける
(Store to au
Smart Pass)" (store data to
an au Smart Pass server),
you must set an au ID.
"SD
カードに保存する
(Save to SD card)" selected
"au
スマートパスに預ける
(Store to au Smart Pass)" selected
Checkmark the data to
save
→
[
保存する
(Save)]
→
[
完了
(Done)]
Checkmark the data to
store
→
[
預ける
(Store)]*
→
Check the
contents, and follow
onscreen instructions
→
[
完了
(Done)]
* If a confirmation screen appears, follow onscreen
directions.
Storing data automatically to au
スマートパス
(au Smart Pass)
To use the "Data Storage App" application and automatically store still images and address book entries to an au
スマートパス
(au
Smart Pass) server, set as follows.
Home screen
→
[Settings]
→
[au Settings Menu]
→
[Backup Setting]
→
Tap "
" for "
定期的に自動で預ける
(Periodically store automatically)" to turn ON


