background image

2-5

2. Windows XL Driver

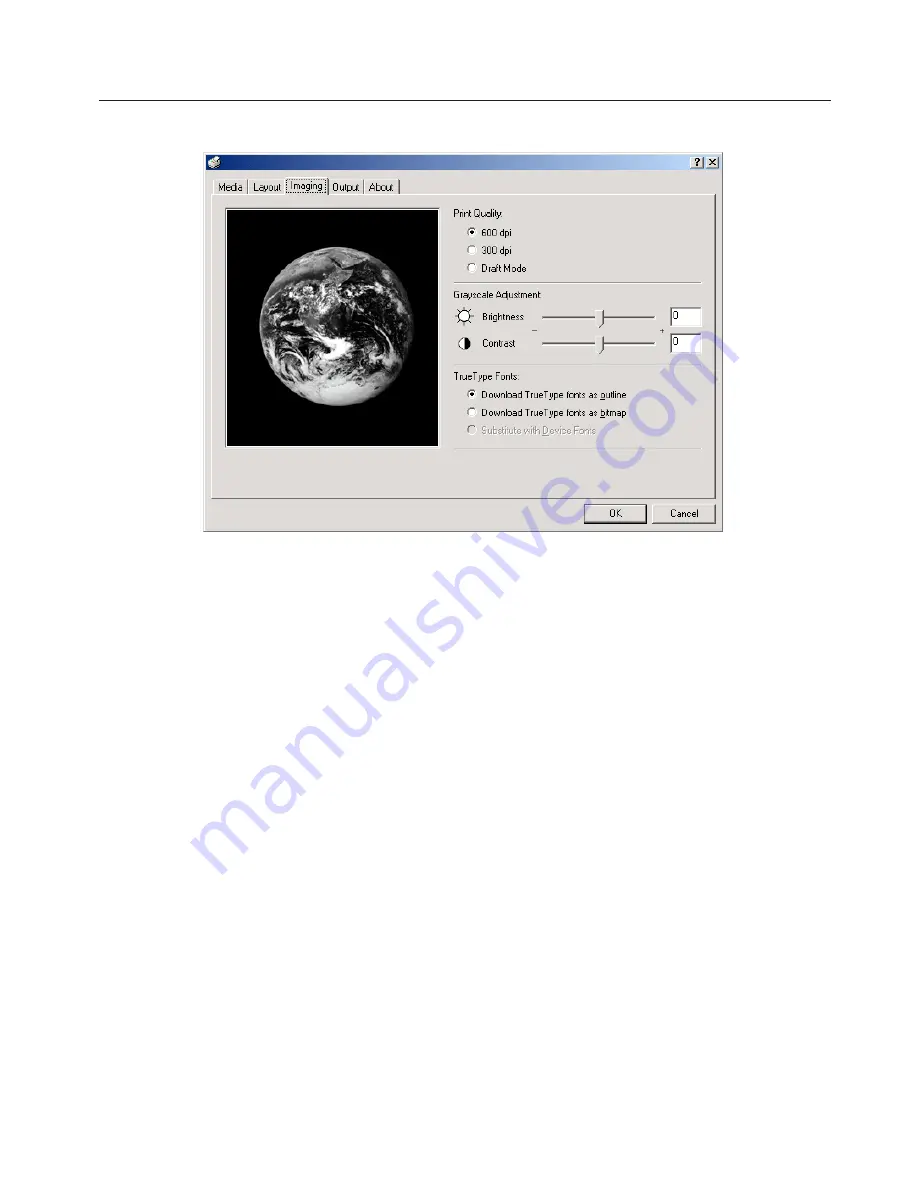
2-4 Imaging Tab

Print Quality:
Specifies the printing resolution (number of dots per inch) to be used
when printing. Select between “600 dpi [High]”, “300 dpi [Low]” and “Draft Mode”. If you select the “Draft Mode” option, printing will be
accomplished printing in a toner-saving mode. This mode is especially suited for test pages, etc., where high printing quality is not
required.

Grayscale Adjustment
Adjusts the brightness and contrast of the printed image. The factory default for both settings is “0”.

[Brightness] ............................... Adjusts the brightness of the image. When you want to print the image brighter than the actual

original, drag the slider towards the plus “+” sign, or type in a positive number directly into the field at
the right of the slider bar. Conversely, when you want to print the image darker than the actual
original, drag the slider towards the minus “-” sign, or type in a negative number directly into that field.

[Contrast] ................................... Adjusts the contrast of the image. When you want to print at a sharper image contrast, drag the slider

towards the plus “+” sign, or type in the desired value (a positive number) directly into the field at the
right of the slider bar. Conversely, when you want to print at a softer image contrast, drag the slider
towards the minus “-” sign, or type in a negative number directly into that field.

TrueType Fonts
Selects the method of printing with fonts. The factory default setting is “Download TrueType fonts as outline”.

[Download TrueType fonts as outline]

.................................................... TrueType fonts will be downloaded to the printer as outline fonts for printing.

[Download TrueType fonts as bitmap]

.................................................... TrueType fonts will be downloaded to the printer as bitmap fonts for printing.

Summary of Contents for KM-1510

Page 1: ... Printer Settings 2 Memory Card RAM Disk Chapter 2 Software related operation 1 Procedure for Installing and Printing with a Printer Driver 2 Windows XL Driver 3 Printer Driver for Windows 95 98 4 Printer Driver for Windows NT 5 Printer Driver for Windows 2000 6 Printer Driver for Macintosh ...

Page 2: ...less Group Redondo Beach CA 90278 U S A Contains UFSTTM and MicroType from Agfa Corporation All other company and product names contained in this Instruction Handbook are trademarks or registered trademarks of their respective companies The designations and will not be used in this handbook All rights reserved No part of this material may be reproduced or transmitted in any form or by any means el...

Page 3: ...ESS FOR A PARTICULAR PURPOSE Some jurisdictions do not allow the exclusion of implied warranties so the above exclusion may not apply to you SUPPLEMENT TO AGREEMENT FOR SOFTWARE BUNDLING AND DISTRIBUTION FOR ALDC 3 Limitation of Remedies IBM s entire liability under this license is the following 1 For any claim including fundamental breach in any form related in any way to this license IBM s liabi...

Page 4: ...an or destroy all copies of the Software and Typefaces and documentation as requested 6 You agree that you will not modify alter disassemble decrypt reverse engineer or decompile the Software 7 Agfa Japan warrants that for ninety 90 days after delivery the Software will perform in accordance with Agfa Japan published specifications Agfa Japan does not warrant that the Software is free from all bug...

Page 5: ...s the Enter key when you are finished in order to register the selected setting When typing in a network address press the Enter key after each block of 3 digits 1 Printer Settings IMPORTANT All setting items and the selection of their actual settings are accomplished in this machine based on a maximum 3 digit entry system Refer to 1 2 List of settings on page 1 3 for information regarding the var...

Page 6: ... version Metric version Printer Key Copy quality magnification display Zoom key Zoom key Stop Reset Cancel key Start Go key Enter key Printer Key Copy quality magnification display Zoom key Zoom key Stop Reset Cancel key Start Go key Enter key ...

Page 7: ...rvice Rep Status Page print out setting menu P76 Emulation protocol parallel interface Sets the emulation protocol that will be used Available settings 1 Auto 2 Normal 3 High Speed 4 Nibble high 1 On 2 Off 1 Auto 2 802 3 3 Ethernet II 4 802 2 5 802 3 SNAP 1 On 2 Off 1 On 2 Off Enter the address Enter the address Enter the address 1 On 2 Off 1 On 2 Off 1 Line Printer 2 IBM Proprinter 3 DIABLO 630 4...

Page 8: ... machine will monitor the data and if necessary will automati cally turn Page Protect ON If a Print overrun error error code E80 does happen to occur even then the machine will automatically change the Page Protect setting to ON setting 2 Line Feed LF handling parallel interface Line Feed LF handling network interface Carriage Return CR handling parallel interface Carriage Return CR handling netwo...

Page 9: ...at will be used as a RAM disk The maximum size that can be selected is the total amount of memory installed minus the amount used by the system 9 MB Bypass mode If First setting 2 is selected here and there is paper set in the Multi Bypass paper feed will be accomplished from the Multi Bypass Force print time out If 000 seconds is selected here successive pages will not be printed until they are m...

Page 10: ...ever Permanent Tempo rary setting 3 is selected temporary resources will also be saved Permanent Temporary Auto Continue ON OFF If one of the following error messages appears and On has been selected here the error state will be released and the printing operation will be restarted automatically after a specified amount of time Memory overflow error code E70 Print overrun error code E80 Recovery t...

Page 11: ...rm electronic sorting which shortens the overall time required for printing as well as to save data to and retrieve data from that disk very quickly Additional memory option must be installed before a RAM Disk can be created IMPORTANT The RAM Disk is created from that portion of the printer s memory that is normally available to the user Thus if the size of the RAM disk created is too large printi...

Page 12: ...mmand operation start C Command RWER D is the command to delete data D Parameters A refers to the Memory Card 2 refers to the type of data in this case print data and SAMPLE txt is the name of the corresponding partition E Command operation end F Printer connection port Network PRN Local LPT1 etc CAUTIONS When issuing DOS commands in the Japanese input mode ALWAYS use JIS ASCII JIS C6220 character...

Page 13: ...g print data Perform the following procedure when you want to write print data to a Memory Card or RAM Disk from your computer Verify beforehand that the Memory Card is in a write enabled state and that the RAM Disk is turned ON Procedure 1 Open an MS DOS Prompt in Windows 2 Type in the command to write data and then press the ENTER key Example To write the print data entitled SAMPLE txt to a Memo...

Page 14: ...write the font data entitled FONT1 to a Memory Card C WINDOWS ECHO R RWER S A 0 FONT1 FONT 45040 LPT1 12 3 4 5 NOTES The parameters contained within the command line are as follows 1 A refers to the Memory Card and 0 refers to the RAM Disk 2 0 refers to a TrueType font 1 refers to a Japanese TrueType font 2 refers to a Japanese TrueType Collection font 3 File name 4 Font name 5 Font data length bi...

Page 15: ...e corresponding data will begin 2 3 6 Deleting print data or font data Perform the following procedure when you want to delete print data or font data that has been saved on a Memory Card or RAM Disk Verify beforehand that the Memory Card or RAM Disk contains the data that you want to delete To verify saved data and the corresponding partition name it is helpful to print out the Partition List Ref...

Page 16: ...o not include this parameter both Partition Lists will be printed out C WINDOWS ECHO R RWER L A EXIT LPT1_ 3 Print out of the Partition List will begin 2 3 8 Auto Partition List print out ON OFF It is possible to have a Partition List printed out automatically any time data is written to a Memory Card or RAM Disk Perform the following procedure when you want to change the setting for automatic pri...

Page 17: ...r will enable you to use such compound printer functions to their fullest This driver is compatible with Adobe PostScript 2 A PPD PostScript Printer Description file is included for use with this product Use LaserWriter 8 as the printer driver for your Mac OS Compatible OS Windows 95 98 Windows NT4 0 Windows 2000 Windows NT4 0 Windows 2000 Windows 95 98 Windows NT4 0 Windows 2000 Macintosh System ...

Page 18: ...ium 90 MHz or more Recomended requirements 32 MB or more 10 MB or more CD ROM drive 1 drive Parallel interface port IEEE 1284 CPU RAM HDD CPU RAM HDD 1 2 System Conditions IBM PC AT or compatible i486SX 25 MHz or more System requirements 8 MB or more 10 MB or more Pentium 90 MHz or more Recomended requirements 16 MB or more 10 MB or more CD ROM drive 1 drive Parallel interface port IEEE 1284 CPU R...

Page 19: ...need of the installer CD ROM Driver for Macintosh cannot be made Network Click to display the printmonitor s installation menu Follow the instructions displayed on the screen to install the print monitor Documentation Click to display the manual PDF supplied with the printer driver To open this PDF manual Adobe Acrobat Reader developed to view PDF files is required so make sure that Adobe Acrobat ...

Page 20: ...uct to install the printer driver The screens shown in the following explanation are those displayed when installing the printer driver for Windows 95 98 Start Windows If any applications are currently running exit them Insert the CD ROM supplied with the printer into the CD ROM drive A start window will appear 1 2 Click Install Driver in the lower left corner of the window If the start window doe...

Page 21: ...cted proceed to step 12 If Network is selected proceed to step 11 9 10 Enter the network queue name or the path for the network queue in the box To select another network queue name press Browse If you are going to use a local port for the network queue click the check box displayed below then proceed to step 12 Otherwise proceed to step 13 11 All available options will be displayed Select the ite...

Page 22: ...n be assigned to your printer Specify a new name or select the desired name from the list then click Next 12 13 Specify whether this printer is to be used as the default printer Click Yes if so or click No if not The settings you have made so far will appear If they are correct click Next Installation of the printer driver will start 14 15 To exit installation click Finish If you want to add anoth...

Page 23: ...er driver installer CD ROM into the CD ROM drive on your computer The window shown on the right will appear 1 2 Click on Driver Tools and then on Remove Drivers from the subsequent menu The Remove Printer Drivers dialog box will appear Select the driver that you want to delete and then click on Uninstall A message to verify whether or not you really want to delete that driver will appear If you DO...

Page 24: ...ons setting Select and installed options here Once you have completed the setting for each option the functions of that option will be available for use Once you have completed these settings click on OK 5 1 6 Printing The following is an example procedure for printing using a printer driver under the conditions and environment noted below OS Windows 95 Printer driver KPDL2 Driver Application Word...

Page 25: ...ppear 6 7 Select the desired number of copies that you want to make and which pages are to be printed Select this printer in the Name field Click on Properties The Properties window will appear 8 Click on the Device Options Tab and select the desired function s 10 Click on OK You will be returned to the Print dialogue box Click on OK once again Printing will begin 11 Click on the Paper Tab and sel...

Page 26: ...ined as though it is being carried out in Windows 2000 If you are using another operating system use this procedure simply as reference Depending upon version upgrades of the printer driver the screenshots shown here may differ somewhat from that of the actual printer driver Refer to the Instruction Manual for Windows regarding items that are not explained in this Instruction Handbook 1 2 3 4 2 1 ...

Page 27: ...mage size will be enlarged or reduced according to difference in the setting made here and in the Page Size field Orientation Sets the orientation of printing Portrait The image will be printed vertically Landscape The image will be printed horizontally Rotated Select this checkbox by clicking on it and putting a check mark in the box in order to have the image printed upside down Source Select th...

Page 28: ...lock and the desired dimen sions of the paper in the Size block Available settings Units Inches or Millimeters Height 5 83 14 00 Inches 148 1 355 6 Millimeters Width 3 88 8 50 Inches 98 4 215 9 Millimeters Type into the Name field the name you want to use for this custom size of paper It is the name that you register here that will actually be displayed under the Page Size setting Click on the Sav...

Page 29: ... printing Prints reduced images of 2 full pages onto a single sheet of paper Print Borders Prints border lines between the different images when the Pages per Sheet function is selected Layout Specifies the order of display of the images when the Pages per Sheet function is selected Scaling Allows enlargement or reduction of the image size Note The image size will normally be enlarged or reduced a...

Page 30: ... of the slider bar Conversely when you want to print the image darker than the actual original drag the slider towards the minus sign or type in a negative number directly into that field Contrast Adjusts the contrast of the image When you want to print at a sharper image contrast drag the slider towards the plus sign or type in the desired value a positive number directly into the field at the ri...

Page 31: ...eld or by typing the desired number directly into the field The factory default setting is 1 Collate When you are printing more than one copy of one or more pages it is possible to sort the printed copy sets It is necessary to create a RAM disk Refer to RAM disk on page 2 7 Example If the Collate option is selected it is possible to print out 2 sets of the same copies ...

Page 32: ...te a RAM disk Refer to Chapter 1 2 2 RAM Disk on page 2 1 for more detailed information on creating a RAM disk In order to create a RAM disk it is necessary to increase the memory capacity of your printer After increasing memory perform the setting here according to the Memory setting below Memory Specifies the amount of memory installed in the printer If you make a mistake in the setting here it ...

Page 33: ... this product will be displayed in the dropdown list If multiple modes are displayed it is possible to select the desired mode GDI compatible mode Select this mode in order to accomplish printing that is more accurate to the data shown on your monitor Select this mode if text corruption etc does happen to occur or if the image is in any other way not printed correctly ...

Page 34: ...o printer drivers have been included with this product a standard printer driver and a Collator compatible driver Refer to 1 Procedure for Installing and Printing with a Printer Driver on page 1 1 for more detailed information If you use the KPDL2 driver be sure to set the emulation mode in the printer to KPDL or KPDL AUTO Start Windows 95 or Windows 98 Click on Start on the task bar The Start men...

Page 35: ...rints widthwise Paper source Displays a list of trays installed in your printer Select the desired tray from the list The factory default setting is Auto Select Media choice EcoPrint Saves on toner The factory default setting is Off Unprintable Area Click this button in order to open the Unprintable Area dialog box and set the area that should not be printed onto Standard size paper sheet Envelope...

Page 36: ... dots per inch Dithering Specifies the method of Dithering Refer to On Line Help for more detailed information Intensity Allows you to adjust the printing contrast Drag the slider towards Darkest or Lightest as appropriate Graphics mode Selects the method of data transmission when printing detailed objects Generally if you select Use vector graphics printing speed will be increased However if you ...

Page 37: ... 98 3 4 Device Option Tab Universal Driver Printer memory Perform this setting according to the amount of memory in your printer If a mistake is made in this setting there is a possibility that printing will not be accomplished properly ...

Page 38: ...elect the desired tray from the list The factory default setting is AutoSelect Tray It is necessary to perform the settings under Page Policy on page 3 7 BEFORE making settings here If you want to select the source of paper feed according to the tray make sure that Cassette Base is selected there If you select AutoSelect Tray here be sure that the Page Policy setting is set to Auto Size Select or ...

Page 39: ... print graphics such as photographics or detailed images you may want to adjust these settings However the default printer settings should work in most cases Do not change these settings unless you have experience using halftones To return to the default settings after you have made changes click Use printer s settings Special Print as a negative image Prints a negative of the image by complementi...

Page 40: ...e or there is a possibility that printing will be accomplished onto paper that is difference the expected Job Spooling When you want to print out more than one set of the same documents it is possible to have them sorted and ejected one set at a time None Does not sort Temporary Sorts and prints in order of sets Set 1 Set 2 Set 3 etc It is necessary to create a RAM disk Refer to Optional Disk belo...

Page 41: ...3 8 3 Printer Driver for Windows 95 98 3 8 PostScript Tab KPDL2 Driver Allows you to make PostScript related settings Refer to On Line Help for more detailed information ...

Page 42: ...tings Tab The following procedure explains the functions of the Universal driver and the KPDL2 driver for those who use Windows NT4 0 as their operating system Depending upon version upgrades of the printer driver the screenshots shown here may differ somewhat from that of the actual printer driver Refer to the Instruction Manual for Windows or to On Line Help for information regarding items that ...

Page 43: ...a The factory default setting is Automatically Select Copy Count Set the number of copies to be made The allowable range is from 1 to 999 Setting can be made in the Change Copy Count Setting area Click the arrow buttons or enter directly from the keyboard The factory default setting is 1 4 3 Graphic Universal Driver Resolution Specify the desired print resolution The resolution must be specified i...

Page 44: ...4 3 4 Printer Driver for WindowsNT Media Saves on toner Setting can be made in the Change Media Setting area The factory default setting is Eco Print Off 4 4 Document Options Universal Driver ...

Page 45: ...g to the tray make sure that Cassette Base is selected there If you select Automatically Select here be sure that the Page Policy setting is set to Auto Size Select or there is a possibility that printing will be accomplished onto paper that is difference the expected Copy Count Set the number of copies to be made The allowable range is from 1 to 999 Setting can be made in the Change Copy Count Se...

Page 46: ...4 5 4 Printer Driver for WindowsNT Allows you to make PostScript related settings Refer to On Line Help for more detailed information 4 7 Document Options KPDL2 Driver 4 7 1 PostScript Options ...

Page 47: ...ing when you want to select Automatically Select under Paper source Cassette Base Select this setting when you want to select the source of paper feed according to the tray under Paper source If you are going to select Automatically Select under Paper source be sure to select Auto Size Select here or there is a possibility that printing will be accomplished onto paper that is difference the expect...

Page 48: ...r Optional Feeder Perform this setting according to the installed Option Cassette Optional Disk Perform this setting when you want to create a RAM disk Refer to Chapter 1 2 2 RAM Disk on page 2 1 for more detailed information on creating a RAM disk In order to create a RAM disk it is necessary to increase the memory capacity of your printer After increasing memory perform the setting here accordin...

Page 49: ... window will open When you are making settings for optional equipment select Properties here and then click on the Device Settings Tab The following procedure explains the functions of the Universal driver and the KPDL2 driver for those who use Windows 2000 as their operating system Depending upon version upgrades of the printer driver the screenshots shown here may differ somewhat from that of th...

Page 50: ...int from 1st page print from page Back to Front Print from last page Page Per Sheet N up Prints multiple pages on a single paper number of pages 1 2 4 6 9 16 This is called combined print The pages are reduced automatically so that all the pages can be put on one page The factory default setting is 1 1 page on each paper It is necessary to enable Advanced Printing Features in order to perform this...

Page 51: ...on of paper feed from the pulldown menu The factory default setting is Automatically Select It is necessary to perform the settings under Page Policy on page 5 6 BEFORE making settings here If you want to select the source of paper feed according to the tray make sure that Cassette Base is selected there If you select Automatically Select here be sure that the Page Policy setting is set to Auto Si...

Page 52: ...Selection can be made in the drop down list The following standard size paper sheets and envelopes can be used with this printer Copy Count Set the number of copies to be made The allowable range is from 1 to 999 5 4 2 Graphics Print Quality Specifies the printing resolution number of dots per inch to be used when printing Select between 600 x 600 dots per inch and 300 x 300 dots per inch The fact...

Page 53: ...er for Windows2000 5 4 3 Document Options Advanced Printing Features Be sure to select Enable for this setting if you want to use the Pages Per Sheet N Up function or the Back to Front option under the Page Order setting ...

Page 54: ...s setting when you want to select the source of paper feed according to the tray under Paper Source If you are going to select Automatically Select under Paper Source be sure to select Auto Size Select here or there is a possibility that printing will be accomplished onto paper that is difference the expected Job Spooling Allows you to select whether to sort the copies in the case of multiple copy...

Page 55: ...5 Printer Driver for Windows2000 5 4 5 PostScript Options This option can only be used with a KPDL2 Driver Allows you to make PostScript related settings Refer to On Line Help for more detailed information ...

Page 56: ...rform this setting according to the installed Option Cassette Optional Disk only available with KPDL2 Driver Perform this setting when you want to create a RAM disk Refer to Chapter 1 2 2 RAM Disk on page 2 1 for more detailed information on creating a RAM disk In order to create a RAM disk it is necessary to increase the memory capacity of your printer After increasing memory perform the setting ...

Page 57: ...and a screen may be different by a version of utilized software to some extent A Install Drivers Click to start installation of the printer driver Follow the instructions displayed on the screen to install the printer driver B Documentation Click to display the manual PDF file supplied with the printer driver To open this PDF manual Adobe Acrobat Reader developed to view PDF files is required so m...

Page 58: ...e of use dialog box will appear 2 Double Click on the copy machine product name of use Installer icon The window shown on the right will appear Click on Continue 3 A dialog box will appear Click on Install A dialog box will appear Click on Yes 4 5 Installation was finished Click on Restart and start again 6 ...

Page 59: ...ke sure that the name of this printer is selected highlighted in the Select a PostScript Printer list and close the Chooser 11 A dialog box for selecting the appropriate options will appear Select the option that are currently installed in or on your printer Select the name of this printer in the Select a PostScript Printer list and then click on the Create button The name of this printer can be v...

Page 60: ...in a file select the All radio button To print only certain pages type in from what page in the From filed to what page in the To field you want to print Paper Source Select the desired location of paper feed from the dropdown list The factory default setting is Auto Select It is necessary to perform the settings under Page Policy on page 6 6 BEFORE making settings here If you want to select the s...

Page 61: ...eet Sets the number of pages to be printed on each sheet of paper Layout Direction A button of either is clicked and a layout direction is decided If right button is selected the pages are laid out from right to left Border Sets the type of line to appear around the page ...

Page 62: ... Paper source on page 6 4 Auto Size Select Select this setting when you want to select Auto Select under Paper source Cassette Base Select this setting when you want to select the source of paper feed according to the tray under Paper source If you are going to select Auto Select under Paper source be sure to select Auto Size Select here or there is a possibility that printing will be accomplished...

Page 63: ...f LaserWriter that you are using For the user using Mac OS 7 6 1 we strongly recommend that you update the LaserWriter8 3 2 to Laser Writer 8 5 1 Format for Use this pop up menu to select the Printer that you want to use Paper Select in this pop up list the desired paper size Choose from among Letter Legal Folio Statement A4 Custom A5 A6 B5 JIS B6 JIS and Envelopes Monarch Com 10 DL C5 ALWAYS use ...

Page 64: ... upon the application and the version of LaserWriter that you are using Visual Effects Visual effects such as horizontal and vertical flip and image inverting can be selected here Place a check in the check box next to the desired visual effects to select that effect Image Text Place a check in the check box next to the desired printing options to select that option ...

Page 65: ...ffer somewhat depending upon the application and the version of LaserWriter that you are using New button To create a new custom page size click this button The acceptable paper width is between 9 81 21 59 cm metric or 3 86 8 5 inches The acceptable paper length is between 14 82 35 56 cm metric or 5 83 14 inches Edit button To edit the selected custom page size click this button Delete button To d...

Reviews: