

5 - 6
A- - - - - -
B- - - - - -
C- - - - - -
D- - - - - -
E- - - - - -
F- - - - - -
G- - - - - -
H- - - - - -
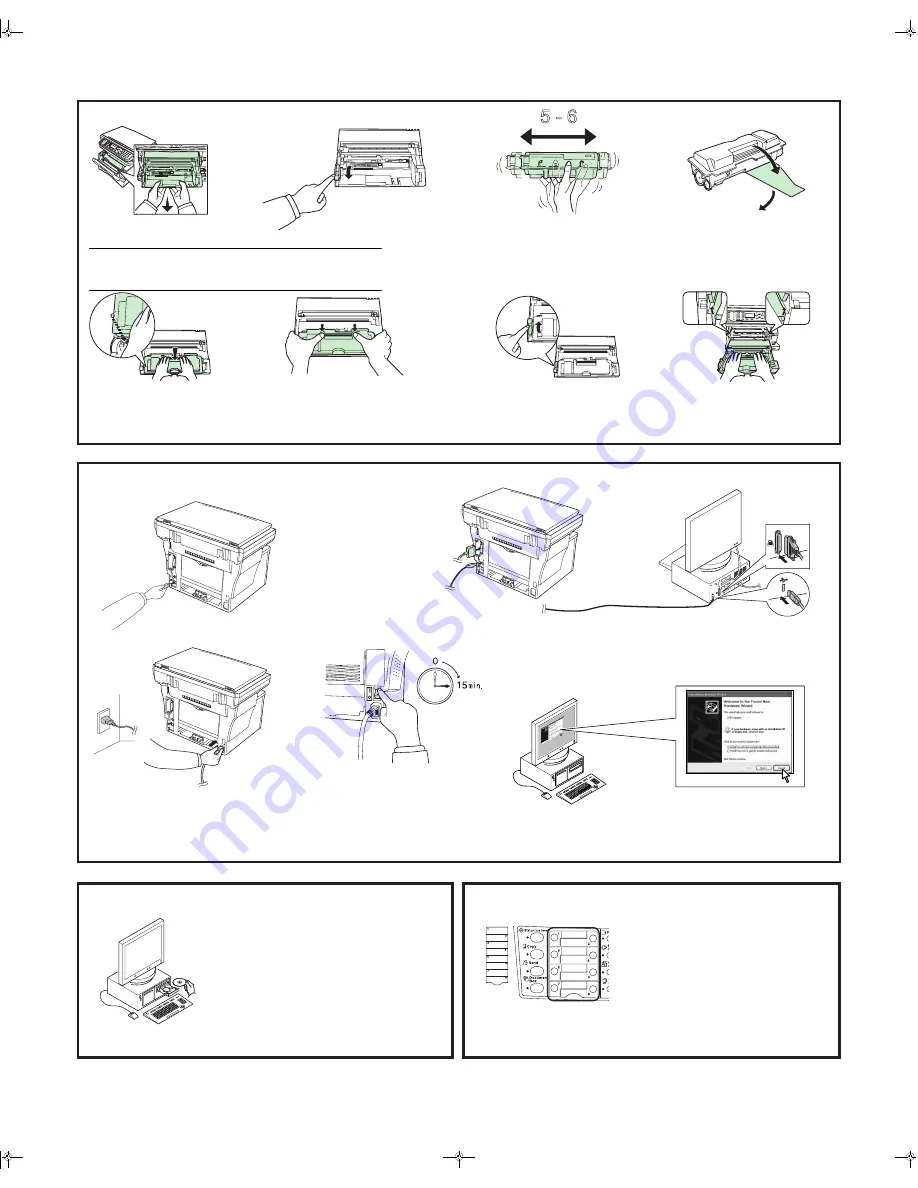
1.
Remove the process unit from the machine.
Install the Toner Container
2.
Move the lock lever to the
UNLOCK
position.
3.
Shake the toner container horizontally 5 or 6 times
so that the toner inside becomes evenly distributed.
5.
Align the knob on the left side of the container
with the groove in the process unit and place the
toner container into the process unit.
4.
Remove the orange protective seal.
6.
Push on the
PUSH HERE
marks on the toner
container until the container clicks into place.
7.
Push the lock lever back into its
LOCK
position (away from you).
8.
Align the pins on both sides of the process unit with
the guides inside the machine, and slide the
process unit into the machine until it stops.
Close the front cover and top cover.
Connect the Machine
1.
Network Interface
When connecting to a network, plug the
network cable into the network interface
connector at the rear of the machine.
Connect the other end of the cable to your
network device.
Make network settings (refer to the
Operation Guide
).
2.
Parallel and USB Interface
When connecting to the parallel and USB interfaces, plug one end into the appropriate port at the
rear of the machine and the other end to the appropriate port on your computer.
3.
Connect the power cord to the machine
and the other end into a power outlet.
4.
Turn the power switch to on ( | ).
The machine will begin replenishing the toner; this will take
approximately 15 minutes.
Once the toner has been replenished,
Ready to copy
will appear
on the message display and the
Start
key will light.
If the Welcome to the Found New Hardware Wizard is displayed on the PC click
Cancel
.
For more information on the machine, refer to the
Operation Guide
.
©2005 KYOCERA MITA Corporation
2-28 1-Chome, Tamatsukuri, Chuo-ku, Osaka 540-8585, Japan
Printed in China 302GM56710 Revision 1.0 2005.2
IMPORTANT:
Place the process unit on a clean, level surface where it will not be
exposed to any sort of impact or shock. The drum in the process unit is sensitive to
light and should not be exposed to normal office lighting for more than five minutes.
Install the Software
Insert the CD-ROM in the PC. The opening screen is displayed.
Follow the instructions on the screen to install the software.
If the installation program fails to launch, use Windows Explorer
to access the CD-ROM and select Setup.exe.
The one-touch key sheet allows you to record destination
information registered under the one-touch keys. Place the
sheet next to the one-touch keys.
Enter the destinations onto the one-touch key sheet. (four
spare one-touch key sheets are included with the machine.)
Using the One-Touch Key Sheet
KM1820_ENG_IG 17_02_05.fm 2 ページ 2005年2月17日 木曜日 午後7時32分


