Kyocera FS-1110 Operation Manual Download Page 35

Loading Paper

2-13

6

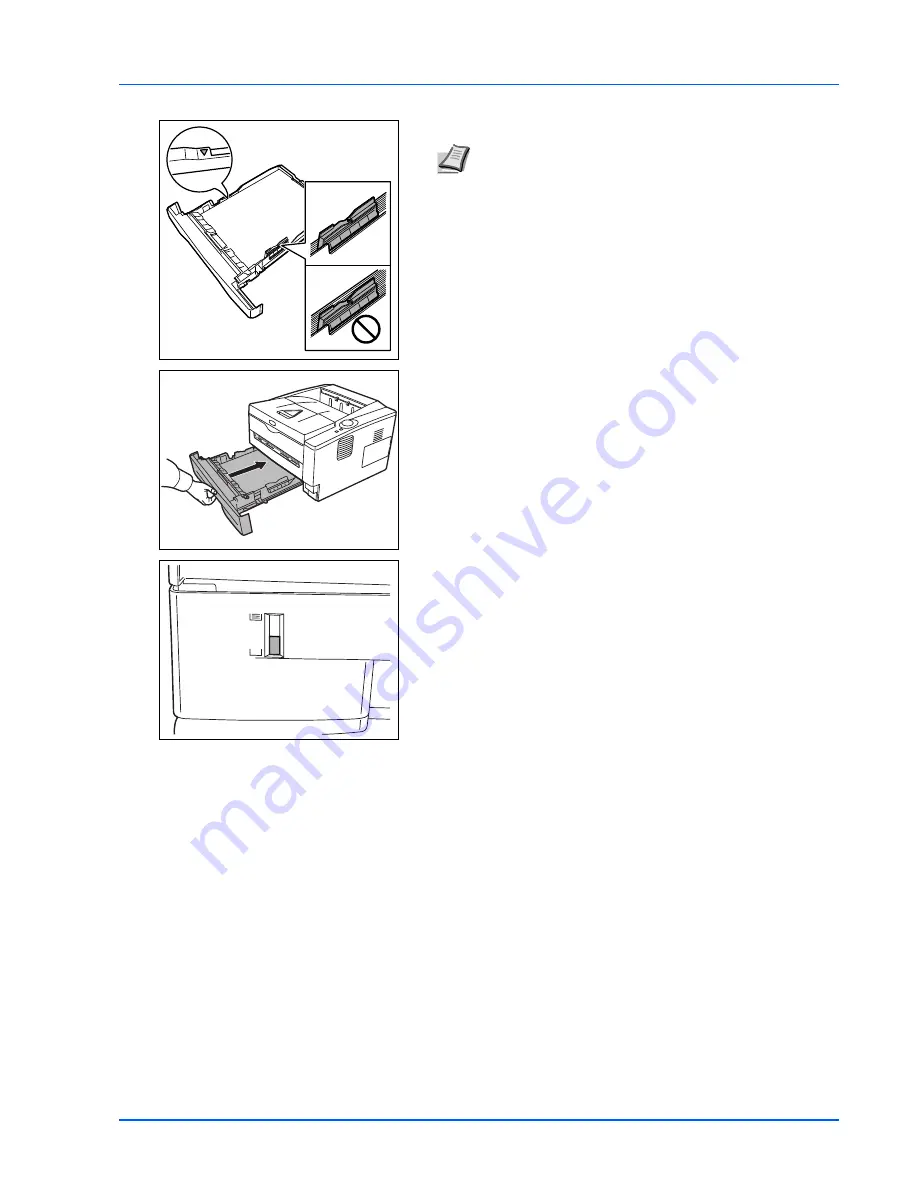
Insert the paper cassette into the slot in the printer. Push it straight in 
as far as it will go.

There is a paper gauge on the left side of the front of the paper 
cassette to indicate the remaining paper supply. When paper is 
exhausted, the pointer will go down to the level of (empty).

7

Specify the paper size and type for the 

cassette

 using Configuration 

Tool. For more information, refer to 

Configuration Tool 

on page

3-11

.

Note

Do not load paper above the triangle mark located on 

the width guide.

Summary of Contents for FS-1110

Page 1: ...FS 1110 OPERATION GUIDE...

Page 2: ...rty supplies in this machine A label shown in the illustration assures that the supplies are our own brand Note This Operation Guide contains information that corresponds to using both the inch and me...

Page 3: ...14 3 Connecting and Printing 3 1 Connections 3 2 Installing the Printer Driver 3 3 Printing 3 5 Status Monitor 3 7 Configuration Tool 3 11 Uninstalling Software 3 14 4 Maintenance 4 1 General Informat...

Page 4: ...ii...

Page 5: ...rior written consent of Kyocera Mita Corporation is prohibited Any copies made of all or part of this guide or any copyrightable subject must contain the same copyright notice as the material from whi...

Page 6: ...ghts in the Programs 1 License Under this license you may use the Programs only with the device on which they are installed and transfer possession of the Programs and the device to another party If y...

Page 7: ...the Program in Canada this license is governed by the laws of the Province of Ontario Otherwise this license is governed by the laws of the country in which you acquired the Program Monotype Imaging L...

Page 8: ...n connection with the Software and Typefaces is repair or replacement of defective parts upon their return to Monotype Imaging 10 IN NO EVENT WILL MONOTYPE IMAGING BE LIABLE FOR LOST PROFITS LOST DATA...

Page 9: ...ct the equipment into an outlet on a circuit different from that to which the receiver is connected Consult the dealer or an experienced radio TV technician for help The use of a non shielded interfac...

Page 10: ...iance is mandatory for products marketed in the United States A label indicating compliance with the CDRH regulations must be attached to laser products marketed in the United States Canadian Departme...

Page 11: ...e printer function remains in a waiting state but power consumption is still reduced to a minimum when there is no activity with the printer within a set amount of time Sleep Mode This printer automat...

Page 12: ...ive to order a replacement if the safety warnings in this Operation Guide are illegible or if the guide itself is missing fee required DANGER Indicates that serious injury or even death will very poss...

Page 13: ...ring printing some ozone is released but the amount does not cause any ill effect to one s health If however the machine is used over a long period of time in a poorly ventilated room or when printing...

Page 14: ...rinting This chapter explains how to install the printer driver print from your PC and use the application software included in the CD ROM 4 Maintenance This chapter explains how to replace the toner...

Page 15: ...Do not remove the toner container from the carton until you are ready to install it in the printer Important Used to provide important information IMPORTANT Take care not to touch the transfer roller...

Page 16: ...Introduction xiv...

Page 17: ...1 Machine Parts This chapter identifies machine parts indicators and operation panel keys Components at the Front of the Printer 1 2 Components at the Rear of the Printer 1 3 Operation Panel 1 4 Indic...

Page 18: ...1 2 Machine Parts Components at the Front of the Printer 1 Top Cover 2 Paper Stopper 3 Top Tray 4 Operation Panel 5 Paper Cassette 6 Front Cover 7 Manual Feed 1 2 3 4 5 6 7...

Page 19: ...Machine Parts 1 3 Components at the Rear of the Printer 8 USB Interface Connector 9 Rear Cover 10 Power Cord Connector 11 Power Switch 10 8 11 9...

Page 20: ...1 4 Machine Parts Operation Panel 1 Ready Indicator 2 Attention Indicator 3 Toner Indicator 4 Data Indicator 5 Paper Indicator 6 Jam Indicator 7 Cancel Key 8 GO Key 2 1 3 4 5 6 7 8...

Page 21: ...The printer is not processing data Jam Amber Lit A paper jam has occurred or the cassette is not inserted properly Off The printer status is normal Paper Amber Lit The paper has run out when printing...

Page 22: ...or 1 second or more Cancels the data from the PC GO At Ready Press momentarily Switches On line Off line Press for 3 to 9 seconds Prints the status page Press for 10 seconds or more Prints the service...

Page 23: ...specifications for this printer and how to load paper into the cassette or Manaul Feed tray General Guidelines 2 2 Selecting the Right Paper 2 4 Paper Type 2 10 Preparing the Paper 2 11 Loading Paper...

Page 24: ...he paper is cut The higher the grade of paper you use the less risk there will be of paper jams and other problems and the higher the level of quality your printed output will reflect Differences betw...

Page 25: ...than JIS B6 postcards and envelopes the Manual Feed tray must be used 105mm 4 1 8 inches 216mm 8 1 2 inches 356mm 14 inches Minimum Paper Size Maximum Paper Size Paper cassette 70mm 2 3 4 inches 148m...

Page 26: ...e 0 7mm for the length and width The angle at the corners must be 90 0 2 Manual Feed Tray Envelope Monarch Envelope 10 Envelope 9 Envelope 6 Envelope C5 Envelope DL Legal Letter Statement Oficio II Ex...

Page 27: ...etric grams per square meter g m The shaded part indicates the standard weight Thickness The paper used with the machine should be neither extremely thick nor extremely thin If you are having problems...

Page 28: ...hort grain Short grain paper can cause feeding problems in the machine All paper used in the machine should be long grain Other Paper Properties Porosity Indicates the density of paper fiber Stiffness...

Page 29: ...fusing during the printing process Transparencies must be placed on the Manual Feed tray with the long edge towards the printer Labels Labels must be fed to the Manual Feed Tray One label can be loade...

Page 30: ...at of ordinary paper it is not always possible to ensure consistent printing quality over the entire envelope surface Normally envelopes have a diagonal grain direction Refer to Paper Grain on page 2...

Page 31: ...Preprinted paper should satisfy the same conditions as white bond paper Refer to Paper Specifications on page 2 2 The preprinted ink must be able to withstand the heat of fusing during the printing pr...

Page 32: ...r and Configuration Tool The following types of paper can be used Paper Type Paper source Manual Feed tray Paper Cassette Plain Yes Yes Transparency Yes No Preprinted Yes Yes Labels Yes No Bond Yes Ye...

Page 33: ...loading Failure to do so may result in a paper jam Loading Paper into Cassette 250 sheets of 11 8 1 2 or A4 paper 80 g m may be loaded into the Cassette 1 Pull the cassette completely out of the print...

Page 34: ...ed 4 Adjust the paper length guide to the paper size required If you are going to use paper that is longer than A4 pull out the extension paper cassette by pushing the release lever one by one and adj...

Page 35: ...of the front of the paper cassette to indicate the remaining paper supply When paper is exhausted the pointer will go down to the level of empty 7 Specify the paper size and type for the cassette usin...

Page 36: ...far as it will go When loading envelope place with the envelope flap closed and keep the printing side face up Insert envelope against the guide with the flap on the front or left side until they stop...

Page 37: ...Loading Paper 2 15 Paper Stopper Open the paper stopper shown in the figure 1 2...

Page 38: ...2 16 Loading Paper...

Page 39: ...is chapter explains how to start up the printer print from your PC and use the application software included in the CD ROM Connections 3 2 Installing the Printer Driver 3 3 Printing 3 5 Status Monitor...

Page 40: ...onnector at the rear of the printer 2 Connect the other end of the power cord to a power outlet 3 Press the Power Switch to On The printer begins to warm up Note Use a USB cable with a rectangular Typ...

Page 41: ...reement and read the License Agreement Click Accept 4 Click Install software The print system detection window appears and the installer detects the connected printer If the installer does not detect...

Page 42: ...the printer installation wizard and return the CD ROM main menu If the device setup dialog box appears after you click Finish you can specify the settings for items such as optional features installed...

Page 43: ...ROM About KX Driver KX Driver consists of the following tabs Quick Print Use this tab to define basic print options into group profiles that can be accessed quickly and easily Basic Use this tab to s...

Page 44: ...An instruction sheet is available to assist with loading the sheets in the correct orientation and order 1 Ensure Cassette 1 is selected as the Source in the Print Properties dialog box 2 Select Prin...

Page 45: ...l be printed Status Monitor The Status Monitor monitors the printer status and provides an ongoing reporting function It also allows you to specify and modify settings for printers not included in the...

Page 46: ...in the menu to exit the Status Monitor Exit automatically The Status Monitor automatically shuts down after 5 minutes if it is not being used Screen Overview The screen overview of the Status Monitor...

Page 47: ...t this check box to enter text you would like to hear played for events Although a sound file is unnecessary this function is applicable To use this function follow these steps 1 Select Enable Event N...

Page 48: ...Appearance tab is contains the following items Enlarge window Doubles the size of the Status Monitor window Always on top Positions the Status Monitor in front of other active windows Transparency Dis...

Page 49: ...ration Tool window appears Exiting the Configuration Tool Use either of the methods listed below to exit the Configuration Tool Exit using the Close button Click in the top right corner of the Configu...

Page 50: ...e engine firmware serial number total memory and number of printed pages Input Tab The Input tab displays information about the paper cassette and Manual Feed Tray of the machine such as the current p...

Page 51: ...mode of the printer for communication processing to the host Others Tab The Others tab enables you to configure the printer settings shown below Item Description Auto sleep Configures the amount of ti...

Page 52: ...ick Allow 3 Following the procedure used to install the printer driver click Remove Software The Kyocera Uninstaller wizard appears 4 Select the software package to remove 5 Click Uninstall The uninst...

Page 53: ...chapter explains how to replace the toner container and clean the printer General Information 4 2 Toner Container Replacement 4 2 Maintenance Kit Replacement 4 5 Cleaning the Printer 4 6 Prolonged Non...

Page 54: ...h roughly represents how much toner is left in the toner container First Toner Container The toner container packed with the new printer has to fill up the system when operating the first time Therefo...

Page 55: ...Kyocera Mita Corporation is not liable against any damages or problems arising from the use of toner containers other than those designated as original Kyocera toner containers For optimum performance...

Page 56: ...in the figure in order to distribute the toner evenly inside the container 4 Remove the label from the toner container 5 Install the new toner container in the printer Push firmly on the top of the co...

Page 57: ...ting that the maintenance kit should be replaced The maintenance kit must then be replaced immediately To replace the maintenance kit contact your service technician IMPORTANT When the waste toner in...

Page 58: ...replacement 1 Open the top cover and front cover 2 Lift the developer unit together with the toner container out of the printer 3 Remove the drum unit from the printer by holding the green levers with...

Page 59: ...ean the charger wire then return it to its original position CLEANER HOME POSITION 7 When cleaning is complete return the drum unit to the original position IMPORTANT Do not place the drum unit on end...

Page 60: ...4 8 Maintenance 8 Return the developer unit to its position aligning the guides at both ends with the slots in the printer Then close the front cover and top cover...

Page 61: ...should take to avoid possible damage that may occur when the printer is used next time Moving the Printer When you move the printer Move it gently Keep it as level as possible to avoid spilling toner...

Page 62: ...4 10 Maintenance...

Page 63: ...ubleshooting This chapter explains how to handle printer problems understand indicator combinations and clean paper jams General Guidelines 5 2 Print Quality Problems 5 3 Understanding Indicators 5 5...

Page 64: ...he job again Print quality is poor Refer to Print Quality Problems on page 5 3 Text is missing on the Windows test page This is a problem specific to the Windows OS It is not a printer problem It does...

Page 65: ...he front cover and check that the toner container is correctly installed in the printer Refer to Toner Container Replacement on page 4 2 Full single color printout Contact your service technician Drop...

Page 66: ...age 4 2 Check the developer unit and drum unit are installed correctly Refer to Cleaning the Printer on page 4 6 Dirt on the top edge or back of the paper If the problem is not solved even after print...

Page 67: ...then select Playback and Play to play the animation repeatedly Normal Indication The table below shows the indicator combinations when the printer status is normal IMPORTANT To play the animation you...

Page 68: ...e printer is receiving data Printing resumes when the GO is pressed The printer is printing the last page after waiting Printing is possible Offline status You cannot print but the printer can receive...

Page 69: ...5 7 The printer is in sleep mode The printer returns to online status when the GO is pressed the cover is opened and closed or the printer receives the print jobs Indicator Meaning Ready indicator is...

Page 70: ...aper specified by the printer driver Load the paper into the cassette 1 and then restart printing You can change the paper source by pressing the GO The paper sizes do not match If the paper size in t...

Page 71: ...ner After replacing the toner container clean the inside of the printer The installed toner container s regional specification does not match the printer s The manufacturer assumes no liability for pr...

Page 72: ...tor can indicate the location of the paper jam the component where the paper jam has occurred Remove the paper jam After removing the paper jam the printer will resume printing Possible Paper Jam Loca...

Page 73: ...med pages are reproduced normally after printing is resumed depends on the location of the paper jam Manual Feed Tray 1 Remove the paper jammed at the Manual Feed tray 2 Reload the Manual Feed tray Op...

Page 74: ...lly fed paper 3 Push the cassette back in securely The printer warms up and resumes printing IMPORTANT Do not try to remove paper that has already been partially fed Proceed to Inside the Printer on p...

Page 75: ...it from the printer by holding the green levers with both hands 4 If the jammed paper appears to be pinched by rollers pull it along the normal running direction of the paper IMPORTANT Do not try to r...

Page 76: ...to its position aligning the guides at both ends with the slots in the printer 6 Insert the developer unit together with the toner container back into the machine Close the top cover and the front cov...

Page 77: ...per is jammed inside the fuser unit open the fuser cover and remove the paper by pulling it out 2 Close the rear cover and open and close the top cover to clear the error The printer warms up and resu...

Page 78: ...5 16 Troubleshooting...

Page 79: ...Appendix 6 1 6 Appendix This section lists the following information of this printer Specifications 6 2 Environmental Standard Requirements 6 4...

Page 80: ...Envelope 10 Envelope 9 Envelope 6 3 4 Envelope Monarch Envelope DL Hagaki Ofuku Hagaki 16K Yokei 2 Yokei 4 Custom 70 148 to 216 356mm 2 13 16 5 13 16 to 8 1 2 14 inches Magnification ratio 25 to 400 1...

Page 81: ...quirements 120 V AC 60 Hz 8 0 A 220 to 240 V AC 50 60 Hz 4 2 A Power Consumption Maximum 899 W 120 V 963 W 220 to 240 V During printing 410 1 W 120 V 388 9 W 220 to 240 V During standby 7 7 W when Eco...

Page 82: ...hine conforms to the following environmental standard requirements Time for switching to Sleep mode default 15 minutes Durable paper for feeding Paper made of 100 recycled paper NOTE Contact your Deal...

Page 83: ...ng paper jams 5 13 maintenance 4 6 Drum unit clearing paper jams 5 13 maintenance 4 6 E Energy Star ix Envelope 2 8 Environmental standard requirements 6 4 Error indication indicators 5 9 F First cont...

Page 84: ...2 8 Power cord connection 3 2 Power cord connector components 1 3 Power switch components 1 3 Preparing paper 2 11 Preprinted paper 2 9 Print quality problems troubleshooting 5 3 Prolonged non use 4...

Page 85: ......

Page 86: ......

Page 87: ......

Page 88: ...First edition 2010 11 2M1KMEN001...

Reviews: