Kyocera FS-1050 - B/W Laser Printer Installation Manual Download Page 8

6

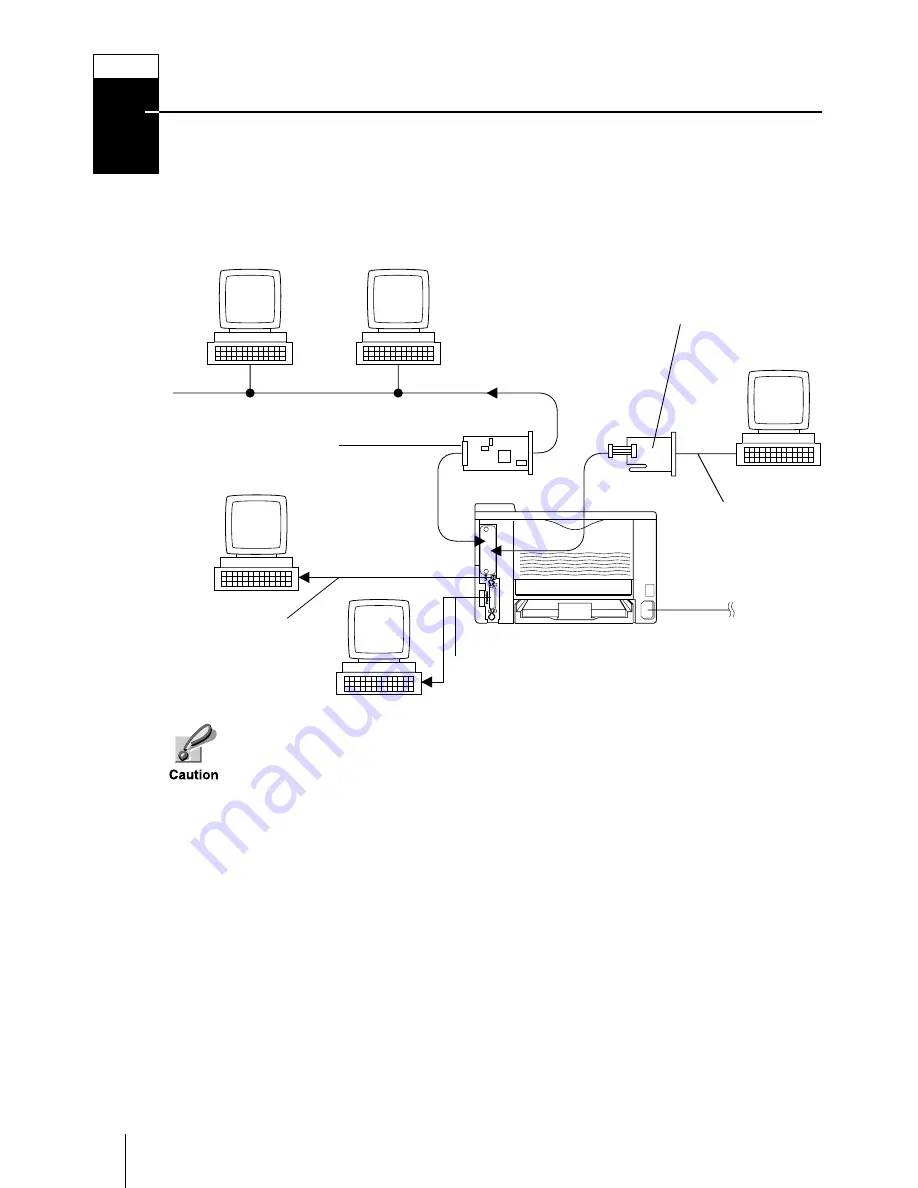
Connecting the Printer to the Computer

There are various ways of connecting the printer to the computer, such as through the 

parallel interface connector, through the USB (Universal Serial Bus) interface connec-

tor, through the optional serial interface board kit (IB-10E) or through the  optional net-

work interface board.

Printer Connections

Before performing this step, be sure to turn off both the printer and the com-
puter’s power switches and unplug the printer’s power plug from the power 
outlet. Failure to do so may result in electrical shock.

The standard Centronics parallel interface connector and USB interface connec-
tor are located on the rear of the printer.

STEP

4

Printer (Rear)

Optional Serial Interface 

Board kit (IB-10E)

Parallel Interface

Network

Optional Network 

Interface Board

(DC 3.3V)

Serial Interface

Power Supply

USB 

Interface

Summary of Contents for FS-1050 - B/W Laser Printer

Page 1: ...Page Printer Installation Guide ...

Page 2: ... defects in the printer s firmware contents of its read only memory This manual any copyrightable subject matter sold or provided with or in connection with the sale of the page printer are protected by copyright All rights are reserved Copying or other reproduc tion of all or part of this manual any copyrightable subject matter without the prior written consent of Kyocera Corporation is prohibite...

Page 3: ...onents below Shipped Components Removing Shipping Material Remove the tape on the rear side of the printer and remove the two spacers and printed notice from the paper cassette STEP 1 Printer Power Cord Toner Container TK 17 Installation Guide this booklet Kyocera Mita Digital Library CD ROM Cleaning Cloth Tape Spacers Printed Notice ...

Page 4: ...of hot or cold air Direct drafts from outside Avoid locations near building entrances Sudden temperature or humidity changes Sources of high temperature for example near stoves or radiators Excessive dust Vibration Unstable surfaces and surfaces that are not level Ammonia or other harmful fumes If you are planning to fumigate the room or make liberal use of insecticide remove the printer first Exc...

Page 5: ...the printer top cover all the way 2 Confirm that the lock lever is in the release UNLOCK position If not pull it forward until it is in the release posi tion 3 Take the toner container from the bag Hold it with the protective seal orange colored facing up Shake the toner con tainerhorizontallyatleast5times This ensures that the toner is evenly distrib uted inside STEP 3 ...

Page 6: ...4 4 Carefully remove the protective seal 5 Install the toner container into the printer 6 Push firmly on the top of the toner con tainer at the positions marked PUSH HERE ...

Page 7: ...k LOCK position 8 Close the top cover To remove the toner container Pull the lock lever 1 to the release UNLOCK position pull the lock lever 2 then gently remove the toner con tainer LOCK UNLOC K LO CK UN LO CK Lock Lever 2 Lock Lever 1 ...

Page 8: ...ard Printer Connections Beforeperformingthisstep besuretoturnoff boththeprinterandthecom puter spowerswitchesand unplugtheprinter spowerplugfromthepower outlet Failure to do so may result in electrical shock The standard Centronics parallel interface connector and USB interface connec tor are located on the rear of the printer STEP 4 Printer Rear OptionalSerialInterface Board kit IB 10E Parallel I...

Page 9: ... on both sides to fix the connector in place Plug the other end of the printer cable into the computer s Centronics parallel interface connector USB Universal Serial Bus Interface Connection 1 Plug one end of the USB cable on the rear of the printer Use a cable that complies with Revision 1 1 ofUSBstan dard a rectangular Type A plug and a square Type B plug The connecting cable should be shielded ...

Page 10: ...ed the total length of the power cord plus extension should be 5 meters 17 feet or less Power Requirements To Connect the Power Cord Be sure the printer s power switch is turned off Only use the power cord supplied with the printer 1 Plug the power cord into the power cord connector on the rear of the printer 2 Connect the other end of the power cord into a power outlet Be sure to connect to a 3 w...

Page 11: ...lowing paper weights can be used with the printer The edges of paper are sharp When loading paper be careful not to cut your hand on the paper Paper cassette Standard paper sizes are attached to the inside of the paper cassette as shown in the following figure Align the paper guides and paper stopper to the paper size you want to print on as described on the next page Paper source Paper weight Pap...

Page 12: ...the desired paper size Whenusingcustomsizepaper movethe paper guides and paper stopper all the way out insert the paper then adjust the paper guides and paper stopper to thesizeofthepaper Adjustthemsothat they are in light contact with the paper The printer does not automati callydetectthesizeofthepaper loaded into the paper cassette or MP tray As a result when ever you load paper having a differe...

Page 13: ...orepaperthanwill fit under the load limits on the top of the paper guides the papercassettewill hold approx imately250sheetsofpaperwith a 80 g m 21 lb basis weight or with a thickness of 110 microns 5 Insert the paper cassette into the slot in the printer Push it straight in as far as it will go Load Limit ...

Page 14: ... For stan dard paper sizes slide the guides to the position marked correspondingly Do not load more paper than will fit under the load limits on the inside of the MP tray If the paper is considerably curled in one direction for example if the paper is already printed on one side try to roll the paper in the opposite direction to counter act the curl Printed sheets will then come out flat Subtray F...

Page 15: ...p using the face up tray Refer to Step 7 Sometypesofenvelopesarenotsuitable for printing For details on suitable types of envelopes see the Operation Guide contained as an electronic file in the CD ROM supplied with the printer To close the MP tray Close the flap on the subtray then push in the subtray and close the MP tray Be careful not to push the tray back into the printer with the subtray fol...

Page 16: ...r to be stacked with the printed side facing up reverse order or when you are printing on envelopes postcards trans parencies or thick paper 1 Pull on the face up output tray to open it 2 Open the extension tray by pressing with your thumbs at the corners next to the hinges STEP 7 ...

Page 17: ... printer gets ready to print as the developerunit needs to be filled with toner During this period the message display shows Please wait Adding toner 2 Wait until the READY indicator is also lit and the message display indicates Ready The printer is ready to print Selecting a Message Language The default message language is English To change the message language to another follow the procedure des...

Page 18: ... the printer print a status page indicating factory settings 1 Press the MENU key on the operator panel 2 Press the or key repeatedly until the message displayshowsPrint Sta tus Page 3 Press the ENTER key twice The mes sage display indicates Processing during printing of the status page then returns to Ready If the status page prints correctly printer setup is complete For details on using the pri...

Page 19: ...the jammed paper openand close thetop cover once Jam at the Face down and Face up Trays Open the face up tray and remove the jammed paper as shown in the figure Jam at the Paper Cassette Pull out the paper cassette and remove the jammed paper Jam Inside the Printer 1 Open the printer s top cover Face up Tray Paper Cassette Top Cover ...

Page 20: ...of the printer 4 Remove the jammed paper When pulling the paper pull gently so as not to tear it Torn pieces of paper are difficult to remove and may be easily over looked preventing recovery from the jam 5 Replace the process unit and toner con tainer then close the printer Front Cover Process Unit ...

Page 21: ...Safety information Laser notice This printer is certified as Class I laser product conforming to the requirements of IEC 60825 DANGER INVISIBLE LASER RADIATION WHEN OPEN AVOID DIRECT EXPOSURE TO BEAM Caution labels Ozone concentration The printers generate ozone gas O3 which may concentrate in the place of installation and cause an unpleasant smell To minimize concentration of ozone gas to less th...

Page 22: ... cord 8 If an extension cord is used with this product make sure that the total of the ampere ratings on the products plugged into the extension cord do not exceed the extension cord ampere rating 9 Neverpushobjectsofanykindintothisproductthroughcabinetslotsastheymaytouchdangerous voltage pointsorshortoutparts thatcouldresultina riskoffireorelectricshock Neverspill liquid of any kind on the produc...

Page 23: ...nformity Australia Manufacturer s name Kyocera Corporation Printer Division Manufacturer s address 2 14 9 Tamagawadai Setagaya Ward Tokyo 158 8610 Japan declares that the product Product name Page Printer Model number FS 1050 as tested with the enhancement optional unit PF 17 Description of device The model FS 1050 is a 14 ppm A4 size plain paper supporting page printer utilizing laser dry toner e...

Page 24: ...Non use If you ever leave the printer unused for a long period of time remove the power cord from the wall outlet We recommend you consult with your dealer about the additional actions you should take to avoid possible damages that may occur when the printer is used next time Moving the Printer When you move the printer Move it gently Keep it as level as possible to avoid spilling toner inside the...

Page 25: ...printer power consumption refer to the CD ROM instruction manual provided with the printer Initial settings of the sleep timer function and power saved using the sleep timer function ENERGY STAR program guideline Group for Energy Efficient Appliances GEEA The goal of GEEA is efficient use of energy This product has a high effi ciency profile and meets the criteria for receiving the GEEA Label GEEA...

Page 26: ...ur Kyocera Mita dealer for purchasing information of the memory DIMM and memory card CF that are best suited for use with this printer Network Interface Cards See your Kyocera Mita dealer for purchasing information of the network interface cards that is best suited for use with this printer Use only the network interface cards operating from DC 3 3V ...

Page 27: ...YOU WILL BE ASSUMED TO HAVE AGREED TO THESE TERMS AND CONDITIONS The Programs are licensed not sold IBM or the applicable IBM country organization grants you a license for the Programs only in the country where you acquired the Programs You obtain no rights other than those granted you under this license The term Programs means the original and all whole or partial copies of it including modified ...

Page 28: ...ation of remedies also applies to any developer of Programs supplied to IBM IBM s and the developer s limitations of remedies are not cumulative Such developer is an intended ben eficiary of this Section Some jurisdictions do not allow these limitations or exclusions so they may not apply to you 4 General You may terminate your license at any time IBM may terminate your license if you fail to comp...

Page 29: ...This page intentionally left blank ...

Page 30: ...This page intentionally left blank ...

Page 31: ...This page intentionally left blank ...

Page 32: ...curs Message Display Name Description INTERFACE Interface indicator The interface indicator shows which of the printer s interfaces is currently active The default is no selection SIZE Paper size indicator Indicates the paper size of the current paper cassette The default is A4 A4 size TYPE Paper type indicator Indicates the paper type of the current paper cassette The default is PLAIN Key Functio...

Reviews: