background image

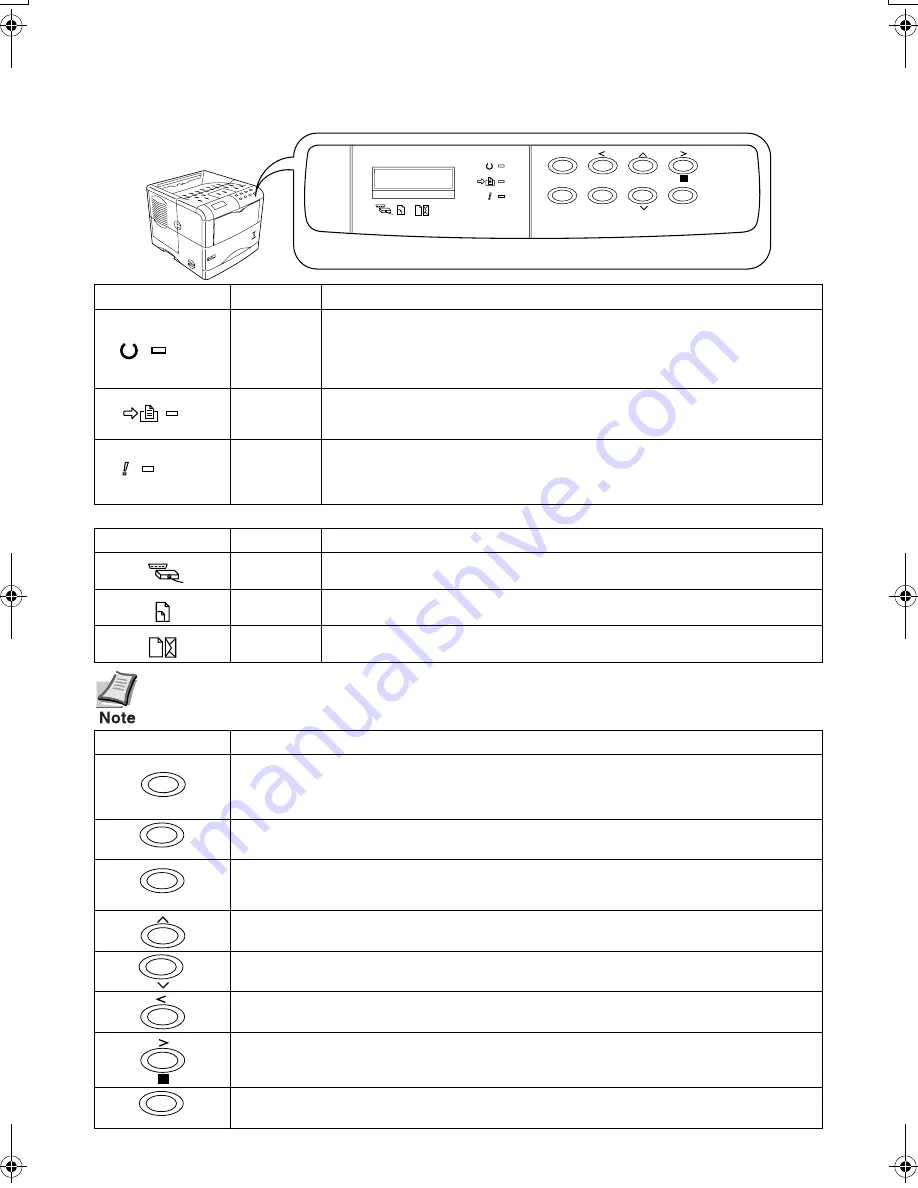
Operator Panel

For more details on operating procedures, see the 

Operation Guide

 contained as a PDF file 

in the CD-ROM supplied with the printer.       

If the number of pages to be printed is set to 2 or more, when printing starts, the lower line of 
the message display shows the 

number of printed pages/set number of pages 

to be printed.

2004. 1

Printed in Japan

7+AA

 Indicator

Name

Description

Ready 

indicator

Flashing:

 Indicates when an error occurs that you can clear by yourself.

Lit:


Indicates that the printer is on-line. Printing is possible.

Off:


Indicates that the printer is off-line. Data can be received but will not be 

printed. Also indicates when printing is automatically stopped due to occur-

rence of an error.

Data 

indicator

Flashing:

 Indicates data transfer is taking place.

Lit:

 Indicates either that data is being processed, or that data is being writ-

ten to the memory card.

Attention 

indicator

Flashing:

 Indicates when the printer needs maintenance attention or the 

printer is warming up (

Please wait

). 

Lit:

 Indicates when a problem or an error occurs that you can clear by yourself. 

(For example, paper jam occurs.)

Message Display

Name

Description

Interface 

indicator

The interface indicator shows which of the printer’s interfaces is currently 

active. The default is no selection (

---

).

Paper size 

indicator

Indicates the paper size of the current paper cassette. The default is A4 (

A4

size.

Paper type 

indicator

Indicates the paper type of the current paper cassette. The default is 

PLAIN

.

 Key

Function

• Switches the printer on-line and off-line.

• Prints and feed out one page.

• Cancels specific errors.

• Wakes from sleep mode.
• Abandons a printing job, resets numeric values, or cancels a setting procedure.

• Used to stop the sounding of the alarm buzzer indicating the occurrence of an error.
• When pressed during mode selection, terminates the setting and returns to the 

Ready


condition.

• Used to select the emulation, font, character code set; to read an memory card and others.
Lets you access the desired item or enter numeric values. In some of the control procedures, 

the < and > keys are used to enter or exit the sub items.

Enables access to the desired item or entering of numeric values. In some of the control pro-

cedures, the < and > keys are used to enter or exit the sub items.

Used as the < key in the mode selection function.

• Used as the > key in the mode selection function.

• Displays online help messages on the message display when paper jam errors occur.

Finalizes numeric values and other selections.

GO

CANCEL

MENU

ENTER

READY

ATTENTION

INTERFACE SIZE

TYPE

DATA

?


Operator Panel

READY

DATA

ATTENTION

INTERFACE

SIZE

TYPE

GO

CANCEL

MENU

?

ENTER

FS3830NIG2.fm  34 ページ  2004年1月14日 水曜日 午後1時42分

Summary of Contents for DISCOVER FS-3830N

Page 1: ...Installation Guide FS 3820N FS 3830N Page Printers ...

Page 2: ...r s firmware contents of its read only memory This manual any copyrightable subject matter sold or provided with or in connection with the sale of the page printer are protected by copyright All rights are reserved Copying or other reproduction of all or part of this manual any copyrightable subject matter without the prior written consent of Kyocera Mita Corporation is pro hibited Any copies made...

Page 3: ... against the list of shipped components below List of Shipped Components STEP 1 Printer E D A B F C for U S A only Printer Power Cord F Installation Guide this booklet and other printed matter B CD ROMs B Waste Toner Box E Toner Container D Plastic Bag for Developer Unit A Dust Cover C for U S A only ...

Page 4: ...rom outside Avoid locations near building entrances Sudden temperature or humidity changes Sources of high temperature for example near stoves or radiators Excessive dust Vibration Unstable surfaces and surfaces that are not level Ammonia or other harmful fumes If you are planning to fumigate the room or make liberal use of insecticide remove the printer first Excessive sunlight or humidity Lack o...

Page 5: ... computer 1 Open the printer top cover all the way 2 Take the toner container from the bag 3 With the label side down thoroughly shake the toner container in the direc tion of the arrow ten times or more to loosen and mix the toner inside 4 Carefully remove the protective seal 5 Install the toner container into the printer STEP 3 Top Cover Toner Container 10 times or more Protective Seal ...

Page 6: ...r at the positions marked PUSH HERE Whenthetonercontainerfitsintoplace it will lock with a clicking sound 7 Close the top cover To remove the toner container Pull the lock lever blue colored to the right and gently lift the toner con tainer Lock Lever ...

Page 7: ... The waste toner box must be installed in the printer 1 Open the cap of the waste toner box 2 Open the left cover on the left side of the printer 3 Insert the waste toner box as shown in the figure The box will be locked when it fits into place STEP 4 Cap Waste Toner Box Left Cover ...

Page 8: ...6 4 Ensuring that it is correctly inserted close the left cover To remove the Waste Toner Box While holding the waste toner box press the lock lever and then gently remove the waste toner box Lock Lever ...

Page 9: ...his step be sure to turn off boththe printer and the com puter s power switches and unplug the printer s power plug fromthe power outlet Failure to do so may result in electrical shock Thestandard Centronicsparallelinterfaceconnector USBinterfaceconnec tor and network interface connector are located on the rear of the printer STEP 5 Printer Rear Power Supply Option Serial Interface Board Kit 3 3 V...

Page 10: ...erial Bus Interface Connection 1 Plug one end of the USB cable into the USB interface connector on the rear of the printer Use a cable that complies withRevision 2 0ofUSB stan dard a rectangular Type A plug or a square Type B plug The connecting cable should be shielded and not be longer than 5 meters 16 feet 2 Plug the other end of the USB cable into the computer s USB interface connec tor Networ...

Page 11: ...ion should be 5 meters 16 feet or less Power Requirements To Connect the Power Cord Be sure the printer s power switch is turned off Only use the power cord supplied with the printer 1 Plug the power cord into the power cord connector on the rear of the printer 2 Connect the other end of the power cord into a power outlet Be sure to connect to a 3 wire grounded power strip Voltage 120 V U S A and ...

Page 12: ...put into the printer on the operator panel Refer to the Operation Guide PDF file provided on the CD ROM Standard size paper settings are indi cated as fixed positions in the cassette The following paper weights can be used with the printer The edges of paper are sharp When loading paper be careful not to cut your hand on the paper Paper cassette Standard paper sizes are attached to the inside of t...

Page 13: ...rinter 2 Push the bottom plate down until it locks Standardpapersizesareattachedto the inside of the paper cassette as shown in the following figure In the paper cassette for U S A Legal size indication is also attached Paper Cassette Bottom Plate ...

Page 14: ...r on the left side guide and slide to the desired paper size 5 Adjust the position of the paper stopper located at the rear of the paper cassette Pull the release lever and slide the paper stopper to the desired paper size When shipped from the factory the paper cassette is set to A4 size When using other size paper move the paper guides and paper stopper all the way out insert the paper then adju...

Page 15: ...per into the paper cassette Do not load more paper than willfitundertheloadlimitson the paper guides The paper cassette will hold approximately 500 sheets of paper with a 80 g m 21 lb basis weight or with a thick ness of 0 11 mm 7 Set the stack of paper so that it is under the clips as shown Load Limit Load Limit Clip Clip ...

Page 16: ...f the paper cassette to indicate the remaining paper supply When paper is exhausted the pointer will go down to the level of empty 9 If you have installed a paper cassette that can hold the Legal size paper install the dust cover at the back of the printer TheLegalsizecassetteandthe dust cover are supplied for U S A only Removing the Dust Cover Paper Gauge ...

Page 17: ... MP tray Standard paper sizes are attached to the MP tray For stan dard paper sizes slide the guides to the position marked correspondingly 4 Align the paper with the paper guides and insert as far as it will go Do not load more paper than will fit under the load limits on the inside of the MP tray MP Tray A4 LTR B5 A5 Paper Guides Load Limit ...

Page 18: ...uides are opened as far as they will go Envelopes Envelopes should be fed in the face up position right edge first Test a sample envelope on the printer and check that printing quality is satisfactory before purchasing To avoid trouble we recommend that envelopes be delivered face up using the option rear tray Refer to next page Sometypesofenvelopesarenotsuitable for printing For details on suitab...

Page 19: ...ay when you wish paper to be stacked with the printed side facing up reverse order or when you are printing on envelopes postcards transparen cies or thick paper This rear tray is a separate option Legal Size A4 Size Letter Size Paper Stopper Rear Tray ...

Page 20: ... ready to print as the developer unit needs to be filled with toner During this period the message display shows Please wait Adding toner 2 Wait until the READY indicator is also lit and the message display indi cates Ready The printer is ready to print Selecting a Message Language The default message language is English To change the message language to another follow the procedure described belo...

Page 21: ...the printer print a status page indicating factory settings 1 Press the MENU key on the operator panel 2 Press the or key repeatedly until the message display shows Print Status Page 3 Press the ENTER key twice The mes sage display indicates Processing during printing of the status page then returns to Ready If the status page prints correctly printer setup is complete For details on using the pri...

Page 22: ...ulling the paper pull it gently so as not to tear it Torn pieces of paper are difficult to remove and may be easily overlooked deterring the jam recovery Jam at the Rear Cover 1 Whilepullingthepapertransferunitreleaselever greencolored pulloutthe paper transfer unit 2 Open the rear cover and remove the jammed paper as shown in the figure Paper Transfer Unit Paper Transfer Unit Release Lever green ...

Page 23: ...lloutthe paper transfer unit 2 If paper is jammed before the registration roller remove it as shown in A If paper is jammed under the registration roller remove it as shown in B Registration Roller Registration Roller Paper Transfer Unit Paper Transfer Unit Release Lever green colored A B ...

Page 24: ...o correct the interference by one or more of the following measures Reorient or relocate the receiving antenna Increase the separation between the equipment and receiver Connect the equipment into an outlet on a circuit different from that to which the receiver is connected Consult the dealer or an experienced radio TV technician for help Changes or modifications not expressly approved by the manu...

Page 25: ...ingsshould never be blocked by placing the product on a bed sofa rug or other similar surface This product should never be placed near or over a radiator or heat register This product should not be placed in a built in installation unless proper ventilation is provided 6 This product is equipped with a 3 wire grounding type plug a plug having a third grounding pin This plug will only fit into a gr...

Page 26: ...he cabinet has been damaged Canadian Department of Communications compliance statement This Class B digital apparatus complies with Canadian ICES 003 Avis de conformité aux normes du ministère des Communications du Canada Cet appareil numérique de la classe B est conforme à la norme NMB 003 du Canada ISO 7779 Maschinenlärminformationsverordnung 3 GSGV 18 01 1991 Der höchste Schalldruckpegel beträg...

Page 27: ...r Printer FS 3820N FS 3830N as tested with enhancement optional units PF 60 DU 61 SO 60 Trade Name Kyocera Responsible Party Kyocera Mita America Inc Address 225 Sand Road PO Box 40008 Fairfield New Jersey 07004 0008 U S A Telephone number 973 808 8444 Fax number 973 882 6000 Manufacturer s name Kyocera Mita Corporation Tamaki Plant Manufacturer s address 704 19 Nojino Tamaki Cho Watarai Gun Mie K...

Page 28: ...location remove the toner container waste toner box and developer unit The procedure for removing these is as follows 1 Remove the toner container and waste toner box from the printer Put the toner container into the plastic bag in which it was supplied to prevent spilling of toner Close the cap of the waste toner box tightly 2 Disconnect the connector of the developer unit from the printer and wh...

Page 29: ...by the printer For maximum power savings turn off the printer s power supply when not using the printer for extended periods of time For details on the sleep timer function and printer power consumption refer to the CD ROM instruction manual provided with the printer Initial settings of the sleep timer function and power saved using the sleep timer function ENERGY STAR program guideline Group for ...

Page 30: ...printing for short edge and long edgebinding Attachesto the bottom of the printer 6 Paper Feeder PF 60 Holds approximately 500 sheets of A5 to A4 Letter andLegalsizepaper Uptothreepaperfeederscan be attached to the bottom of the printer unit Other Options Paper Cassette PC 60LG Holds A5 to A4 Letter and Legal size paper Bulk Paper Feeder PF 8E Holds approximately 2 000 sheets of 76 to 216 mm 3 to ...

Page 31: ...s 1 License Under this license you may use the Programs only with the device on which they are installed and transfer pos session of the Programs and the device to another party If you transfer the Programs you must transfer a copy of this license and any other documentation to the other party Your license is then terminated The other party agrees to these terms and conditions by its first use of ...

Page 32: ...inter For pro tection against static discharge which may be applied to the printer s internal electronics through the interface connector s keep any interface connector which is not in use capped using the protective cap supplied Note Use shielded interface cable Safety Information Laser Safety This printer is certified as a Class 1 laser product under the U S Department of Health and Human Servic...

Page 33: ...This page intentionally left blank ...

Page 34: ...This page intentionally left blank ...

Page 35: ......

Page 36: ...which of the printer s interfaces is currently active The default is no selection Paper size indicator Indicates the paper size of the current paper cassette The default is A4 A4 size Paper type indicator Indicates the paper type of the current paper cassette The default is PLAIN Key Function Switches the printer on line and off line Prints and feed out one page Cancels specific errors Wakes from ...

Reviews: