KVM-TEC Scalable line Manual Download Page 34

34    |    kvm-tec

Misprints, errors and technical changes reserved

Misprints, errors and technical changes reserved

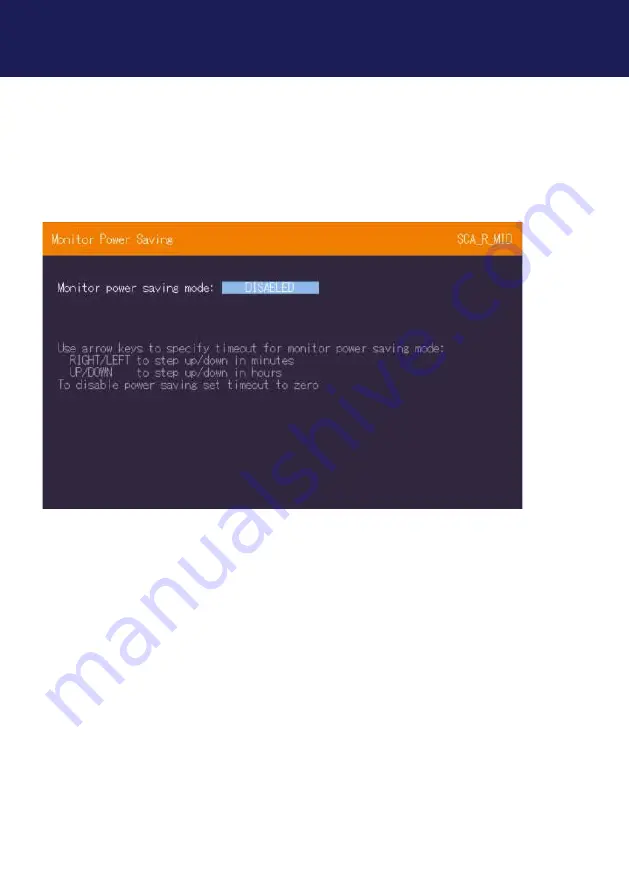
3.4.7 MONITOR POWER SAVE MODE

Power saving mode: The monitor turns off when no video signal is transmitted 

Press in the main menu the button “P” 

SCREEN „Monitor Power save mode“

3. MAIN MENU & SETTINGS

Summary of Contents for Scalable line

Page 1: ...K 5K 6990L ScalableLine Local 6990R ScalableLine Remote Full HD 6026L MAXflex Dual copper or 6024L MAXflex Dual Fiber 6990R ScalableLine Remote Special Version f r Videowall Funktion KT 6991L Scalable...

Page 2: ...ine Full HD 13 1 6 About the status LED 15 2 1 Unpacking and checking the content 16 2 Extender Installation 16 2 2 Installing the extender 17 2 3 Quickinstallation ScalableLine 4K 5K 18 2 4 Quickinst...

Page 3: ...s 31 3 4 5 Managing Local Settings 32 3 4 6 Video Sync Settings 33 3 4 7 Monitor power save mode 34 4 Global Settings 35 5 Windows Set up 36 5 1 Create Window 36 5 2 edit mode WINDOW 36 5 3 Connecting...

Page 4: ...s and technical changes reserved TABLE OF CONTENT 8 Cable specifications 43 8 1 Multi Mode standard 43 9 Switch specification 42 9 1 Switches 42 10 Warranty 43 10 1 extended warranty 43 11 Address pho...

Page 5: ...use glide Switch 4 Units in 1HE 16 Sources up to 16 sources can be displayed on one monitor scaled and ope rated as desired Move Images can be moved flexible across different monitors Cut it out Parts...

Page 6: ...They contain important information regarding safety use and disposal for every user of the ScalableLine Extender Please familiarise yourself with the information within prior to using your product Use...

Page 7: ...al All use other than that described in this manual is seen as unintended use Modifications in the course of technological progress are reserved In these user instructions the ScalableLine is referred...

Page 8: ...ack of experience and or knowledge unless they are supervised by a person who is responsible for their safety or provides them with instructions on how to use the product Danger Not for use in potenti...

Page 9: ...ot in use Danger Never touch the adapter with wet hands Use the product within the specified performance limits Do not place the product near heaters Do not drop or hit the product Unplug all connecti...

Page 10: ...B devices Operating temperature 0 C to 45 C 32 bis 113 F Storage temperature 25 C bis 80 C 13 to 176 F Relativ humidity max 80 not condensing Casing material anodized aluminum Dimension and Weight Loc...

Page 11: ...n Audio in from microphon 2 Audio out Audio out to speaker 3 RS232 RS232 plug 4 DC power supply for 12V 2A 5 DC power supply for 12V 2A 6 kvm link link for fiber cable main 7 kvm link link for fiber c...

Page 12: ...dio in from PC 2 Audio out Audio out to PC 3 RS232 RS232 plug 4 DC power supply for 12V 2A 5 DC power supply for 12V 2A 6 kvm link link for fiber cable main 7 kvm link link for fiber cable secondary 8...

Page 13: ...in Audio in from microphon 2 Audio out Audio out to speaker 3 RS232 RS232 plug 4 DC power supply for 12V 2A 5 DC power supply for 12V 2A 6 kvm link link for fiber cable main 7 kvm link link for fiber...

Page 14: ...dio in from PC 3 Audio out Audio out to PC 4 RS232 RS232 plug 5 DC Connection for 12V 2A power supply 1 DC Connection for 12V 2A power supply 2 6 kvm link link for fiber cable main 7 kvm link link for...

Page 15: ...play Autoupdate Mode fast flashing Update runs shining Update fails shining Update successful Bedeutung LED Anzeigen Color Light display Meaning shining only network connection available fast flashing...

Page 16: ...contains the following content 4K 5K 1x ScalableLine local Extender CPU 1x ScalableLine remote Extender CON 2 x 12 VDC 2 A power supply 1 x DP DP cable 1 8 m 5 9ft 1x USB A B cable 1 8m 5 9ft 2 x SFP...

Page 17: ...rmation before installing the product The units can be set up to access point to point or over a Switching System with a host computer In the case of the latter an additional 10 G Network Switch and a...

Page 18: ...ect the Audio cable from Remote Extender to Speaker 6 Connect the Audio Cable from Microphone to Remote Extender and connect the Audio cable from Local Extender to PC HAVE FUN Your kvm tec Extender is...

Page 19: ...nnect the screen on the remote side with the DP cable 5 Connect the Audio cable from PC to Local Extender and connect the Audio cable from Remote Extender to Speaker 6 Connect the Audio Cable from Mic...

Page 20: ...process The status LED blinks some seconds red and changes to green after a successful connection The monitor will displays your computer s desktop or any open applications 2 6 REPLACING THE SFP MODU...

Page 21: ...kvm tec 21 Misprints errors and technical changes reserved 2 EXTENDER INSTALLATION 2 7 REMOVING A FIBER CABLE To remove a fiber cable Press the latch down and slowly pull the cable out...

Page 22: ...22 kvm tec Misprints errors and technical changes reserved 2 EXTENDER INSTALLATION 2 8 BEST PRACTICE FOR WINDOWS 10 Disable USB Energy Savings in Windows 10...

Page 23: ...kvm tec 23 Misprints errors and technical changes reserved 2 EXTENDER INSTALLATION...

Page 24: ...24 kvm tec Misprints errors and technical changes reserved 2 EXTENDER INSTALLATION...

Page 25: ...one after the other The main menu and the overview of the submenus are displayed 3 To access a submenu press the corresponding key or navigate with the arrow keys up and down to the corresponding line...

Page 26: ...ys information about the connection the resolution of the video channel and the USB status The current Firmware version is displayed in the upper left corner The link status indicates whether a connec...

Page 27: ...the G key or by selecting the arrow keys you can enter the Settings menu where you can make all extender settings SCREEN Settings O DDC EDID Settings K Keyboard Locale DE S Keyboard Shortcuts F Keyboa...

Page 28: ...e O key to display the DDC option menu Press 1 to use the DDC information of the connected monitor CON Extender is connected The DDC information is automatically saved Press 2 for a fixed resolution o...

Page 29: ...K key or by selecting the arrow keys you enter the Keyboard Layout Selection menu The Keyboard Layout menu allows you to switch between the keyboard layouts that you can use to navigate the On Screen...

Page 30: ...ou want to change one of the shortcuts you have to press the letter specified for the shortcut Now you can press any key or key combination Please note that only a key combination with the keys 1 or F...

Page 31: ...with key V 3 4 4 MOUSE SETTINGS By pressing the M button or by selecting the arrow buttons you enter the Mouse Settings menu With the M button you will open the Mouse Settings where you can adjust th...

Page 32: ...ed 3 4 5 MANAGING LOCAL SETTINGS By pressing the L key or by selecting the arrow keys you can access the Menu Local Settings Press the L key to open the Local Settings Here you will find the Remote Wa...

Page 33: ...n or selecting the arrow buttons selects the Video Sync Settings menu SCREEN Video Sync Settings This feature can be used to determine the control loop for video synchronization The following modes ca...

Page 34: ...s and technical changes reserved 3 4 7 MONITOR POWER SAVE MODE Power saving mode The monitor turns off when no video signal is transmitted Press in the main menu the button P SCREEN Monitor Power save...

Page 35: ...TINGS Pressing the F key takes you to the Global Settings SCREEN Global Settings Scenario User defined Layouts Default Layout Defaukt Layouts Frame Color of the window frame Grid changes the size of t...

Page 36: ...nd Alt keys at the same time you activate the window editing mode which allows you to control the size spacing and placement of each window How it works Our scalable devices emulate a computer mouse c...

Page 37: ...reserved 5 WINDOWS SETUP 2 Drag the corner of the window or move the mouse scroll wheel to resize it SCREEN Scaling an OSD window using our KVM emulated cursor EXITING WINDOW EDITING MODE Editing Mode...

Page 38: ...her kvm tec extender How it works 1 Point with the mouse to the window to which you want to connect want to connect to 2 Press Ctrl Alt right mouse button 3 In the connection window that opens select...

Page 39: ...able Settings Window Resolution Aspect Ratio Cut out Layer Set to Foreground If several windows overlap this key brings the currently selected window to the foreground and ovverlaps the other windows...

Page 40: ...ntries that operate separate collection systems for waste electrical and electronic equipment By disposing of the product in the proper manner you help to avoid possible hazards for the environment an...

Page 41: ...he remote Unit is causing the problem by swaping first the local and than the remote Unit to ano ther Unit Contact kvm tec support Check if all cables are plugged in correctly Check if the PC is sendi...

Page 42: ...p even if only one connection is established This process is repeated cyclically so that the switch keeps the multicast group active One exception is the Gateway2Go which uses unicast and communicates...

Page 43: ...y expires in case of External effort improper maintenance Violation of the operating instructions lightning damage Please contact us first before returning the product 10 1 EXTENDED WARRANTY 2 years s...

Page 44: ...Tattendorf Austria Phone 0043 0 2253 81 912 Fax 0043 0 2253 81 912 99 Email support kvm tec com Web www kvm tec com Find our newest updates and FAQs on our homepage 11 ADDRESS PHONE EMAIL kvm tec Inc...

Page 45: ...kvm tec 45 Misprints errors and technical changes reserved 12 NOTES...

Reviews: