First
Aid
kvm-tec
line
master
Delivery content
LOCAL/CPU Unit
1 x MVX 2 local (CPU)
1 x wall power supply unit l 12V 1A (EU-plug or
INT plug)
2 x DVI - DVI cable 1,8m/5.9ft
1 x USB cable 1,8m/5.9ft
1 x VGA – DVI cable 1,8m/ 5, 9 ft. (opt)
2x Audio Cable 1,8m /5.9ft (opt)
4 x rubber feet
REMOTE/CON Unit
1 x MVX2 remote (CON)
1 x wall power supply unit 12V 1A (EU-plug or
INT. plug)
4 x rubber feet
for your FIBER Extender
4 x SFP Module-Multimode up to
500m/1640 ft.
alternativ with Single-Mode up to 20km/12mi-
ItemNr6831
possible upgrades for MASTERLINE MVX2
USB Memory
Analog VGA- transmitted as DVI
(included in US)
Sound analog in both directions as CD quality
Matrix Switching System up to 48 endpoints
( included in US )
to unlock upgrades, please send an email or give us a
calll. Please have your ID code ready.( you fi nde your ID
in the OSD menu by pressing the button „M“ - Device ID
You´ll get a code from our support team.
Please, enter the code
12
13
14
15
18
19
17
16
MVX2
digital kvm-extender
power/status
20
power/status
MVX2
digital kvm-extender
power/status
power/status
5. Audio to PC
6. Audio
fr
om PC
4. D
VI in
fr
om PC
4. D
VI out
to Monitor
4. D
VI in
fr
om PC
1. power
plug 12V 3A
2. USB fr
om
ke
yboar
d and mouse
6. Audio fr
om
micr
ophone
5. Audio to
speak
er
3. Network cable CAT5e/6/7/ up to 150m/492ft
2. USB zu PC
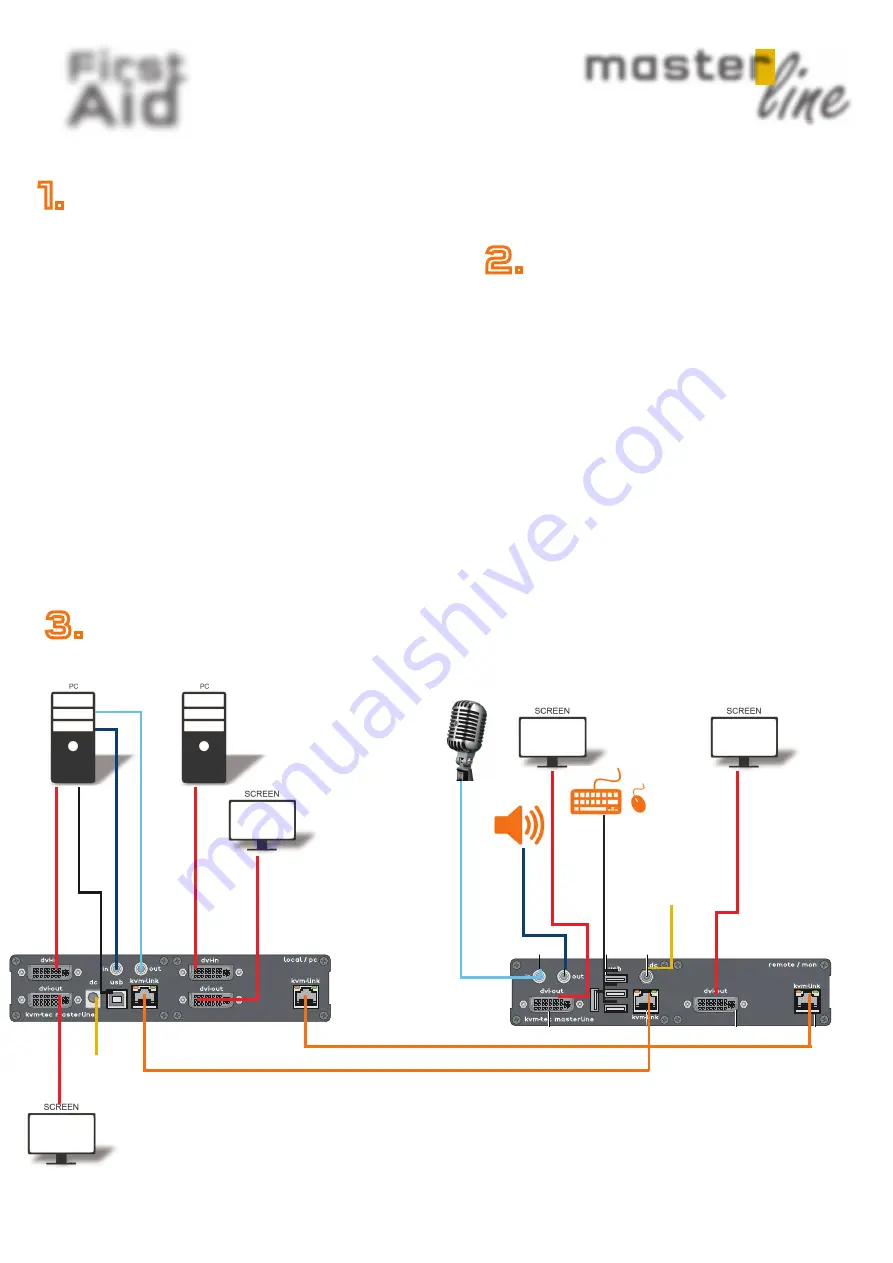
Quick Installation MVX2 MASTERLINE
local / CPU – remote/ CON
1. Connect the CON / Remote and the CPU / Local Unit with the included 12V 2A power supply.
2. Now connect the USB cable to a USB port on your PC and connect the other end of the USB cable to the CPU / Local Unit.
Connect keyboard and mouse to the CON / Remote Unit.
3. Connect the CPU / Local and the CON / Remote Unit with two network cables.
4. Now connect the DVI cable to the DVI socket of the PC and the other end to the DVI socket of the CPU / Local Unit (DVI-in).
Then connect the monitor to the CON / Remote Unit with a DVI cable.
5. Then connect PC audio out with the audio cable to Local Audio in. Then connect audio / out via the audio cable
6. Almost done! Now connect the audio cable Local Audio / out to the PC Audio in and Remote Audio / out with the audio
cable to the microphone.
HAVE FUN - your kvm-tec Extender is now in use for many years (MTBF approx 10 years)
1. power
plug 12V 3A
3. Network cable CAT5e/6/7/ up to 150m/492ft
4. D
VI out
to Monitor
4. D
VI out
to Monitor
4. D
VI out
to Monitor
1.
First check your delivery content for MVX2...
2.
Are your upgrades for
MASTERLINE unlocked
3.
Than check your installation....


