background image

TracVision R5SL

4

Gyro Replacement Instructions

g.

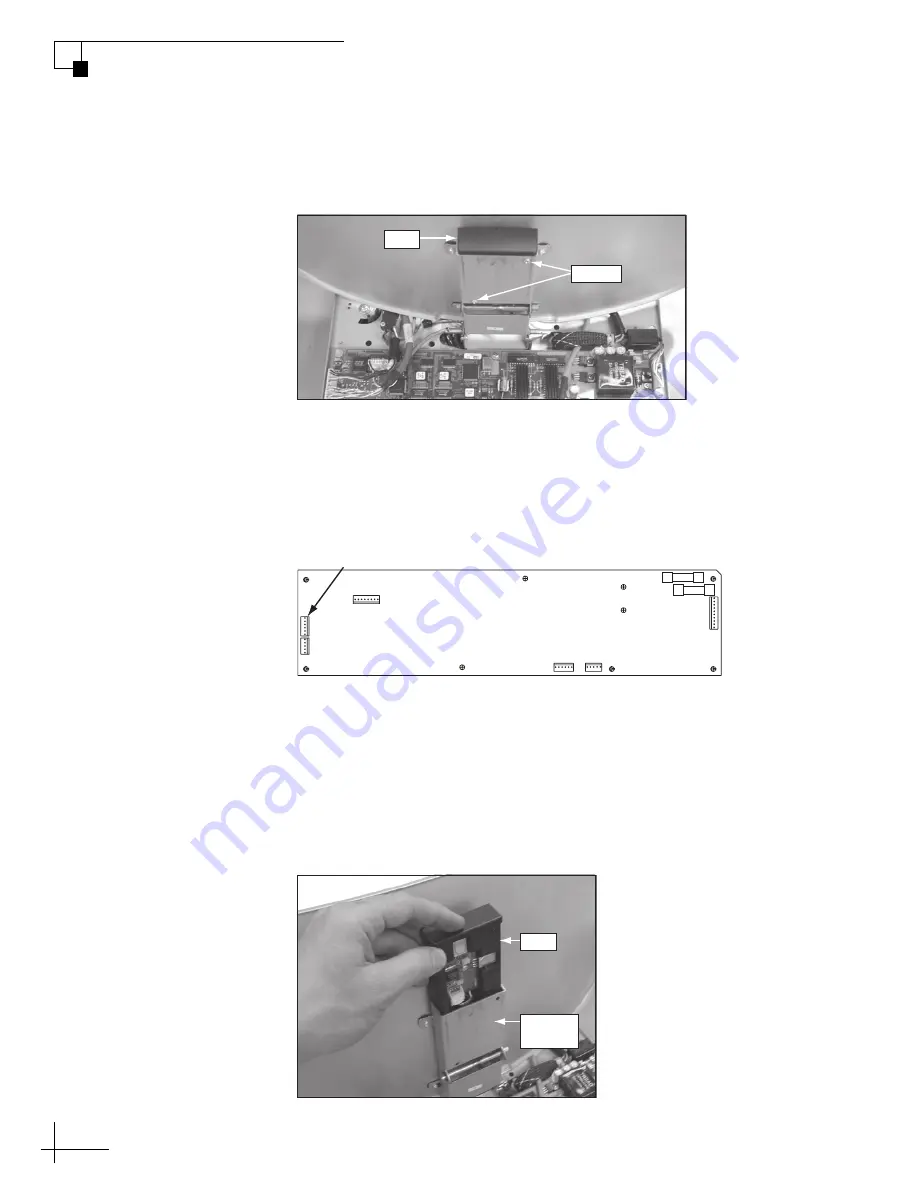
Using a #1 Phillips screwdriver, remove the two screws 

securing the gyro to the gyro housing.

Figure 5  Gyro Screws

h.

Disconnect the gyro cable from the main PCB. Then 

gently remove the gyro and gyro cable, ensuring no 

cables are dislodged from the main PCB.

Figure 6  Gyro Cable Connector

i.

Insert the new gyro and gyro cable into the gyro 

housing. Route the gyro cable to the bottom of the gyro 

housing.

NOTE: 

Gyros are sensitive to shock. Handle the gyro carefully to 

avoid damage.

Figure 7  Gyro Installation

Screws

Gyro

Gyro Cable
Connector

J11

Main PCB

Gyro
Housing

Gyro

Summary of Contents for TracVision R5SL

Page 1: ...tner Portal at www kvh com partners 1 Phillips screwdriver 2 Phillips screwdriver 11 32 open end wrench PC with the latest version of the Flash Update Wizard installed Be sure to avoid causing sharp b...

Page 2: ...32 screws securing the radome to the baseplate Remove the radome and set it aside in a safe place Figure 1 Radome Screws b Using an 11 32 open end wrench loosen the elevation motor shaft nut but do n...

Page 3: ...g plate Then remove the elevation motor from the mounting plate and set it aside Figure 4 Elevation Motor Main PCB Screws e Using a 1 Phillips screwdriver remove the four screws from the main PCB cove...

Page 4: ...B Then gently remove the gyro and gyro cable ensuring no cables are dislodged from the main PCB Figure 6 Gyro Cable Connector i Insert the new gyro and gyro cable into the gyro housing Route the gyro...

Page 5: ...able Connector l Using a 1 Phillips screwdriver secure the gyro to the gyro housing using the two screws you removed in Step 1g on page 4 Step 2 Complete the Installation a Gently reinstall the main P...

Page 6: ...Loctite threadlocker to the threads of the screws Figure 10 Elevation Motor Shaft Nut motor shown unmounted for clarity purposes d Extend the elevation motor shaft by rotating it clockwise then inser...

Page 7: ...d USB adapter Refer to the Flash Update Wizard s Release Notes for more information Figure 11 TracVision Switchplate b Double click the KVH Flash Update Wizard shortcut on your PC s desktop to start t...

Page 8: ...switchplate s POWER switch to the on up position The procedure is complete Be sure to return the old gyro to KVH NOTE Before returning the gyro be sure to obtain an RMA number from KVH Technical Supp...

Reviews: