5
Basic setup:
Note:
Carefully unpack parts which are in protective plastic bags.
Note:
When assembling the motor tower and platter, ensure that the platter will not touch or
damage the motor pulley!
Check the distance of the motor tower from the T base.
Note:
While the
parts are packed in plastic bags for protection, these are not intended to be
strong enough to lift or carry the parts.
Note:
Allow space above Power supply for ventilation, of at least 10-20 mm.
Lid:
If the turntable is supplied with a wooden platform, remove this and place in position. The
rounded part should be on the left. Locate the three small holes which correspond to the
intended position of the three black rubber rings on the main T base. If the turntable is
supplied with Stogi S tonearm remove it in its box.
Unpack lid and put it aside.
T base:
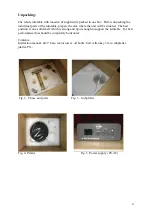
Remove the foam and lift the main T base ( Fig. 2) of turntable carefully as it is heavy and
put it on a shelf so that the side with the bearing is situated at 8 o' clock and the side with the
tonearm mount at 2' o clock. See Fig 6.
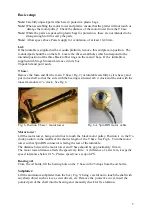
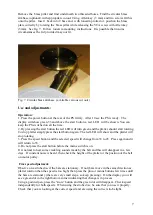
Fig. 6. Position T base + motor tower Fig. 6A. 5pin DIN motor cable
Motor tower:
Lift the motor tower, being careful not to touch the black motor pulley. Position it in the 8 'o
clock position in the middle of the shorter length of the T base. See Fig.6. Turn the motor
tower so that 5pin DIN connector is facing the rear of the turntable.
The distance between the motor tower and T base should be approximately 10 mm.
The motor tower distance affects the speed very little. A difference of a few mm, keeps the
speed tolerances below 0.1%. Precise speed you set up on PS.
Bearing oil:
From the oil bottle, fill the bearing hole on the T base with 25 drops from the oil bottle.
Subplatter:
Lift the aluminium subplatter from the box ( Fig. 3) being careful not to touch the shaft with
any sharp object such as keys, screwdrivers, etc. Remove the protective cover, insert the
pointed part of the shaft into the bearing and manually check for free rotation.


