background image


___________________________________________________________________________________________ 

ATS-33


SECTION 3 : OPERATION 

 
3.1  General 
 

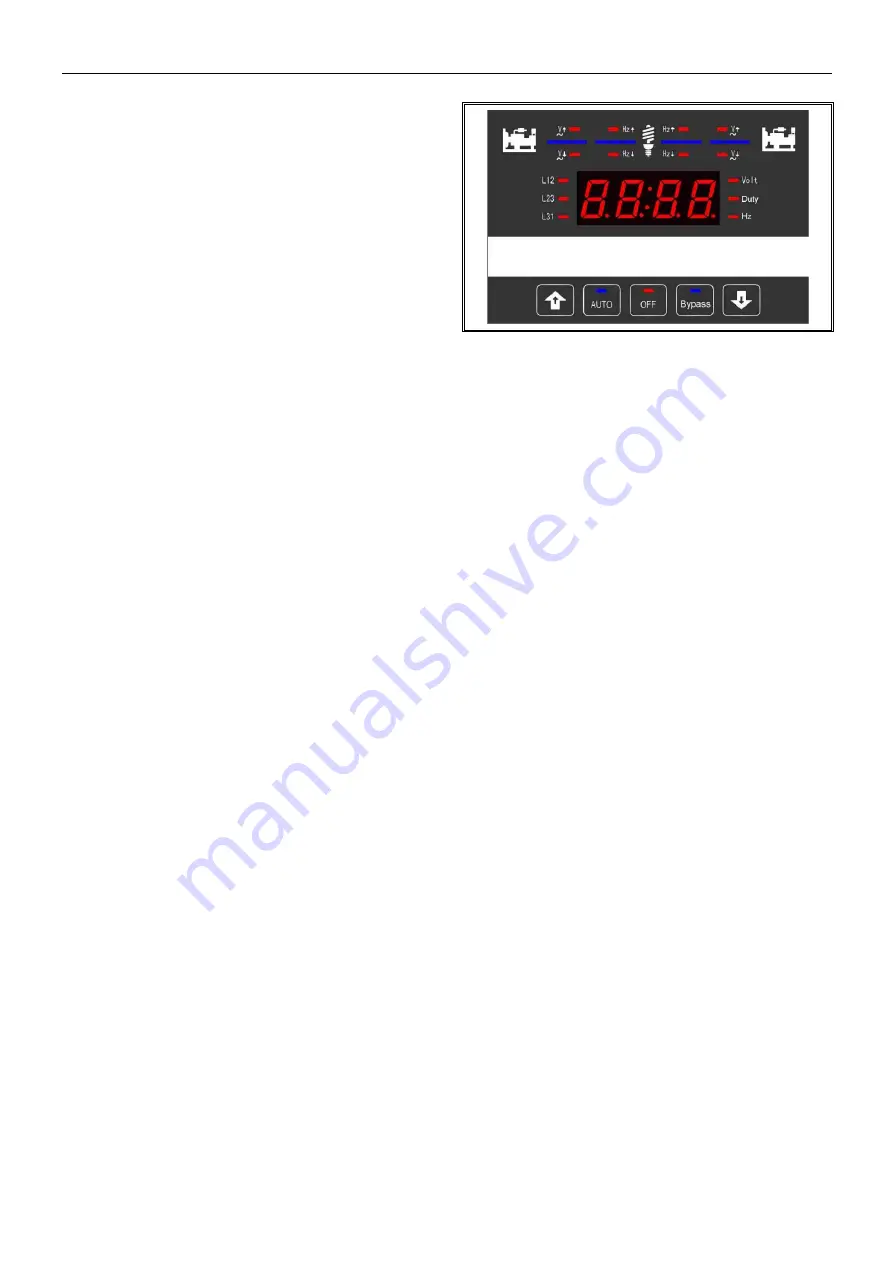
The five functions of the ATS-33


●  Automatic mode 
●  OFF mode 
●  Bypass mode 
●  Programming mode 
●  KCU-XX Remote Communication 
 
The  practical  use  of  each  operation  under  each 
category will be explained in this section. It is assumed 
that  prior  sections  are  understood,  and  the  operator 
has a basic understanding of the hardware. 
 

3.2  AUTO Mode 

 
The AUTO mode of the ATS-33 controller provides for 
automatic start, transfer and retransfers from source to 
source as dictated by the programmed values. 
 
The  ATS-33  controller  constantly  monitors  the 
condition  of  both  generators

’  power  sources  thus 

providing  the  required  intelligence  for  transfer 
operations. 
 
For  example,  the  ATS-33  control  unit  automatically 
initiates a start and transfer of power when the working 
generator duty time countdown to zero or when power 
fails  or  voltage  level  drops  below  a  preset  value  at  its 
duty  time.  Exactly  what  the  ATS-33  controller  will 
initiate  in  response  to  a  given  system  condition 
depends  upon  the  combination  of  standard  and 
selected optional features. 
 

3.3  OFF Mode 

 
In  OFF  the  ATS-33  disables  all  the  transfers  and 
protection  functions,  the  display  window  and  all  the 
LEDs are turned off. 
 
Both remote start signals are also disabled in OFF and 
the  ATS  can’t  transfer  the  load  to  any  source 
automatically. 
 
However,  when  programming,  the  OFF  button  allows 
you to move to the next program line and then change 
the  values  for  that  line  using  down  (▼)  and  up  (▲) 
buttons. 
 

Controller Panel Lighting Test 

This  checks  the  LED  lights.  Press  the  OFF  button,  all 
panel LEDs must light up. 


3.4  Bypass Mode 

 
If the ATS-33 is running in AUTO, pressing the bypass 
button  ignores  its  current  duties  and  force  starts  the 
next  generator,  and 

transfer’s  power  from  this 

generator  to  the  other.  If  the  second  generator  fail  to 
start  or  its  voltage  and  frequency  does  not  become 
available,  the  controller  keeps  the  load  connected  to 
the working generator and triggers an alarm. 
 
Activate the Bypass only when in AUTO. 
 

3.5  Programming Instruction 

 
You program the ATS-33 from the front faceplate. 
To start, set the controller to OFF and press & hold the 
OFF button for 4 seconds. The  word “Vr1.0” appears 
on  the  display  for  2  seconds,  showing  the  software 
version. 
 
You  are  now  ready  to  start  the  line-by-line 
programming sequence. Always press the OFF key to 
move  to  the  next  line.  To  change  the  parameter,  on 
each  line  use  the  up  (▲)  and  down  (▼)  arrows. 
Repeatedly  pressing  the  up  (▲)  or  down  (▼)  key, 
changes the displayed by one. To change faster, hold 
the buttons down. 
 
Remember to always press the “OFF” button to move 
to 

the next line or until the “End” appears on the screen. 

Note : 

To end and exit at any time, hold the “OFF” key 

down for 4 seconds. 
 
If  you  make  an  error  or  need  to  return  to  factory 
settings,  stay  or  reenter  programming  and  then  hold 
the  AUTO  keys  down  for  4  seconds,  until  the  word 
“Au.Po”  appears  on  the  screen  verifying  that  all 
programming  lines  are  factory  reset  back  like  in  the 
manual.  (See  line-by-line  programming  table  for 
ATS-33 factory settings). 

Summary of Contents for ATS-33

Page 1: ...dquarters No 3 Ln 201 Qianfu St Qianzhen Dist Kaohsiung City 80664 Taiwan Tel 886 7 8121771 Fax 886 7 8121775 URL http www kutai com tw ATS 33 Ver1 3 Automatic Transfer Switch Control Unit Operation Manual ...

Page 2: ...eneral 4 2 2 Display Window 4 2 3 Operate Touch Buttons 5 2 4 Panel Led Outputs 5 SECTOIN 3 OPERATION 3 1 General 7 3 2 AUTO Mode 7 3 3 OFF Mode 7 3 4 Bypass Mode 7 3 5 Programming Instruction 7 3 6 Remote Communication Instruction 8 3 7 Voltage Adjustment If Needed 9 3 8 Line By Line Programming Table 11 3 9 Specification Summary 12 SECTOIN 4 INSTALLATION INSTRUCTIONS 4 1 General 12 4 2 Panel Cut...

Page 3: ... timing functions Controller s features Microprocessor based with touch screen Smart touch screen touch sensor design Compact size with user friendly LED display Programmable for cycle mode or fix mode displays for 3 phase and 1 phase voltages and frequencies All programming and operations are done from the front screen interface Monitor both primary and stand by generator for over and under volta...

Page 4: ...nge 00 99 sec Feature 5 Under Over voltage Sensing The controller monitors the voltage of each phase of both generators power source User adjustable settings are provided Refer to program line 9 10 11 15 16 17 Adjustable over voltage range 110 500 Vac Adjustable under voltage range 80 470 Vac Feature 6 Under Over frequency Sensing The controller monitors the frequency of the normal and standby pow...

Page 5: ...matic mode lighting the corresponding LED to indicate the selection The controller automatically starts the generator transfer and retransfers from source to source as commanded by the features supplied and the preprogrammed setting In AUTO all anomaly are accompanied by its matching alarm output make sure all failures are corrected before touching the auto key to reset the alarm signal WARNING Wh...

Page 6: ...ilable display for G1 and G2 Generator 1 Over Voltage Generator 1 Under Voltage Generator 1 Over Frequency Generator 1 Under Frequency Generator 2 Over Voltage Generator 2 Under Voltage Generator 2 Over Frequency Generator 2 Under Frequency Generator 1 Transfer Failure Generator 2 Transfer Failure Generator 1 Fail to Start Generator 2 Fail to Start ...

Page 7: ...allows you to move to the next program line and then change the values for that line using down and up buttons Controller Panel Lighting Test This checks the LED lights Press the OFF button all panel LEDs must light up 3 4 Bypass Mode If the ATS 33 is running in AUTO pressing the bypass button ignores its current duties and force starts the next generator and transfer s power from this generator t...

Page 8: ... from App Store or Google Play by simply key in Kutai and hit search Free software can be downloaded from App Store or Google Play by simply key in Kutai and hit search You have the option of using one of these communications modules KCU 01 USB communication module KCU 02 RS 485 communications module KCU 03 Ethernet communications module The corresponding program settings for ATS 33 installed with...

Page 9: ...indow Step 3 Select the phase you wish to re calibrate by pressing the OFF key EX Generator 1 Phase L12 Calibration EX Generator 2 Phase L23 Calibration Step 4 Use a good quality voltmeter as a reference to calibrate the ATS 33 voltage reading to the desired phase Step 5 With the up and down buttons reset the voltage reading on the ATS 33 Step 6 Press the OFF button to move to the next phase or un...

Page 10: ...___________________________________________________________________________________________ 10 ATS 33 ...

Page 11: ...lem with Generator 1 voltage output 00 99 sec 00 Without voltage monitor function 10 sec 12 Generator 1 over frequency setting 51 75 Hz 65 Hz 13 Generator 1 under frequency setting 45 59 Hz 55 Hz 14 Time delay if there is a problem with Generator 1 frequency output 00 99 sec 00 Without frequency monitor function 10 sec 15 Generator 2 over voltage setting 11 55 110 550V 25 250V 16 Generator 2 under...

Page 12: ...equency Measurement Range 45 70 Hz Remote Start Contact 7A 250 Vac Max Generator 1 ON Contact 7A 250 Vac Max Generator 2 ON Contact 7A 250 Vac Max Alarm Output Contact 7A 250 Vac Max Operating Temperature 20 to 60 C Storage Temperature 30 to 80 C Operating Humidity Max 90 Weight 495 g 2 SECTION 4 INSTALLATION INSTRUCTIONS 4 1 General The ATS 33 controller has been designed for front panel mounting...

Page 13: ...______________________________________________________________ ATS 33 13 4 3 Unit Dimensions All Dimensions in mm 4 4 Installation Reference Silicon waterproof seal Panel Cut out A T S Metal door Fix bracket Screw Screw Fix bracket ...

Page 14: ...___________________________ 14 ATS 33 SECTION 5 TYPICAL WIRING 5 1 MCCB Type ATS Wiring Diagram 3P 4P 220 Vac ELS Generator 2 Auxiliary Switch NLS Generator 1 Auxiliary Switch ATS 33 Control Unit L2 L1 N L3 Genset 2 L3 N L1 LOAD L2 MCCB TYPE BTS L2 L1 N L3 Genset 1 ...

Page 15: ..._________________________________________________ ATS 33 15 5 2 MCCB Type ATS Wiring Diagram 2P 220 Vac Genset 1 L1 L2 MCCB TYPE BTS L2 LOAD L1 Genset 2 L1 L2 ATS 33 Control Unit NLS Generator 1 Auxiliary Switch ELS Generator 2 Auxiliary Switch ...

Page 16: ..._______ 16 ATS 33 5 3 MOT Type ATS Wiring Diagram 3P 4P 220 Vac ELS Generator 2 Auxiliary Switch NLS Generator 1 Auxiliary Switch ATS 33 Control Unit MOT TYPE BTS C P1 E MOTOR UNIT L1 N L2 L3 A On B Off C P1 D P2 N MOTOR UNIT B Off D P2 A On L1 L3 L2 N Genset 2 Genset 1 L3 N L1 LOAD L2 ...

Page 17: ...________________ ATS 33 17 5 4 MOT Type ATS Wiring Diagram 2P 220 Vac L2 LOAD L1 Genset 1 Genset 2 L2 L1 A On D P2 B Off N MOTOR UNIT D P2 C P1 B Off A On L2 L1 E MOTOR UNIT C P1 MOT TYPE BTS ATS 33 Control Unit NLS Generator 1 Auxiliary Switch ELS Generator 2 Auxiliary Switch ...

Page 18: ..._________________________________________ 18 ATS 33 5 5 Air Circuit Breaker Type ATS Wiring Diagram 3P 4P 220 Vac ATS 33 Control Unit L1 L2 N L3 ACB TYPE BTS L1 L3 N L2 Genset 1 Genset 2 L3 N L1 LOAD L2 MCH Charging Alternator MX1 Trip coil XF ON Coil ...

Page 19: ...__________________________________________________ ATS 33 19 5 6 Air Circuit Breaker Type ATS Wiring Diagram 2P 220 Vac XF ON Coil MX1 Trip coil MCH Charging Alternator L2 LOAD L1 Genset 2 Genset 1 L2 L1 ACB TYPE BTS L2 L1 ATS 33 Control Unit ...

Page 20: ...________ 20 ATS 33 5 7 Single Coil Double Throw Type ATS Wiring Diagram 3P 4P 220 Vac CS2 CS2 CS2 CS2 CS1 CS1 CS1 CS1 ELS Generator 2 Auxiliary Switch NLS Generator 1 Auxiliary Switch ATS 33 Control Unit 1 COIL DOUBLE THROW TYPE L2 L3 L1 N L3 N L1 L2 L2 LOAD L1 N L3 Genset 1 Genset 2 ...

Page 21: ..._________________________ ATS 33 21 5 8 Single Coil Double Throw Type ATS Wiring Diagram 2P 220 Vac CS2 CS2 CS1 CS1 Genset 2 Genset 1 L1 LOAD L2 L2 L1 L1 L2 1 COIL DOUBLE THROW TYPE ATS 33 Control Unit NLS Generator 1 Auxiliary Switch ELS Generator 2 Auxiliary Switch ...

Page 22: ..._________ 22 ATS 33 5 9 Dual Coil Double Throw Type ATS Wiring Diagram 3P 4P 220 Vac CS2 CS2 CS2 CS2 CS1 CS1 CS1 CS1 ELS Generator 2 Auxiliary Switch NLS Generator 1 Auxiliary Switch ATS 33 Control Unit 2 COILS DOUBLE THROW TYPE L3 L2 L1 N L2 L1 N L3 L3 N L1 LOAD L2 Genset 2 Genset 1 ...

Page 23: ..._________________________ ATS 33 23 5 10 Dual Coil Double Throw Type ATS Wiring Diagram 2P 220 Vac CS2 CS2 CS1 CS1 Genset 1 Genset 2 L2 LOAD L1 L1 L2 L1 L2 2 COILS DOUBLE THROW TYPE ATS 33 Control Unit NLS Generator 1 Auxiliary Switch ELS Generator 2 Auxiliary Switch ...

Page 24: ...m 3P 4P 220 Vac Genset 2 Genset 1 ATS 33 Control Unit NLS Generator 1 Auxiliary Switch ELS Generator 2 Auxiliary Switch GREEN CN1 5 BROWN CN1 1 N1 N3 N2 BLUE PINK WHITE BLACK NLS CN1 9 ELS CN1 11 CN1 6 CN1 10 RED COIL 220V CN1 2 CS1 CS1 CS1 CS2 CS2 CS2 GRAY RED WHITE ORANGE YELLOW CN1 3 CN1 8 CN1 12 CN1 4 KUTAI TS3P125 E1 E3 E2 L2 LOAD L1 L3 ...

Page 25: ...Type ATS Wiring Diagram 2P 220 Vac RED WHITE CN1 12 WHITE CN1 9 Genset 2 Genset 1 CN1 4 YELLOW L1 LOAD L2 E2 E1 KUTAI TS2P125 CN1 3 ORANGE CS2 CS2 CS1 CS1 CN1 2 220V COIL RED CN1 10 CN1 6 CN1 11 ELS NLS BLACK PINK BLUE N2 N1 CN1 1 BROWN ELS Generator 2 Auxiliary Switch NLS Generator 1 Auxiliary Switch ATS 33 Control Unit ...

Page 26: ..._ 26 ATS 33 5 13 KME WN Type and AICHI WN type ATS Wiring Diagram 3P 4P 220 Vac CS2 CS2 CS2 CS2 CS1 CS1 CS1 CS1 ELS Generator 2 Auxiliary Switch NLS Generator 1 Auxiliary Switch ATS 33 Control Unit L1 L2 N L3 L1 L3 L2 AICHI WN TYS TYPE BTS KME WN TYPE BTS N L2 LOAD L1 N L3 Genset 1 Genset 2 ...

Page 27: ...__________________ ATS 33 27 5 14 KME WN Type and AICHI WN type ATS Wiring Diagram 2P 220 Vac CS2 CS2 CS1 CS1 ELS Generator 2 Auxiliary Switch NLS Generator 1 Auxiliary Switch L2 L1 Genset 2 L1 LOAD L2 L2 L1 Genset 1 KME WN TYPE BTS AICHI WN TYS TYPE BTS ATS 33 Control Unit ...

Page 28: ..._____________________________________________ 28 ATS 33 5 15 SOCOMEC ATyS 3S type ATS Wiring Diagram 3P 4P 220 Vac CS2 CS2 CS2 CS2 CS1 CS1 CS1 CS1 ATS 33 Control Unit SOCOMEC ATyS 3S TYPE BTS N L2 L1 L3 L2 L1 L3 N Genset 1 Genset 2 L3 N L1 LOAD L2 ...

Page 29: ...______________________________________________________________ ATS 33 29 5 16 SOCOMEC ATyS 3S type ATS Wiring Diagram 2P 220 Vac CS2 CS2 CS1 CS1 L2 LOAD L1 Genset 2 Genset 1 L1 L2 L1 L2 SOCOMEC ATyS 3S TYPE BTS ATS 33 Control Unit ...

Page 30: ..._____________________________________________ 30 ATS 33 5 17 SOCOMEC ATyS 3e type ATS Wiring Diagram 3P 4P 220 Vac CS2 CS2 CS2 CS2 CS1 CS1 CS1 CS1 ATS 33 Control Unit L3 L2 L1 N L3 L1 L2 N Genset 1 Genset 2 L3 N L1 LOAD L2 SOCOMEC ATyS 3e TYPE BTS ...

Page 31: ...______________________________________________________________ ATS 33 31 5 18 SOCOMEC ATyS 3e type ATS Wiring Diagram 2P 220 Vac CS2 CS2 CS1 CS1 SOCOMEC ATyS 3e TYPE BTS L2 LOAD L1 Genset 2 Genset 1 L2 L1 L1 L2 ATS 33 Control Unit ...

Page 32: ...______________________________________________ 32 ATS 33 5 19 SOCOMEC ATyS 6 type ATS Wiring Diagram 3P 4P 220 Vac CS2 CS2 CS2 CS2 CS1 CS1 CS1 CS1 ATS 33 Control Unit SOCOMEC ATyS 6 TYPE BTS N L2 L3 L1 L2 L3 N L1 Genset 1 Genset 2 L3 N L1 LOAD L2 ...

Page 33: ..._______________________________________________________________ ATS 33 33 5 20 SOCOMEC ATyS 6 type ATS Wiring Diagram 2P 220 Vac CS2 CS2 CS1 CS1 L2 LOAD L1 Genset 2 Genset 1 L1 L2 L1 L2 SOCOMEC ATyS 6 TYPE BTS ATS 33 Control Unit ...

Page 34: ..._____________________________________________ 34 ATS 33 5 21 SOCOMEC ATyS 6e type ATS Wiring Diagram 3P 4P 220 Vac CS2 CS2 CS2 CS2 CS1 CS1 CS1 CS1 ATS 33 Control Unit SOCOMEC ATyS 6e TYPE BTS L3 L2 N L1 L2 N L3 L1 Genset 1 Genset 2 L3 N L1 LOAD L2 ...

Page 35: ...______________________________________________________________ ATS 33 35 5 22 SOCOMEC ATyS 6e type ATS Wiring Diagram 2P 220 Vac CS2 CS2 CS1 CS1 L2 L1 L2 L1 Genset 1 Genset 2 L1 LOAD L2 SOCOMEC ATyS 6e TYPE BTS ATS 33 Control Unit ...

Page 36: ..._______ 36 ATS 33 5 23 MITSUBISHI MD type ATS Wiring Diagram 3P 4P 220 Vac EAU Generator 2 Auxiliary Switch NAU Generator 1 Auxiliary Switch ATS 33 Control Unit L3 L2 L1 N A2 N MOTOR UNIT C B A1 A2 B C E MOTOR UNIT A1 MITSUBISHI MD TYPE BTS L2 L1 N L3 Genset 1 Genset 2 L3 N L1 LOAD L2 ...

Page 37: ...________________ ATS 33 37 5 24 MITSUBISHI MD type ATS Wiring Diagram 2P 220 Vac L2 LOAD L1 Genset 2 Genset 1 L1 L2 MITSUBISHI MD TYPE BTS A1 E MOTOR UNIT C B A2 A1 B C N MOTOR UNIT A2 L1 L2 ATS 33 Control Unit NAU Generator 1 Auxiliary Switch EAU Generator 2 Auxiliary Switch ...

Page 38: ..._________________________________________ 38 ATS 33 5 25 MERLIN GERIN MCB type ATS Wiring Diagram 3P 4P 220 Vac ATS 33 Control Unit L1 N L3 L2 MX1 Trip coil XF ON Coil MG MCB TYPE BTS MCH Charging Alternator L1 L2 L3 N Genset 1 Genset 2 L3 N L1 LOAD L2 ...

Page 39: ...__________________________________________________ ATS 33 39 5 26 MERLIN GERIN MCB type ATS Wiring Diagram 2P 220 Vac L2 LOAD L1 Genset 2 Genset 1 L2 L1 MCH Charging Alternator MG MCB TYPE BTS XF ON Coil MX1 Trip coil L2 L1 ATS 33 Control Unit ...

Page 40: ...____ 40 ATS 33 5 27 Magnetic Contact type ATS Wiring Diagram 3P 4P 220 Vac MAGNETIC CONTACTOR TYPE ELS Generator 2 Auxiliary Switch NLS Generator 1 Auxiliary Switch Genset 2 Genset 1 L3 L2 L1 N L2 L1 N L3 L3 N L1 L2 MC1 MC1 MC1 MC1 MC2 MC2 MC2 MC2 Note Line 2 set to 06 ATS 33 Control Unit ...

Page 41: ...__________________ ATS 33 41 5 28 Magnetic Contact type ATS Wiring Diagram 2P 220 Vac Genset 2 Genset 1 NLS Generator 1 Auxiliary Switch ELS Generator 2 Auxiliary Switch ATS 33 Control Unit Note Line 2 set to 06 MC2 MC2 MC1 MC1 L2 L1 L1 L2 L1 L2 MAGNETIC CONTACTOR TYPE LOAD ...

Page 42: ...__________________________________________________________________________________ 42 ATS 33 5 29 System Voltage different From AC220V wiring Diagram For AC380 440 480V System For AC220V System 220V 380 440 480V ...

Reviews: