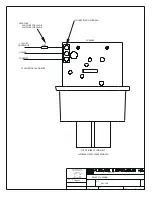
Step #1 wiring unit
1.
Remove rear plastic cover from Super 30 Auto Eject by unscrewing (4) #8-32 screws.
2.
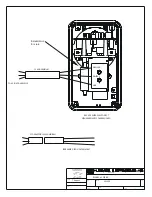
See figure 3 DC wiring. Snake wires though small cover strain relief and install wires as shown use
18 AWG wire minimum.
3.
See figure 2 AC wiring. Snake wires though large cover strain relief and install wires as shown use
10 AWG wire minimum.
4.
Reinstall rear plastic cover.
5.
Test the unit to see if it is operational before mounting.
INSTALLATION INSTRUCTIONS
Step #2 mounting of unit
1. Locate a convenient place on the vehicle to mount the AUTO EJECT. A minimum clearance of 5
inches behind the mounting panel is required.
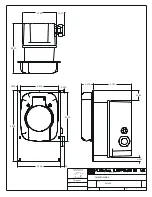
2. Place the hole template (figure 4) in position and center punch in 6 places.
3. Drill 6 mounting holes, #29 drill (0.136” diameter). Be certain that all the holes are precisely located.
4. Cut-out rectangular hole.
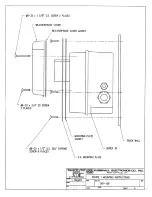
5. See figure 1mounting. Install weatherproof cover, weatherproof cover gasket, mounting plate, and
mounting plate gasket to super 30 using (2)#8-32 x ¾” and (2)#8-32 x 1 5/8” screws provided.
6. Install that assembly into cut-out in truck wall using (6)#8-32 x ½” self tapping screws provided.
INTRODUCTION
The Super 30 Auto Eject is a completely sealed automatic power line disconnect. This prevents
contamination of the mechanism by road dirt and ensures long reliable life even when mounted in the most
severe environment. A novel plug detector closes and opens the 120 volt A.C. circuit after the mating
connector is inserted and before the connector is ejected. This eliminates arcing at the connector contacts
and assures long contact life. As with all Auto Ejects, the Super 30 Auto Eject is connected to the starter
circuit so that ejection occurs when the engine is cranked.


