Tutorial: Song Mode
13-9
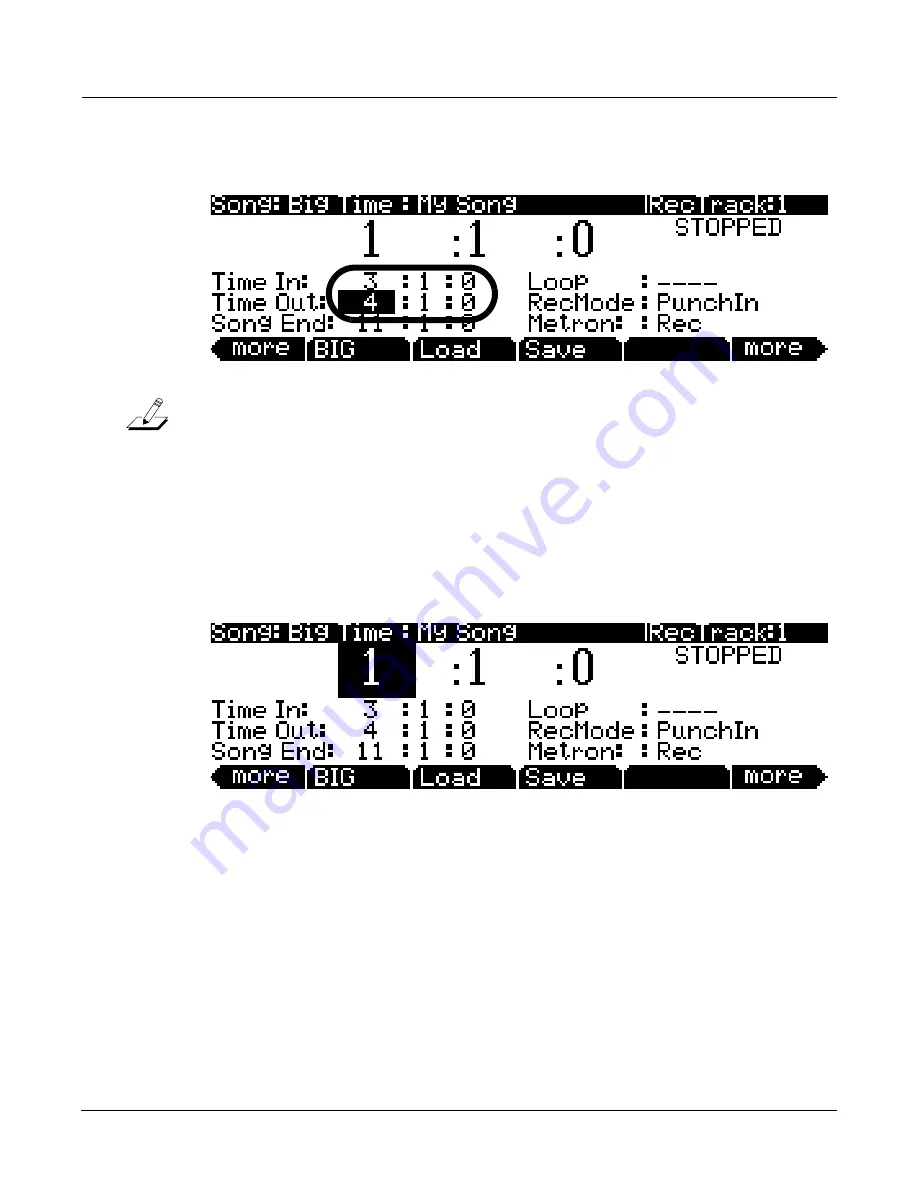
5. Set times for the
Time In
and
Time Out
fields to select the time to fix. For this example we will fix
bar 3 (see below.)
Note:
If
you
need
to
fix
a
section
which
isn’t
exactly
within
one
bar
or
an
even
division
of
beats,
use
the
following
method
to
find
your
Time In
and
Time Out
points:
Use
the
big
time
location
numbers
on
the
top
of
the
page
to
find
a
time
where
the
first
notes
played
(when
you
press
play/
pause
)
are
the
notes
that
you
wish
to
replace.
Enter
this
location
in
the
Time
In
field.
Next,
use
the
big
time
location
numbers
on
the
top
of
the
page
to
find
a
time
where
the
first
notes
played
(when
you
press
play/pause
)
are
the
first
notes
that
you
wish
to
keep
after
the
notes
that
you
wish
to
replace
.
Enter
this
location
in
the
Time
Out
field.
6. Use the big time location numbers on the top of the page and set a time before the area you want to
replace. This will be where you start playback of the song in order to re-record the desired section.
Leave enough time (usually a bar or two) so that you will have time to prepare before the section
you are replacing plays. For this example we will set our start time to
1 :1 :0
, because it is two bars
before bar 3 (see below.)
7. Press the
Record
button, then the
Play/Pause
button located on the front panel. Play your new part
when the song reaches the part you want to replace. This technique is called “punching in.” You
will often get more natural sounding results if you play along with the song before the part that you
are fixing. Doing this allows you to match your performance style (loudness, timing, phrasing) with
what has already been recorded. Because of your settings in steps 4, 5 and 6, no extra notes will be
recorded outside of the time that you want to replace.
8. Press the
Stop
button when you are done. You will be able to review and save your changes just as
in Step 4 of Part 3 (see above.)
9. Remember to set the
RecMode
parameter back to Linear when you are done if you wish to record
in the standard way again (as in Part 3, above.) This is done on the Big Time page (see below.)
Summary of Contents for PC3LE
Page 14: ...x...
Page 28: ...2 10 Startup Software Upgrades...
Page 42: ...3 14 User Interface Basics Quick Song Recording and Playback...
Page 46: ...4 4 The Operating Modes Using the Modes...
Page 196: ...8 4 Quick Access Mode The QA Editor...
Page 226: ...9 30 Master Mode UTILITIES...
Page 260: ...10 34 Song Mode and the Song Editor Song Editor The EVENT Page...
Page 272: ...11 12 Storage Mode Format...
Page 286: ...12 14 Keymap and Sample Editing Editing Samples...


