


If Something Doesn’t Work
Before calling the repair service, make the following checks:.
Fault
Possible Cause
Solution
Hood does not work
Mains cable not connected
Connect mains cable
Power not reaching plug
Check/repair mains supply
Hood not extracting sufficiently or vibrating
Filter saturated with grease
Clean or replace filter
Obstruction in venting duct
Remove obstruction
Inadequate venting duct
Contact installer and follow
the instructions in this manual
Lights do not work
Bulbs blown
Replace bulbs
Bulbs loose
Tighten up bulbs
Technical Information
Installation
Before installing the hood, consult the require-
ments of the corresponding authorities concer-
ning air and smoke extraction regulations.
Extracted air must not be channelled through
ducts that are used to extract fumes from
appliances powered by any form of energy other
than electricity.
The room (kitchen) must be well ventilated if the
cooker hood is to be used simultaneously with
other appliances powered by any form of energy
other than electricity.
When the hood is to operate at the same time as
other appliances powered by any form of energy
other than electricity, the air output pressure
must not exceed 4 Pa (4 x 10
-5
bar).
To ensure optimum hood performance, the
length of the venting duct should not exceed
four metres and should not have more than two
right angles (90º).
The hood must be connected to a power point
provided with an effective earth connection.
If the hood is supplied without a lead for its
mains connection (or if this is replaced), discon-
nection from the mains electricity supply must
be achieved by means of an omnipolar cut-off
switch, with a minimum contact separation of 3
mm at all the poles, incorporated into the fixed
installation.
The appliance must be connected to the mains
using flexible cable. The use of rigid tubing is
not permitted.
Though it is recommendable to vent fumes
externally, activated carbon filters may be fitted
to allow the recirculation of purified air to the kit-
chen through the hood’s outlet duct.
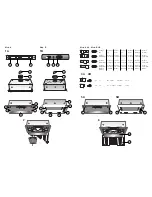
Fitting in kitchen cabinet
The fitting of this hood in a kitchen cabinet is
achieved in two steps (Fig. 8).
1
Use the coach screws provided in the
accessory bag to bolt the hood to a wooden
panel in which the appropriate aperture has
previously been cut (Fig. 8).
2
Enclose the top of the appliance with a sec-
ond wooden panel, after previously drilling
openings for the fumes outlet duct, the
mains power cable and the fastening
screws (Fig. 9).
The bottom of the hood (H) must be situated at
a minimum height of 65 cm above electric hobs
and 70 cm above gas hobs (Fig. 10).
Replacement of mains power cable
The mains power cable may only be replaced by
qualified technical service personnel.
English
Dimensions
Fitting
Voltaje
Max.
Power
(mm)
Dimensions (mm)
Frequency
551 x 310 x 175
503 x 289
See rating label
See rating label
See rating label
(width x depth x height)
(width x depth)
MOD.
TYP.
ELECT.
220...230 V ~
50 Hz
310 W
Made in European Community- C.I.F.: A-39004932
LB644.1E
F-522325
Nº. de fabric.
Fabrík.-Nr.
Serial Nº
POTENCIA NOM. LÁMPARAS
NENLEISTUNG GLÜHLAMPEN
LAMPS RATE
PUISSANCE LAMPES
2 X 20 W
POTENCIA NOM. DAS LAMPADAS
14-000001
MOD.
TYP.
ELECT.
220...230 V ~
50 Hz
205 W
Made in European Community- C.I.F.: A-39004932
LB632.1W
F-521325
Nº. de fabric.
Fabrík.-Nr.
Serial Nº
POTENCIA NOM. LÁMPARAS
NENLEISTUNG GLÜHLAMPEN
LAMPS RATE
PUISSANCE LAMPES
2 X 40 W
POTENCIA NOM. DAS LAMPADAS
13-000001