background image

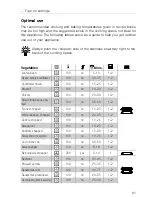
…  Tips on settings

71

Bottling involves preserving food in jars. Put a maximum of 5 jars in the coo-
king space at the same time.

A

Only use undamaged jars that hold no more than 1 litre each.

A

Put the stainless steel tray at level 

1

.

A

Fill the jars evenly with the food to be preserved. Close the jars according
to the manufacturer's instructions.

A

Place  the  jars  on  the  stainless
steel tray as shown in the illustra-
tion.  The  jars  should  not  touch
one another..

A

Select  the 

  operating  mode,

the  cooking  space  temperature
and  the  duration  according  to
the table.

A

Press  the 

  adjusting  knob

to confirm.

A

Press the 

 button to switch off the appliance. Leave the appliance door

open in the at-rest position.

Preserving and bottling

 Mins.

Carrots

100

no

90

1

Cauliflower, broccoli

100

no

90

1

Beans *

100

no

60

1

Mushrooms **

100

no

75–90

1

Apples, pears

90

no

30

1

Apricots

90

no

30

1

Peaches

90

no

30

1

Quinces

90

no

30

1

Plums

90

no

30

1

Cherries

80

no

30

1

*
**

Repeat process 2×, allowing the jars to cool down completely in between time.
The mushrooms must be precooked.

˚C

Summary of Contents for EKDG 6800.3

Page 1: ...fkpqor qflkp clo rpb åÇ áåëí ää íáçå áåëíêìÅíáçåë 073173R61 J770 033 0 bhad SUMMKP bhad SVMMKN çåîÉÅíJ áê máÅÅçäç ...

Page 2: ...cted up to the power supply in accordance with the separate Installation Instructions The necessary work should be done by a qualified fitter or electrician 䡲 Dispose of the packaging material in accordance with local regulations 䡲 Before using the newly installed appliance for the first time please follow the advice in the Using for the first time section 䡲 Make the desired user settings The appl...

Page 3: ...ons to the appliance especially any electrically live parts should only be carried out by the manufacturer its Customer Services or similarly qualified persons Repairs if carried out incorrectly may cause serious injury damage to the appliance and fittings as well as affect the functioning of the appliance If the appliance is not working properly or in case of a repair order follow the instruction...

Page 4: ...bly damaged do not use it Contact our Customer Services 䡲 If the appliance is not operating property disconnect it from the power sup ply immediately 䡲 Ensure the mains cables of other electrical appliances do not get caught in the door of the appliance as the electrical cable insulation could get damaged 䡲 If the mains cable of the appliance is damaged it must be replaced by Cus tomer Services in...

Page 5: ...eam vent during operation 䡲 Overheated fat and oil can easily catch fire Heating oil in the cooking space to sear meat is dangerous and should not be done Never try to ex tinguish burning oil or fat with water danger of explosion Smother the flames with a fire blanket and keep all doors and windows closed 䡲 Do not pour spirits e g brandy whisky schnapps etc over hot food danger of explosion 䡲 Do n...

Page 6: ...he bottom of the cooking space as this can result in an optical change in the cooking space floor 䡲 Using knives or cutting wheels on the stainless steel tray the enamelled baking tray or the perforated cooking tray will cause visible damage 䡲 Do not use objects that can rust in the cooking space 䡲 Do not use silver cutlery in the cooking space 䡲 To prevent corrosion allow the cooking space to dry...

Page 7: ...6 Using for the first time 18 Example 19 Filling the water tank 19 Selecting the operating mode 20 Changing the operating mode 20 Selecting the cooking space temperature 21 Checking Changing the cooking space temperature 21 Switching off 22 Emptying the water tank 22 User settings 23 Language 25 Childproof lock 25 Time display 26 Acoustic signal 26 Illumination 26 Water hardness 27 Temperature uni...

Page 8: ...Soft roasting 43 BakeOmatic 46 Degree of browning 46 Cooking Baking times 46 Selecting and starting BakeOmatic 48 GourmetSteam 50 Selecting and starting GourmetSteam 51 Recipes 53 Selecting and starting a recipe 54 Own recipes 56 Creating own recipes 56 Keeping cooked food warm 59 Tips on settings 60 Symbols used 60 Optimal use 61 BakeOmatic 74 Tips and tricks 79 Hygiene 83 Saving energy 83 ...

Page 9: ...door seal 90 Cleaning the accessories 90 Cleaning the cooking space 91 Replacing a defective light bulb 91 Trouble shooting 92 What to do if 92 After a power failure 95 Accessories and spare parts 96 Technical data 98 Disposal 100 Index 101 Installation instructions for fitter 104 Electrics 104 Installation dimensions inch 105 Installing in a fitted kitchen unit 107 Quick instructions 108 ...

Page 10: ...10 Appliance description Construction 1 Operating and display elements 2 Door handle 3 Appliance door 1 2 3 ...

Page 11: ...nation Timer Cooking space food probe temperature Time operating time switch off time Operating mode Off Adjusting knob Temperature Plain text display Time operating time switch off time timer etc Cooking space temperature Time Food probe temperature Operating time Timer Switch off time Hot air OK Hot air ...

Page 12: ... of the cooking space 1 Appliance door 8 Cooking space temperature sensor 2 Door seal 9 Water tank compartment 3 Socket for food probe 10 Levels 4 Illumination 11 Knurled nut 5 Climate sensor 12 Steam inlet 6 Cooking space ventilation 13 Hot air fan 7 Ventilation outlet 7 10 12 6 5 4 3 2 1 8 13 9 11 3 4 1 2 ...

Page 13: ...overed by the baking the shape of the stainless steel tray can become distorted during baking This is normal As it cools down the stain less steel tray will go back to its original form 䡲 The stainless steel tray is to be used the normal way round not upside down Wire shelf 䡲 For standing roasting and baking tins on 䡲 For standing meat frozen pizza etc on 䡲 Serves as a cooling rack For preparing f...

Page 14: ...Food probe with straight handle The food probe is suitable for measuring the core tem perature of food between the range of 30 C to 99 C 䡲 As soon as the set food probe temperature is reached the appliance switches off automatically A guide to appropriate food probe temperatures can be found in Tips on settings The food probe can also be simply used to measure the core temperature In this case the...

Page 15: ...ray will visibly damage the surface Available in different sizes and depths Perforated cooking tray 䡲 For cooking fresh or frozen vegetables meat and fish Available in two different depths Unperforated cooking tray with lip 䡲 For extracting juice from berries fruit etc 䡲 Serves as a drip tray for collecting condensate from food Roller runner 䡲 For safely pulling out one or more trays wire shelves ...

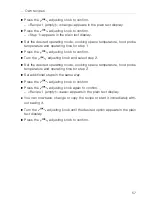
Page 16: ...nge the setting 䡲 Press the adjusting knob to confirm the setting or it will be automat ically accepted after 10 seconds 䡲 Other settings or changes can be made at any time 䡲 Press the button to switch off the appliance Using the plain text display When the appliance is switched off the adjusting knob is used to dis play text to view the different selection options and to confirm 䡲 Press the adjus...

Page 17: ...es additional information Select and press OK BakeOmatic Select and press OK GourmetSteam Select and press OK Soft roasting Select and press OK Recipes Select and press OK Own recipes Select and press OK Keep warm Select and press OK User settings Select and press OK Descale Select and press OK Hygiene Select and press OK back i ...

Page 18: ...adjusting knob to set the time A Clean the cooking space and the accessories A Heat the empty cooking space i e without the wire shelves baking trays etc using the operating mode for about 30 minutes at 210 C A Press the adjusting knob to switch between hours and minutes A Turn it to set the hours and the minutes A Press the adjusting knob to confirm the setting or it will be automatically accepte...

Page 19: ...tion in the water tank compartment 䡲 For the and operating modes as well as for BakeOmatic and GourmetSteam the filled water tank must be in posi tion in the water tank compartment 䡲 For the and operating modes as well as for Soft roasting the water tank can be left in the water tank compartment without affecting the cooking results Burns hazard from heat produced during cooking and baking Use pro...

Page 20: ... in the plain text display The recommended temperature flashes in the left digital display The and symbols flash A Press the adjusting knob to confirm Professional baking Steam phase and then Professional bak ing Hot air phase appears in the plain text display Changing the operating mode The operating mode selected cannot be changed during operation A Press the button The operating mode selected i...

Page 21: ...erature flashes in the left digital display The symbol flashes A The cooking space temperature can be changed by turning the adjusting knob Removing the cooked food from the cooking space To test if the bread is ready tap the bottom of the loaf and it should sound hollow A Take the bread loaf out of the cooking space when ready A Place it on the wire shelf and allow to cool down For the and operat...

Page 22: ... door open in the at rest position until the cooking space has cooled down Emptying the water tank When the appliance is switched off the residual water is pumped back into the water tank Water is being pumped off appears in the plain text display A When the water has been pumped back remove empty and then dry the water tank When the symbols are no longer illuminated and the plain text display is ...

Page 23: ...gs appears A Press the adjusting knob to confirm User settings Language appears in the plain text display A Turn the adjusting knob to display the available options A Select setting and press the adjusting knob to confirm A Press the button to exit Possible settings The settings are retained in the event of a power failure Select and press OK BakeOmatic Select and press OK Descale Select and press...

Page 24: ... low off Text in Deutsch Texte en français Testo in italiano visible invisible automatically with door via button only User settings Illumination User settings Water hardness User settings Temperature unit hard medium soft C F User settings Time format User settings Contrast Select contrast 24 h 12 h User settings back User settings Factory settings restore Factory setting ...

Page 25: ...ssed when the childproof lock is activated A double acoustic signal is emitted Childproof lock appears in the plain text display Nothing happens when either button is pressed Operating the appliance when the childproof lock is activated A Hold the button depressed and press the or buttons The childproof lock is overridden The appliance can be operated as normal The childproof lock is automatically...

Page 26: ... off again when it is closed To reduce power consumption to an absolute minimum select Time display invisible in the user settings Despite automatic energy saving stand by all safety functions are active All displays go out when the cooking process has been completed 䡲 High Maximum loudness 䡲 Low Reduced loudness 䡲 Off Acoustic signal is switched off Even if the acoustic signal setting is set to o...

Page 27: ... temperature unit select between C and F Contrast With this function the readability of the display can be adjusted based on how the appliance is installed Time format Select the 24 h setting to activate the European time format and the 12 h setting for the US time format a m p m Factory settings If one or more user settings have been changed these can be reset to the factory settings Type Water h...

Page 28: ...lay The symbol flashes A Turn the adjusting knob to set the hour A Press the button or the adjusting knob Time set minutes Confirm press OK appears in the plain text display The minutes flash in the right digital display The symbol flashes A Turn the adjusting knob to set the minutes 䡲 Press the adjusting knob to confirm the setting or it will be auto matically accepted after 10 seconds 䡲 When the...

Page 29: ...es and 50 seconds 䡲 over 10 minutes in 1 minute intervals e g 1 hour and 12 minutes The maximum timer duration that can be set is 9 hours and 59 minutes A Press the adjusting knob to start the timer Timer appears in the plain text display The countdown to the time remaining is visible in the right digital display The symbol illuminates When the set duration is up A sequence of 5 short acoustic sig...

Page 30: ... display The countdown to the time remaining flashes in the right digital display The symbol flashes A Turn the adjusting knob to change the timer duration Switching off before time A Press the button 2 Timer set mins secs appears in the plain text display flashes in the right digital display The symbol flashes i ...

Page 31: ...e food in the cooking space A Press the button Operating time hrs mins Switch off time press again appears in the plain text display flashes in the right digital display The symbol flashes A Turn the adjusting knob to set the duration maximum of A Press the adjusting knob to confirm Checking Changing A Press the button The time remaining flashes in the right digital display The symbol flashes A Tu...

Page 32: ...n text display A long intermittent acoustic signal is emitted for 1 minute The actual cooking space temperature appears in the left digital display flashes in the right digital display The symbol flashes The settings remain for 3 minutes Extending the operating time A Turn the adjusting knob within 3 minutes to select a new duration A Press the adjusting knob to confirm A Press the button to switc...

Page 33: ... with a delay and off again when the set food probe temperature is reached Note that depending on the estimated duration this could occur somewhat earlier or later than the set switch off time A Place the food in the cooking space A Select the desired operating mode and cooking space temperature Setting the operating time A Press the button Operating time hrs mins Switch off time press again appea...

Page 34: ...tomatic start Checking and changing A Press the button 1 The operating time is visible for 3 seconds A Press the button 2 The switch off time flashes It can be changed The switch off time can be delayed by a maximum of 23 hours and 59 minutes If the 12 h time format has been selected the switch off time can be delayed by a maximum of 11 hours and 59 minutes Example A Select the operating mode and ...

Page 35: ...cally A long intermittent acoustic signal is emitted for 1 minute flashes in the right digital display The symbol flashes The settings remain for 3 minutes Extending the operating time A Turn the adjusting knob within 3 minutes to select a new duration A Press the adjusting knob to confirm A Press the button to switch off The settings are cleared ...

Page 36: ... in Tips and tricks A Press the button once or more to select the desired operating mode Operating mode Symbol Temperature range Recommended temperature Level Steaming 30 100 C 100 C 1 4 Regenerating 100 150 C 120 C 1 4 Professional baking 100 230 C 210 C 1 1 3 ...

Page 37: ...erneath the perforated cooking tray The cooking space is heated simultaneously by steam and hot air The food is heated up or cooked by steaming Reheating pre cooked food frozen products semi ready and ready meals Simultaneously regenerating food on several levels The cooking space is heated by steam and hot air The food is reheated gently without drying it out Bread yeast pastries puff pastries fr...

Page 38: ... Operating modes 38 Operating mode Symbol Temperature range Recommended temperature Level Hot air 30 230 C 180 C 1 1 3 Hot air humid 30 230 C 180 C 1 1 3 Hot air steaming 30 230 C 180 C 1 1 3 ...

Page 39: ...d which is circulated evenly The steam produced is largely retained in the cooking space ensuring the food retains its moisture Gratins soufflés meat frozen products chestnuts puff pastries yeast pastries bread and convenience foods on one or two levels Press the button to activate deactivate steam The symbol is illuminated when steam is activated A heating element behind the back wall of the cook...

Page 40: ...nd side wall of the cooking space Both the plug and the socket are without current A Always keep the plug 2 clean A Flip back the cover and insert the plug 2 into the socket 3 Only use the food probe supplied Do not clean the food probe in the dishwasher 䡲 Reliable readings are only possible for thick compact cuts of the meat if necessary tie the meat up 䡲 Do not position the food probe next to a ...

Page 41: ...of doneness see Tips on settings A Press the adjusting knob to confirm The actual food probe temperature is displayed during the cooking process As long as the food probe temperature is below 30 C is displayed Checking Changing A Press the button 2 The set food probe temperature flashes in the left digital display The symbol flashes A Turn the adjusting knob to change the food probe temperature To...

Page 42: ...e Food probe temperature reached appears in the plain text display The actual food probe temperature e g appears in the left digital display The symbol flashes A Press the button to switch off the appliance If the meat is left in the cooking space after having switched off the appliance the food probe temperature will continue to rise due to the residual heat ...

Page 43: ... that the meat is ready by the set time The temperature reading of the food probe plays an important role which is why the food probe must be positioned carefully Lean quality cuts of meat are best for soft roasting The meat should weigh between 500 g and 2000 g and for best results be no thinner than 4 cm Sinewy or fatty cuts of meat are less suitable for soft roasting A Marinate or season the me...

Page 44: ...eg of lamb as an example A Press the adjusting knob to activate the plain text display Select and press OK BakeOmatic appears in the plain text display A Turn the adjusting knob until Select and press OK Soft roast ing appears in the plain text display A Press the adjusting knob to confirm Soft roasting Fillet of veal appears in the plain text display A Turn the adjusting knob until Soft roasting ...

Page 45: ...text display A Press the adjusting knob to continue operation Switching off before time A Press the button 2 To change the preset food probe temperature A Press the button The recommended food probe temperature flashes in the left digital display The symbol flashes A Turn the adjusting knob to change the food probe temperature To change the preset operating time A Press the button flashes in the r...

Page 46: ...ll browned setting Cooking Baking times When BakeOmatic starts sensors determine optimum and exact cooking or baking times The effective cooking or baking times are displayed after about 5 10 minutes Before starting the cooking space must have cooled down in order to determine the optimum cooking or baking time A In order to determine the cooking or baking time correctly the ap pliance door must n...

Page 47: ...reheating Example A14 Torte Select and press OK BakeOmatic BakeOmatic A14 Torte A14 Torte start A14 Torte medium browned A14 Torte Appliance is preheating Put food into cooking space press OK to continue End A14 Torte medium browned i i ...

Page 48: ...nob until BakeOmatic A14 Torte appears in the plain text display A Press the adjusting knob to confirm A14 Torte medium browned appears in the plain text display A Turn the adjusting knob to change the degree of browning if necessary A Press the adjusting knob to confirm A14 Torte Appliance is preheating appears in the plain text display A single acoustic signal is emitted as soon as the cooking s...

Page 49: ...ubsequently appears in the right digital display Switching off before time A Press the button 2 Before starting the cooking space must have cooled down in order to determine the optimum cooking or baking time A In order to determine the cooking or baking time correctly the ap pliance door must not be opened when is flashing in the digital display For recipes that do not require preheating place th...

Page 50: ...recipe book After being selected a stored rec ipe can be changed if required Recipes requiring preheating Example G16 Chocolate surprise Select and press OK GourmetSteam Select and press OK BakeOmatic GourmetSteam G16 Chocolate surprise G16 Chocolate surprise start G16 Chocolate surprise Appliance is preheating Put food into cooking space press OK to continue G16 Chocolate surprise End i i ...

Page 51: ...plain text display A Turn the adjusting knob until GourmetSteam G16 Chocolate sur prise appears in the plain text display A Press the adjusting knob to confirm G16 Chocolate surprise Appliance is preheating appears in the plain text display The cooking space is being preheated A single acoustic signal is emitted as soon as the preset cooking space temperature is reached Put food into cooking space...

Page 52: ...g the programme A If the button is pressed operation is interrupted G16 Chocolate surprise continue appears in the plain text display A Press the adjusting knob to continue operation Switching off before time A Press the button 2 To change the preset cooking space temperature A Press the button A Turn the adjusting knob to change the cooking space temperature To change the operating time A Press t...

Page 53: ...fely The recipes are detailed in the recipe book After being selected a stored rec ipe can be changed if required Recipes requiring preheating Example R35 Cake Select and press OK Recipes Select and press OK BakeOmatic Recipes R35 Cake R35 Cake start R35 Cake Appliance is preheating Put food into cooking space press OK to continue R35 Cake End i i ...

Page 54: ... knob until Recipes R35 Cake appears in the plain text display A Press the adjusting knob to confirm R35 Cake start appears in the plain text display A Press the adjusting knob to confirm R35 Cake Appliance is preheating appears in the plain text display The cooking space is preheating A single acoustic signal is emitted as soon as the preset cooking space temperature is reached Put food into cook...

Page 55: ... confirm The appliance starts with the corresponding settings Inadvertently interrupting the programme A If the button is pressed operation is interrupted R35 Cake continue appears in the plain text display A Press the adjusting knob to continue operation Switching off before time A Press the button 2 A Press the button A Turn the adjusting knob to change the cooking space temperature A Press the ...

Page 56: ...t takes to reach the set food probe temperature Making recipe settings A Press the adjusting knob to activate the plain text display Select and press OK BakeOmatic appears in the plain text display A Turn the adjusting knob until Select and press OK Own recipes appears in the plain text display A Press the adjusting knob to confirm A Turn the adjusting knob until the first empty recipe appears in ...

Page 57: ...A Turn the adjusting knob and select step 2 A Set the desired operating mode cooking space temperature food probe temperature and operating time for step 2 A Set additional steps in the same way A Press the adjusting knob to confirm A Press the adjusting knob again to confirm Recipe 1 empty save appears in the plain text display 䡲 You can now save change or copy the recipe or start it immediately ...

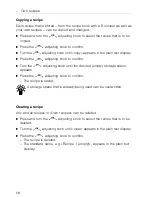
Page 58: ...g knob to confirm A Turn the adjusting knob until the desired empty storage space appears A Press the adjusting knob to confirm The recipe is saved Clearing a recipe Any and all recipes in Own recipes can be deleted A Press and turn the adjusting knob to select the recipe that is to be deleted A Turn the adjusting knob until clear appears in the plain text display A Press the adjusting knob to con...

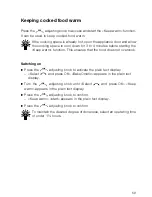
Page 59: ...ting knob until Select and press OK Keep warm appears in the plain text display A Press the adjusting knob to confirm Keep warm start appears in the plain text display A Press the adjusting knob to confirm If the cooking space is already hot open the appliance door and allow the cooking space to cool down for 3 to 4 minutes before starting the Keep warm function This ensures that the food does not...

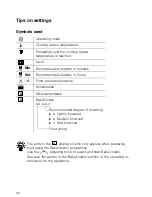
Page 60: ...probe temperature Accessories Mikrowellendauer BakeOmatic AX a b c The entry in the display column only applies when preparing food using the BakeOmatic programme Use the adjusting knob to select and start BakeOmatic See also the advice in the BakeOmatic section of the operating in structions for the appliance C A A Recommended degree of browning 䡲 a Lightly browned 䡲 b Medium browned 䡲 c Well bro...

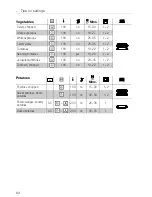
Page 61: ...cauliflower 100 no 30 45 1 2 Cauliflower florets 100 no 15 25 1 2 Broccoli 100 no 10 20 1 2 Chicory 100 no 20 30 1 2 Dried string beans soa ked 100 no 35 50 1 2 Fennel chopped 100 no 15 25 1 2 White cabbage chopped 100 no 20 35 1 2 Carrots chopped 100 no 10 25 1 2 Mange tout 100 no 10 25 1 2 Kohlrabi chopped 100 no 15 30 1 2 Swiss chard mangold 100 no 10 25 1 2 Corn on the cob 100 no 30 50 1 2 Swe...

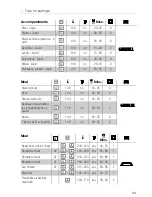
Page 62: ...25 35 1 2 Tomatoes 100 no 13 22 1 2 Skinning tomatoes 100 yes 10 20 1 2 Jerusalem artichoke 100 no 20 45 1 2 Zucchetti chopped 100 no 13 22 1 2 Potatoes Mins Potatoes chopped 100 no 15 30 1 2 Sweet potatoes whole potatoes 100 no 30 50 1 2 Potato wedges country potatoes A5 230 no 20 35 1 Baked potatoes A5 230 no 30 55 1 Vegetables Mins C A C ...

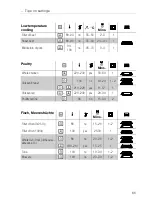
Page 63: ... Mins Stewing meat 100 no 60 95 2 Ham 100 no 60 95 2 Smoked pork loin 100 no 45 65 2 Saucisson Geschnetzel tes chopped meat in a sauce 100 no 30 50 2 Bacon 100 no 20 35 2 Fillet of beef veal pork 100 no 20 35 2 Meat Mins Roast beef sirloin of beef 200 210 yes 40 55 1 Shoulder of beef A7 190 200 yes 60 80 1 Shoulder of veal A7 200 210 yes 60 80 1 Shoulder of pork A7 180 200 yes 60 95 1 Leg of lamb ...

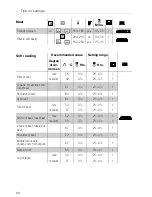
Page 64: ...um 62 3 2 4 1 Topside of veal thick end loin of veal 67 3 2 4 1 Shoulder of veal 80 3 2 4 1 Veal neck 81 3 2 4 1 Fillet of beef rare 53 3 2 4 1 medium 57 3 2 4 1 Sirloin of beef roast beef rare 52 3 2 4 1 medium 55 3 2 4 1 Chuck of beef topside of beef 67 3 2 4 1 Shoulder of beef 72 3 2 4 1 Middle loin of pork chump end of loin of pork 67 3 2 4 1 Neck of pork 85 3 2 4 1 Leg of lamb rare 63 3 2 4 1...

Page 65: ...Whole chicken 220 230 yes 50 60 1 Chicken breast 100 no 10 20 1 2 210 220 yes 8 12 1 Chicken leg 220 230 yes 20 30 1 Poultry terrine 90 no 15 30 2 Fisch Meeresfrüchte Mins Fillet of fish 3 x250 g 80 no 15 20 1 2 Fillet of fish 1000g 100 yes 25 30 1 Whole fish trout gilthead se abream etc 80 no 20 30 1 2 180 210 yes 15 25 1 Tuna 100 no 10 30 1 2 Mussels 100 no 20 30 1 2 C C C ...

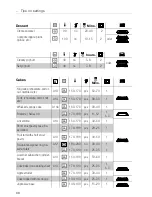
Page 66: ...a 160 170 yes 30 40 1 Roulade Swiss roll 170 180 yes 8 12 1 1 3 Linzertorte A14 150 170 yes 40 50 1 Short crust pastry case ba ked blind 170 180 yes 20 25 1 Fruit tart with short crust pastry A10 170 180 yes 40 50 1 Raisin bread yeast ring ha zelnut plait A12 180 200 no 30 40 1 170 190 no 25 35 1 Luzerner Lebkuchen ginger bread A14 150 160 yes 50 60 1 Cake bakedon a baking sheet A13 170 190 yes 25...

Page 67: ...0 170 yes 20 30 1 1 3 Macaroons 170 180 yes 12 17 1 1 3 Brunsli chocolate almond spice cookies Zimtsterne cinnamon star coo kies 170 180 yes 8 12 1 1 3 Mailänderli butter biscuits Spitzbuben jam biscuits 150 160 yes 12 17 1 1 3 Basler Leckerli honey almond spice cookies 170 180 yes 12 17 1 1 3 Savouries and biscuits Mins Chräbeli aniseed biscuits 130 140 yes 20 30 1 1 3 Bruschetta garlic bread 180...

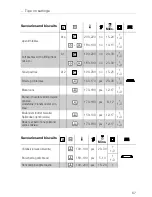
Page 68: ...za fresh A8 200 210 yes 20 30 1 1 3 Pizza frozen A9 Savoury flan cheese vege table onion A10 170 180 yes 40 50 1 Bread and plaited bread Mins Bread A11 200 210 no 40 50 1 200 210 no 35 50 1 Bread rolls A11 210 220 no 25 30 1 1 3 210 220 no 20 30 1 1 3 Plaited bread A11 a 190 200 no 30 40 1 1 3 180 190 no 25 35 1 1 3 190 200 yes 25 35 1 1 3 Yeast ring A12 190 200 no 35 45 1 180 190 no 30 40 1 180 1...

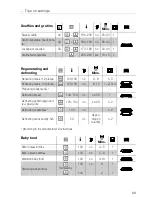
Page 69: ...Reheating meals 1 2 plates 120 130 no 6 8 1 3 Reheating meals 3 4 plates 120 130 no 8 10 1 2 3 4 Preparing ready meals Defrosting bread 140 150 no ca 20 1 Defrosting spätzli egg nood les pasta rice 120 130 no ca 20 1 2 Defrosting vegetables 100 no 1 2 Defrosting meat poultry fish 50 no depen ding on quantity 1 2 Baby food Mins Milk in glass bottles 100 no 4 5 1 Milk in plastic bottles 100 no 5 6 1...

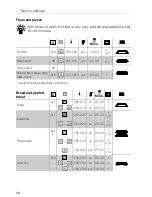
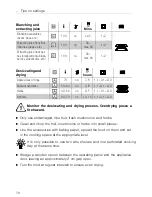
Page 70: ...re even drying Blanching and extracting juice Mins Blanching vegetables beans peas etc 100 no ca 5 1 2 Extracting juice from fruit cherries grapes etc 100 no 30 max 90 1 2 Extracting juice from ber ries blackcurrants black berries elderberries etc 100 no 30 max 90 1 2 Desiccating and drying hours Apple slices or rings 70 no 7 8 1 1 3 1 2 3 Sliced mushrooms 50 60 no 5 8 1 1 3 1 2 3 Herbs 40 50 no 3...

Page 71: ...jars should not touch one another A Select the operating mode the cooking space temperature and the duration according to the table A Press the adjusting knob to confirm A Press the button to switch off the appliance Leave the appliance door open in the at rest position Preserving and bottling Mins Carrots 100 no 90 1 Cauliflower broccoli 100 no 90 1 Beans 100 no 60 1 Mushrooms 100 no 75 90 1 Appl...

Page 72: ... Tips on settings 72 A Leave the jars in the cooking space to cool down completely A Remove the jars Check that the jars are sealed tight ...

Page 73: ...JUR kÉÅâI âåìÅâäÉ UMJUR ìíäÉíI ë ÇÇäÉ NTMJNTR ETRJUMF _çåÉäÉëë ÅìíäÉí NSM ETMF d ããçå NRMJ NSMESRJTMF jÉ í äç Ñ NSMJNTM ETMJTRF sÉ ä oç ëí îÉ ä NSMJNTM ETMJTRF oç ëíÉÇ îÉ ä ëíìÑÑÉÇ ïáíÜ âáÇåÉóë NTMJNTR ETRJUMF håìÅâäÉ çÑ îÉ ä NTRJNUR EUMJURF d ãÉ d ãÉ NTMJNTR ETRJUMF p ÇÇäÉ çÑ Ö ãÉ NQMJNSM ESMJTMF d ãÉ ÑáääÉíI ê êÉ NMRJNNR EQMJQRF d ãÉ ÑáääÉíI ãÉÇáìã NOMJNPM ERMJRRF d ãÉ ÑáääÉíI ïÉääJÇçåÉ NQMJNRM ...

Page 74: ...Frozen aperitif nibbles Use Note 10 35 mins Level 1 or 1 3 Frozen ready made products e g 䡲 Ham croissants 䡲 Mini cheese flans 䡲 Tarte flambée flammku chen 䡲 Puff pastries 䡲 Spring rolls Frozen products are pre baked to various de grees Select duration according to the instruc tions on the packaging 䡲 8 12 mins 䡲 13 20 mins 䡲 21 35 mins A Must not be brushed with egg yolk A3 Baked dish Use Note 30...

Page 75: ...se Note 20 50 mins Level 1 or 1 3 Baked potato accompani ments e g 䡲 Potato wedges 䡲 Sliced potatoes 䡲 Diced potatoes 䡲 Baked potatoes 䡲 Marinated vegetables coarsely chopped A Leave enough space bet ween the pieces of potato Preferably spread on two baking sheets A6 Frozen po tato products Use Note 10 35 mins Level 1 or 1 3 Frozen ready made potato products e g 䡲 Chips 䡲 Croquettes 䡲 Potato burge...

Page 76: ...䡲 Mini pizzas 䡲 Mini pizza rounds 䡲 Tarte flambée flammku chen A For a crispier base bake in greased perfo rated cooking tray A9 Frozen pizza Use Note 10 35 mins Level 1 or 1 3 Frozen ready made pizza e g 䡲 Round pizza 䡲 Mini pizza 䡲 Family pizza Frozen products are pre baked to various de grees Select duration according to the instruc tions on the packaging 䡲 8 12 mins 䡲 13 20 mins 䡲 21 35 mins A...

Page 77: ... bread 䡲 Party bread 䡲 Focaccia Italian flat bread Plaited bread A Must not be brushed with egg yolk A Select Lightly browned A12 Yeast pastry with fil ling Use Note 25 45 mins Level 1 or 1 3 Sweet and savoury yeast pa stries e g 䡲 Hazelnut croissant 䡲 Russian plait 䡲 Yeast ring 䡲 Pizza rounds Hazel croissants A Select Lightly browned or Medium browned ...

Page 78: ...ffins cake ba ked on a baking sheet e g 䡲 Chocolate cake 䡲 Lemon cake 䡲 Banana muffins 䡲 Cake baked on a baking sheet A14 Torte Use Note With preheating 30 45 mins Level 1 All types of torte e g 䡲 Chocolate torte 䡲 Carrot torte 䡲 Linzertorte Cakes topped with me ringue and Swiss rolls A Bake in the usual way ...

Page 79: ... stainless steel tray underneath the per forated cooking tray or wire shelf to catch food spills and collect condensate 䡲 Put the tableware directly on the stainless steel tray or the wire shelf and put into the cooking space 䡲 Season vegetables after steaming Type of food Weight Approximate amount of liquid to be added depending on desired consistency Rice 3 35 ounce 100 g 2 3 cup 1 d l salted wa...

Page 80: ...a 5 Result Solution 䡲 The baking or roast looks good on the outside but is still doughy or raw on the inside A Next time set a lower cooking space tem perature and lengthen the operating time Result Solution 䡲 Regenerated food is dried out A Next time set a lower cooking space tem perature and shorten the operating time 䡲 Too much condensate on or around the regenerat ed food A Next time set a hig...

Page 81: ...d can be oversteamed The bread will come out flatter 䡲 For a nice crispy crust the smaller the item to be baked the higher the temperature should be during the hot air phase The optimum baking tem perature for bread buns is generally higher than for a single loaf of bread Hot air steaming Through the condensation of steam the transfer of energy to the food is more efficient than with baking with h...

Page 82: ... powder to add Result Solution 䡲 The baking has browned unevenly A Next time set a lower the cooking space temperature and adjust the operating time A If using or check that the levels used correspond to those recommended in Tips on settings A Do not push baking tins or bulky foodstuff right to the back of the cooking space 䡲 The baking has come out lighter on one tray than on the other A Check th...

Page 83: ...an the operating mode 䡲 Avoid opening the appliance door frequently 䡲 Only switch the illumination on if needed 䡲 Use the residual heat for longer cooking times i e over 30 minutes switch the appliance off some 5 to10 minutes before the end of the cooking time Exceptions soufflé sponge choux pastry and puff pastry 䡲 Minimise preheating 䡲 Only preheat the cooking space if the baking results depend ...

Page 84: ...se If steaming 4 30 minutes per week the appliance must be descaled depending on water hardness roughly as follows We recommend you descale the appliance whenever the warning appears in the plain text display Failure to descale the appliance will likely impair the functioning of or cause damage to the appliance Operating time remaining to descaling The operating time remaining to descaling can be ...

Page 85: ... a gentle yet professional level of descaling Standard descaling solutions are not suitable as they may contain foam creating additives or not be effective enough Using a different descaler could cause The descaler contains highly effective acid Rinse away any splashes immediately with water 䡲 Overfoaming in the cooking space 䡲 Insufficient descaling of the boiler 䡲 Damage to the appliance in the ...

Page 86: ...nob to confirm The descaling phase starts Descale appliance running appears in the plain text display After about 30 minutes Pour away descaler Add 1 2 l water appears in the plain text display A Remove the water tank pour away the descaler and fill the tank with 1 2 l cold water A Put the water tank back The rinsing phase starts automatically Descale appliance 1st rinsing cycle appears in the pla...

Page 87: ...ars in the plain text display A Remove empty and dry the water tank A Wipe up any water in the bottom of the cooking space with a soft cloth Whether further rinsing cycles are required depends on the level of soiling of the liquid being pumped off In this case Descale appliance Repeat 2nd rinsing cycle ap pears in the plain text display For the und operating modes after descal ing the water that i...

Page 88: ...soiling or excess cleaning solution immediately A Clean the surface with a soft cloth dampened with water and a little wash ing up liquid for metallic surfaces rub in the direction of the original polish lines Dry with a soft cloth A Clean the appliance door with a soft cloth dampened with water and a little washing up liquid Dry with a soft cloth Allow the appliance and accessories to cool down b...

Page 89: ...Fold the clamps 2 on the door hinges 1 forward A Close the appliance door as far as its at rest position ap proximately 30 A Lift the appliance door for ward and out Reassembling the appliance door A From the front push the two hinges 1 into the opening 3 A Open the appliance door as far as it will go and close back the clips 2 Exercise caution when removing and reassembling the appliance door It ...

Page 90: ... screws and tighten securely in a clockwise direction Replacing the door seal For safety reasons the door seal must be replaced by our Customer Services Cleaning the accessories 䡲 The stainless steel tray the perforated cooking tray the wire shelf and the shelf guides can be cleaned in the dishwasher 䡲 The baking tray can be cleaned in the dishwasher however this will affect its non stick properti...

Page 91: ...ch the appliance on for a short period of time about 30 minutes beforehand setting it to the operat ing mode and a temperature of 80 C This will soften the soiling Replacing a defective light bulb For safety reasons in case of a defective light bulb please contact our Customer Services Do not bend temperature sensor during cleaning With use the cooking space will over time turn a golden colour Thi...

Page 92: ... down the error message in full message serial number FN and error number E before calling Customer Services As an example Possible cause Solution 䡲 The fuse or circuit breaker for electrical installations in the home is defective A Change the fuse A Reset the circuit breaker 䡲 The fuse or circuit breaker keeps blowing A Call Customer Services 䡲 An interruption in the power supply A Check the powe...

Page 93: ...n in the water tank compartment Possible cause Solution 䡲 For safety reasons the water in the boiler is not pumped off until the tem perature of the water drops below 80 C If there is enough cold water in the water tank the boiler will be automatically filled This will cool down the water in the boiler If there is not enough cold water in the water tank it will take longer to cool down this can ta...

Page 94: ...essage in full message serial number FN and error number E A Call Customer Services Possible cause Solution 䡲 Various situations can lead to an error message A Cancel the error message by pressing the button A Disconnect the power supply for about 1 minute A Reconnect the power supply A If the error message appears again note down the error message in full message serial number FN and error number...

Page 95: ...message by pressing the button A Disconnect the power supply for about 1 minute A Reconnect the power supply A If the error message appears again note down the error message in full message serial number FN and error number E A Disconnect the power supply A Call Customer Services 䡲 The user settings remain unchanged 䡲 If a power failure occurs during BakeOmatic Soft roasting GourmetSteaming Recipe...

Page 96: ...s steel GN 325 40 354 565051 Wire shelf 325 23 354 565038 Cooking tray unperfo rated stainless steel GN 325 40 354 565052 Stainless steel tray GN 325 20 177 565055 Cooking tray unperfo rated stainless steel GN 325 40 177 565054 Cooking tray perforat ed stainless steel GN 325 40 177 565048 Cooking tray unperfo rated with lip stainless steel GN 325 40 354 566403 The dimensions correspond to Gastrono...

Page 97: ... Accessories and spare parts 97 Spare parts Shelf guide left right 566981 Knurled nut 566372 Lid for water tank 565035 Water tank 565035 Food probe with straight handle Decalcifier 566405 ...

Page 98: ... is measured when the cooking space is empty according to an internationally accepted standard Own measure ments may be inaccurate and are not suitable for checking the accuracy of the temperature EKDG 6800 3 Convect Air Piccolo EKDG 6900 1 Height 14 7 8 37 8 cm 17 15 16 45 5 cm Width 23 7 16 59 6 cm 23 7 16 59 6 cm Depth 21 9 16 56 7 cm 21 9 16 56 7 cm Weight 72 75 pounds 33 kg 74 93 pounds 34 kg...

Page 99: ...suming power unnecessarily the appliance is equipped with automatic energy saving stand by To reduce power consumption to an absolute minimum select Time display invisible in the user settings Despite automatic energy saving stand by all safety functions are active ...

Page 100: ... socket or have the appliance disconnected from the mains by a qualified electrician Then cut off the mains cable Disposal 䡲 The old appliance should not be discarded as worthless rubbish If disposed of correctly the raw materials can be recovered for recycling 䡲 The symbol on the identification plate warns that the appliance may not be disposed of in normal household waste 䡲 The appliance must be...

Page 101: ...ing 91 Temperature measurement 98 Temperature sensor 12 Ventilation 12 Cooking space temperature Checking Changing 21 Selecting 21 Cooking trays 14 15 D Delayed start 33 Descale Descaling 86 Operating time remaining 84 Descaler 85 Descaling 84 Disconnection 100 Display elements 11 Displays 11 Disposal 100 Door seal 12 Replacing 90 E Electrical connection 98 Energy Saving 83 Example 19 Exterior cle...

Page 102: ... Quick instructions 108 R Recipes Changing 55 Creating own 56 Starting 54 Refilling water tank 20 Regenerating 36 80 Removing cooked food 21 Roller runner 15 S Safety 100 Safety concept 98 Safety precautions Before using for the first time 2 Children in the home 4 Correct use 3 Note on use 4 Saving energy 83 Shelf guides 90 Socket for food probe 12 Soft roasting 43 Preparing 44 Selecting and start...

Page 103: ...Time setting 28 Timer 29 Tips and tricks 79 Trouble shooting 92 U U E messages 95 User settings 23 Using for the first time 18 W Water hardness 24 27 Water tank 14 Emptying 22 Filling 19 Refilling 20 Wire shelf 13 ...

Page 104: ...ctrician under the observation of statutory regulations A If the socket is inaccessible after the installation safety regulations require that an all polo isolator with a contact opening of at least 3 mm be used on the installation side A The built in cabinet for the combination steam oven must be temperature resistant up to 100 C This applies particularly to veneers plastic coa tings adhesives pa...

Page 105: ... Installation instructions for fitter 105 Installation dimensions inch for a corresponding niche EKDG 6800 3 EKDG 6900 1 for a standard niche 6800 3 with a compensating panel ZUB 736 ...

Page 106: ... Installation instructions for fitter 106 Installation dimensions cm for a corresponding niche EKDG 6800 3 EKDG 6900 1 for a standard niche 6800 3 with a compensating panel ZUB 736 ...

Page 107: ...áëéä óI íÜÉ éäìÖ ãìëí ÄÉ íìêåÉÇK fÑ íÜáë áë åçí éçëëáÄäÉI å ÉäÉÅíêáÅá å ãìëí ÉñJ ÅÜ åÖÉ íÜÉ åÉìíê ä ÅçåÇìÅíçê åÇ íÜÉ íÉêãáå ä ÅçåÇìÅíçêK A Slide the oven fully into the housing unit Do not jam the cooker connection Fixing the appliance A Open the oven door Fix the oven to the housing by inserting the screws supp lied at an angle and screwing through into the housing unit ...

Page 108: ...adjusting knob to set the minutes A Press the adjusting knob to confirm To select the operating mode A Press the button repeatedly until the desired operating mode appears A Turn the adjusting knob to set the cooking space temperature A Press the adjusting knob to confirm To switch off the appliance A Press the button To set the timer A Press the button A Turn the adjusting knob to set the timer d...

Page 109: ......

Page 110: ......

Page 111: ......

Page 112: ...ééÉêëÄìëÅÜëíêK NSI aJQRUUP dÉäëÉåâáêÅÜÉå qÉäÉéÜçåÉW EMO MVF Q MNJMI íÉäÉÑ ñW EMO MVF Q MNJP MP ïïïKâìÉééÉêëÄìëÅÜKÇÉ hΩééÉêëÄìëÅÜ dÉëKãKÄKeK báíåÉêÖ ëëÉ NPI NOPN táÉåI íÉäÉéÜçåÉW MN L U SS UMJMI íÉäÉÑ ñW MN L U SS UM TO ïïïKâìÉééÉêëÄìëÅÜK í bJã áäW îÉêâ ìÑ âìÉééÉêëÄìëÅÜK í ...

Reviews: