background image

H5-60-85-01

13

For internal use only

6.2

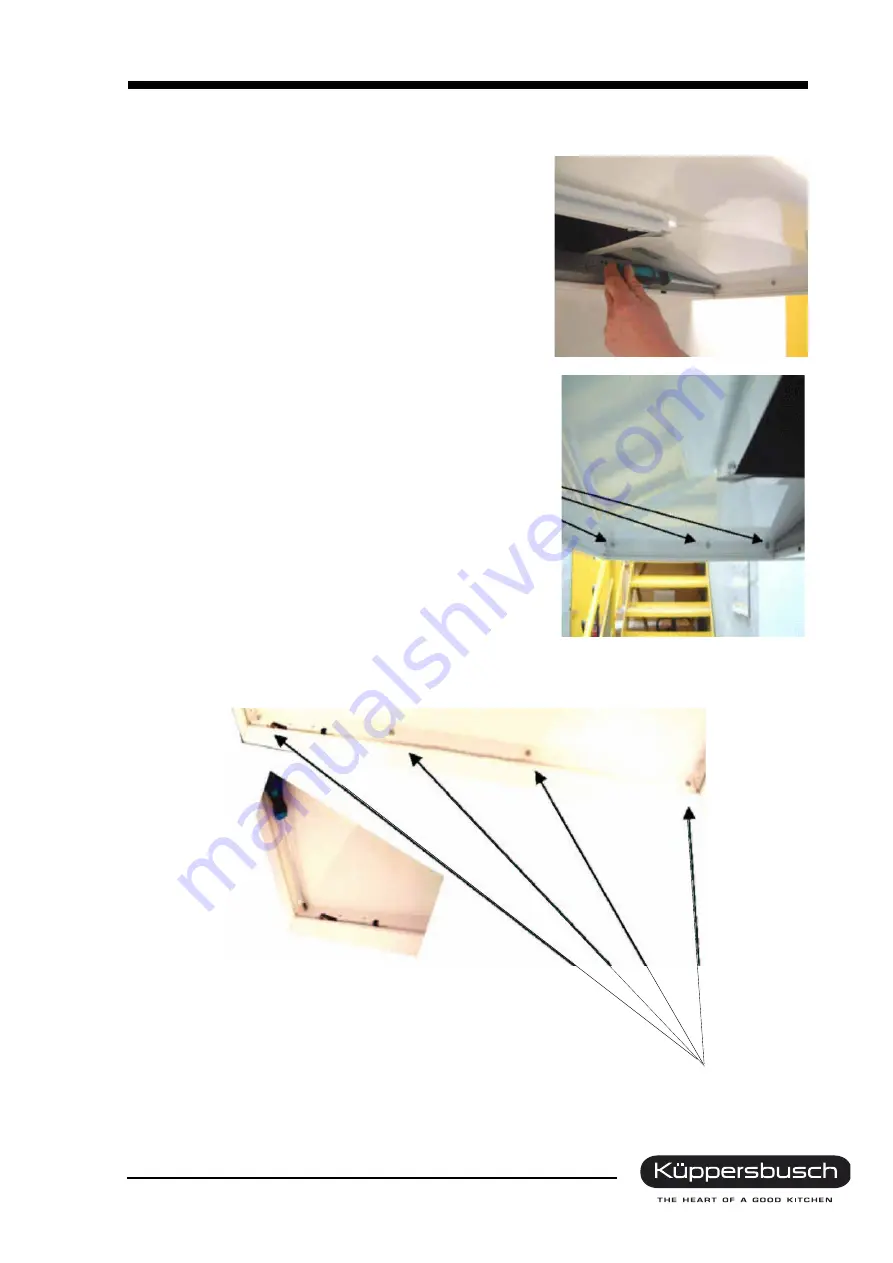
Disassembling the aluminium front strip

Unscrew the 3 screws on the left-hand sideand on the right-
hand side of the hood (fig. 5).

Details fig. 6

Unscrew the 4 screws on the inner
front edge of the hood (fig. 6).

Fig. 4

Fig. 6

Summary of Contents for KD 12450.0

Page 1: ... c QLMHFH c IJLMHFH ...

Page 2: ...e Manual H5 60 85 01 Responsible U Laarmann KÜPPERSBUSCH HAUSGERÄTE AG E mail uwe laarmann kueppersbusch de Tel 0209 401 732 Kundendienst Fax 0209 401 743 Postfach 100 132 Date 12 09 2003 45801 Gelsenkirchen ...

Page 3: ...Removing the grease filter of the KD 12450 and KD 9450 10 6 Access to components 12 6 1 Replacing the aluminium front strip 12 6 2 Disassembling the aluminium front strip 13 6 3 Removing the switch block 14 6 4 Replacing the right hand side aluminium trim 15 6 5 Replacing the left hand side aluminium trim 15 6 6 Replacing the aluminium front trim 16 6 7 Replacing the control panel 17 6 8 Replacing...

Page 4: ... must be used at all times The ground wire resistance must not exceed that specified in the standard It is of vital importance for ensuring the safety of people and the functioning of the appliance On completion of repairs an inspection must be carried out in accordance with VDE 0701 Association of German Electrical Engineers or the corresponding regulations for your country Caution Make sure you ...

Page 5: ...ety instructions and the respective instructions of your country 1 The cooker hood must always be installed above the centre of the hob 2 The clearance stipulated for instalment must be maintained The minimum distance between hobs and the lower edge of the hood must be 650 mm The minimum distance between gas hobs and the lower edge of the hood must be 700 mm 3 Exhaust air may not be discharged int...

Page 6: ...nge Press the active LED lights up orange once again in order to switch off the fan The high power setting is generally only needed for a short time For this reason the cooker hood will switch down to level 3 after 10 minutes When the high power setting has been activated the Max LED will light up orange In order to switch the lamp on and off press the lamp led 3 2 Automatic switch off for the per...

Page 7: ...e 10 minutes follow up time 4 blinks of the LEDs 1 and 5 indicate 15 minutes follow up time Please switch on the appliance once it has been progammed Set the required fan power level The follow up time programmed will be indicated by the blinking of LEDs 2 3 and 4 as follows In the case of the MAX setting LEDs 2 3 and 4 do not blink if the automatic switch off function has not been activated LEDs ...

Page 8: ...operation please carry out the following steps Recirculating air operation The motor and the lamp must be switched off Press the 4 switch for approximately 20 seconds Two blinks of all 5 LEDs indicates recirculating air function ON Return to exhaust air operation The motor and the lamp must be switched off Press the 4 switch for approximately 10 seconds A single blink of all 5 LEDs indicates exhau...

Page 9: ...se filters are saturated 4 1 Resetting the grease filter indicator The motor and the lamp must be switched off Press the 4 switch for approximately 3 4 seconds If all 5 LEDs light up briefly reset has been carried out successfully 4 2 Removing the grease filters Release the grease filter by pressing on the locking mechanism and opening it up downwards ...

Page 10: ... 613 does not fit into these cooker hoods Instead the charcoal filter ZUB 870 and a U shaped supporting frame for the charcoal filter needs to be used for both cooker hoods Additional reinforcement is required for cooker hoods produced prior to October 2002 The following spare parts are required U shaped support frame Spare part no 56 55 18 Charcoal filter ZUB 870 Spare part no 56 45 11 Additional...

Page 11: ... 11 For internal use only Stainless steel u shaped support frame reinforcement Charcoal filter support In order to install the stainless steel reinforcement loosen all 4 screws A and install the new reinforcement ...

Page 12: ...de of the upper chimney part fig 1 Remove the upper and lower chimney parts of the hood fig 2 Switch off the appliance and disconnect it from the electrical socket if it is fitted with a plug or if the appliance is hard wired by means of a double pole switch disconnect the fuse Remove the metal filters fig 3 Fig 1 Fig 2 Fig 3 Fig 3 ...

Page 13: ... use only 6 2 Disassembling the aluminium front strip Unscrew the 3 screws on the left hand sideand on the right hand side of the hood fig 5 Details fig 6 Unscrew the 4 screws on the inner front edge of the hood fig 6 Fig 4 Fig 6 ...

Page 14: ...6 3 Removing the switch block Unscrew the 2 screws on the inner rear cover fig 7 Remove the inner rear cover fig 8 Unscrew the 2 screws on the inner rear cover fig 9 and 10 Now remove the switch block fig 11 Fig 7 Fig 8 Fig 9 Fig 10 Fig 11 ...

Page 15: ...m front trim fig 12 6 4 Replacing the right hand side aluminium trim To replace the right hand trim unscrew the 4 screws fig 13 6 5 Replacing the left hand side aluminium trim To replace the left hand trim unscrew the 4 screws fig 14 Fig 12 F Fig 13 F Fig 14 ...

Page 16: ...ndicated in fig 16 Ensure the flat multiwires are replaced correctly Carefully adjust the position of the aluminium front trim to prevent any damage to the flat multiwires Fit the aluminium front trim with the 10 screws as indicated in fig 4 5 and 6 on page 12 and fig 17 Re position the control box in the aperture in the aluminium front trim Fit the switch block as indicated on page 14 Fig 15 Fig ...

Page 17: ...ted on page 14 Take the control element in your hand as illustrated fig 18 Loosen the 2 screws on each side of the control box fig 19 and then remove the bracket from the control box Loosen and remove the 2 screws fig 20 Remove the rear cover of the control box fig 21 Fig 18 Fig 19 Fig 20 Fig 20 Fig 21 ...

Page 18: ...n page 14 Switch on the electricity supply to the hood Check the different functions of the controls 6 8 Replacing the halogen lights Disconnect the hood as indicated on page 12 Remove the 2 screws on each side of the glass diffuser fig 24 and then remove the diffuser fig 25 To ensure the hood functions safely replace the halogen tube with an identical tube 230V 60W and then mount the diffuser aga...

Page 19: ...lained on page 18 Then remove the metal filters as shown on page 9 Loosen the two screws 1 and 2 on each side of the bracket which supports the halogen light fig 26 Loosen the two screws 1 and 2 from the housing of the control board fig 27 Remove the housing with the control board fig 28 Remove the 4 screws A from the control board box cover fig 24 Fig 26 Fig 27 Fig 28 Fig 29 ...

Page 20: ...ck the different control functions to ensure that the hood is working peoperly 6 10 Replacing the flat multiwires of the control panel Remove the control panel as described on page 17 Then remove the control board as described on page 19 Replace the flat multiwires and instal the control board Then instal the control panel by reversing the disassembling process Switch on the electricity supply to ...

Page 21: ...r as indicated in fig 35 and 36 Remove the processor as indicated in fig 37 Install the new processor correctly using the positioning aid as indicated in fig 34 Install the control board by reversing the disassembling process Switch on the electricity supply to the hood Check the different control functions to ensure that the hood is working properly Fig 33 L Processor Positioning aid Fig 34 Fig 3...

Page 22: ... data Voltage frequency 230V 50Hz Air extraction rate free blowing MIN setting MED setting MAX setting HIGH POWER 440 m h 540 m h 780 m h 950 m h Electrical connection 470 W Halogen lighting high voltage halogen 2 x 60 W Exhaust air connection 150 mm ...

Page 23: ...H5 60 85 01 23 For internal use only 8 Circuit diagram Flat multi wires Control panel light blue brown green yellow purple pink blue black white brown black grey white royal blue brown yellow ...

Page 24: ...B A Med setting 57 dB A Max setting 65 dB A High power setting 69 dB A Attention There is currently no standard gauging procedure for these figures These figures may only be used as reference figures for determining the noise level A higher number of decibels dB A is detemined in the case of the recirculating air mode ...

Page 25: ...LED button no 2 is pressed The velocity of the ventilator cannot be regulated to the required setting when the and buttons are pressed The high power setting cannot be acti vated by means of pressing the LED button no 5 The lamps have burnt out The switch unit has blocked The flat multi wires are damaged Failure in the connections to the flat multi wires The control board does not function The con...

Page 26: ...rs Firstly take a look at the procedure in the instruction manual Replace the processor Replace the control board The remote control does not function properly The remote control is being used beyond the 30 angle and the 7m range The remote transmission lense and the sen sor window are dirty Strong fluorescent light is being used in the same room Check to see whether the batteries in the remote co...

Page 27: ...is attached to the wall supports Connect the exhaust air duct to the fan outlet of the hood 4 Check the adjustment and the positioning of the cooker hood from the outside with the 5x10 screws of the supports and with the two 5 x 25 mm screws 5 Once everything has been adjusted secure the cooker hood with the fastening screw against unintentional extension This positive fastening screw is indicated...

Page 28: ...he hood and is provided with a ventilation opening to the recirculating airdiverter Connect the connection pipe of the respective diameter to the opening of the recirculating air diverter and the output opening of the fan Connect the diagonal connection pieces supplied to the inner edges of the frame in accordance with the diagram using the 4 2 x 9 5 screws Insert the charcoal filter cartridge fro...

Reviews: