

5. IP Address Assignment
KNC-HMB6319-iWX should be assigned an IP Address from a DHCP server. It is configured from the factory by default to work like that.
Usually small home router has the feature of DHCP Server.
You can download the open-source DHCP server from the Internet.
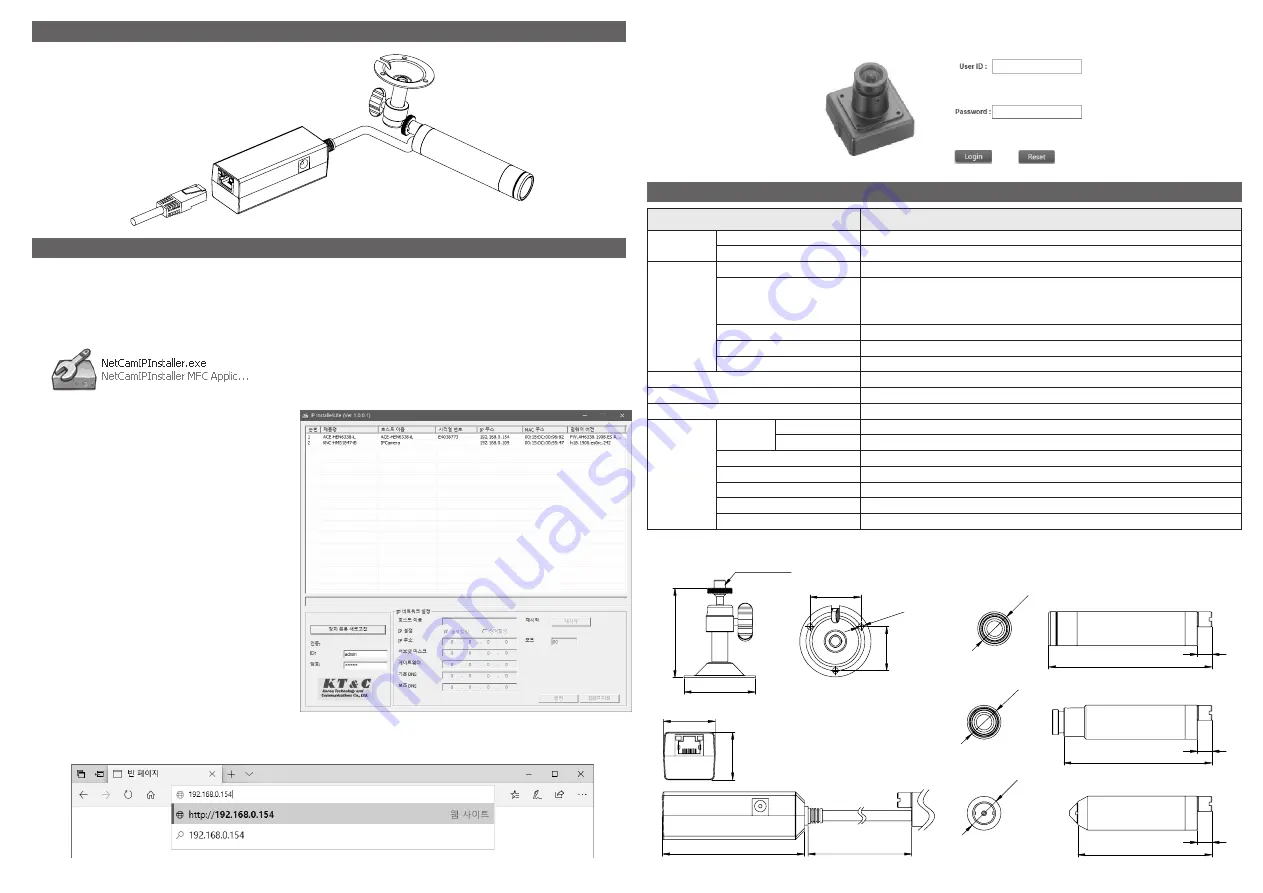
Assign an IP address using IP Installer
The IP installer automatically searches for and displays the network devices on your network.
This application can also be used to manually assign a static IP address.
1. Check that the Network Camera is connected to the network and that power has been supplied.
2. Start NetCAM installer.
3. When the Network Camera is displayed, as shown above,
select the unit that needs changing of an IP address.
A. Refresh Device List – Rescan local network to find the
Network Camera.
B. Authenticate – Enter the administrator ID and password.
* Default User ID and Password is
[ID: admin, Password: admin]
C. Host Name – Enter the Host Name of the Network Camera.
D. IP Settings
i. Dynamic – Assign a dynamic IP address automatically
from the DHCP server on your network.
ii. Static – Assign a static IP address manually.
iii. Port – Enter the HTTP port the Network Camera will use.
The default setting is 80.
Alternatively, any port in the range 1024-65535 may be
used, but check first with your system administrator
before changing the default setting.
E. Network Settings
i. Subnet Mask – Specify the mask for the subnet the
Network Camera is located on.
ii. Gateway – Specify the IP address of the default router
(gateway) used for connecting devices attached to
different networks and network segments.
iii. Pri. DNS – Enter the IP address of the primary DNS server.
This server provides the translation of host names to
IP addresses on your network.
iv. Sec. DNS – Specify the IP address of the secondary DNS
server. This will be used if the primary DNS server is
unvailable.
4. Click the “Set” button to save the configuration.
Dimensions
(Unit:mm)
Accessing the Network Camera
1. Start your browser.
2. Enter the IP address or host name of the Network Camera in the Address field of your browser.
3. After accessing the web page with a browser, a Login page will appear. Enter the user ID and password.
Ø40
29
80
350
50
24.8
26.5
91.4
82.9
75
8
8
8
1/4"-20UNC
28.6
3-Ø3.2
Ø19
Ø19
Ø19
6. Product Specifications
Features
Specification
Video Input
Image Sensor
1/2.8" 2.13MP Sony STARVIS CMOS
Resolution
1080p(1920x1080), 720p(1280x720), 800x600, 640x480
Video
Output
Codec
H.264 (Main/Baseline Profile), MJPEG
Framerate
First: 1080p 30(25)fps (H.264)
Second : 640x360 30(25)fps (H.264)
Third : 1080p 30(25)fps (MJPEG)
Bitrate Control
H.264 : CBR, VBR, CVBR
Motion Detection
60x34 Motion Block, upto 4 Zones
Privacy Masking Zone
16 Zones
Ethernet
10/100 Base-T Ethernet
Protocols
HTTP, HTTPS, UPnP, DNS, DDNS, RTP/RTSP, TCP/IP, UDP, DHCP, RARP, NTP
SW Integration API
ONVIF, KT&C API
General
Power
Input
12VDC(±10%), PoE (IEEE802.3af Integrated)
Consumption
12VDC(Max 190mA) / PoE(Max 3.0W)
Connectors
Ethernet
Dimension
∅19 x 91.4 mm (iWX type)
Weight
Approx. 85.5g (with PoE Cable/iWX type)
Operating Conditions
Temperature: -10°C ~ +50°C (14°F ~ 122°), Humidity Max. 80% RH (non-condensing)
Storage Conditions
Temperature:-20°C ~ +60°C(-4°F~140°F), Humidity Max. 90% RH(non-condensing)
4. Hardware Connection


