background image

UK/FR 


32 

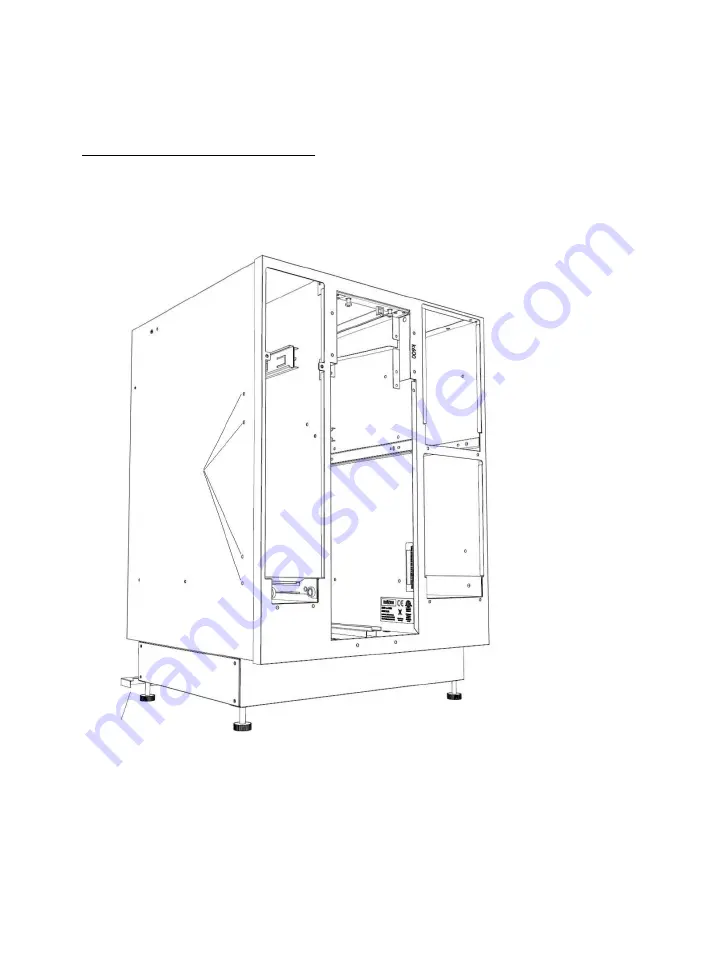
Comment ancrer l'appareil 

 
L'appareil doit être fermement ancré. Cela peut être fait en fixant l'appareil aux 
placards adjacents en vissant l'appareil sur les côtés dans la carcasse/placards de 
jointure (schéma 8). 


Schéma 8 

CROCHET DE FIXATION 
AU SOL (MODÈLES S) 

TROUS 

D'INSTALLATION 

Summary of Contents for F86/300

Page 1: ...krushr com Des sacs sur mesure krushr sont disponibles chez votre revendeur local ou sur www krushr com A34 050 R1 March 2015 Waste Recycling Compactor Installation Manual Compacteur de d chet pour le...

Page 2: ...Installation Information 4 Parts Supplied 4 Tools Required 5 Design Information 5 Product Dimensions and Clearances 5 Grounding Instructions and Electrical Safety 7 Installation Instructions 9 Unpack...

Page 3: ...ion to a potential hazard exists Protective Earth Ground To identify any terminal which is intended for connection to an external conductor for protection against electric shock in case of a fault or...

Page 4: ...s the responsibility of the installer Product failure due to incorrect product installation is not covered under the warranty See owners User Guide IMPORTANT TO THE CONSUMER OWNER Keep these instructi...

Page 5: ...ensure that no damage is caused to surrounding cabinetry ensure that you source appropriate sized screws fixing bolts that are no longer than the thickness of your door Design Information Electrical...

Page 6: ...The plug socket should be at least 440mm from the ground The appliance is equipped with a power cord An electrical outlet must be provided in the under counter opening that meets all applicable elect...

Page 7: ...tain the electrical supply has been correctly installed or the appliance has been properly grounded The appliance is equipped with a three conductor cord and three prong grounding type plug to fit the...

Page 8: ...cian Unplug the appliance from outlet before servicing Do not modify the plug attached to the appliance Use only with a grounded receptacle When not in use or uninstalled the appliance should be kept...

Page 9: ...to just short of the proposed height so that the appliance will slot into the allocated space easily You might want to consider using a lever under the appliance to lift it up or a G clamp to hold th...

Page 10: ...ktop clearance for removal of the Main Collection Bin During installation of the appliance you will need to assess the ease by which the Main Collection Bin can be removed This is particularly relevan...

Page 11: ...ate can be found in Door Mounting Guide on page 16 WARNING Take great care NOT to drill right through the door All models will accommodate either a Kr shr stainless steel door or other furniture door...

Page 12: ...te to the door Dia 2 Hook plate Step 3 If fitting a Kr shr stainless steel door you may need to attach the handle by placing the handle in position and fully tighten the securing bolts Fit plastic cap...

Page 13: ...UK FR 13 Step 4 Next hang the door in position by aligning the 4 hooks on the hook plate over the keyway slots on the door cage Dia 4 Dia 4 4 Hooks Door Cage...

Page 14: ...osen the 4 screws on the door securing plate and slide this down until the lip at the bottom sits just below the door Dia 5 Step 6 Screw the two base retaining screws into position Dia 6 Dia 5 Door Se...

Page 15: ...the screws Dia 7 No Door shown for clarity Dia 7b Step 8 Attach the door rigidity brackets in the positions shown in Dia 7b Care must be taken to ensure that the bracket is positioned such that the ov...

Page 16: ...e appliance must be anchored securely This can be done by securing the appliance to adjoining cabinetry by screwing the appliance sideways into the adjoining carcass cabinetry Dia 8 Dia 8 FLOOR MOUNTI...

Page 17: ...F86 300 F86 310 298 63 74 F86 400 F86 410 398 41 52 F86 600 F86 610 598 242 253 HANDLE THROUGH HOLES POSITION AS APPROPRIATE DOOR RIGIDITY BRACKET POSITIONS PILOT HOLE FOR SCREWS ONLY NOT THRU HOLES...

Page 18: ...ation 20 l ments fournis 20 Outils n cessaires 21 Information sur la conception 21 Dimensions du produit et espaces n cessaires 21 Instructions de mise la terre et s curit lectrique 23 Notice d instal...

Page 19: ...instructions concernant un danger potentiel sont indiqu es Protection sol terre Pour identifier un terminal con u pour une connexion un conducteur externe pour la protection contre les lectrochocs en...

Page 20: ...de l installateur Une panne du produit due une installation incorrecte du produit n est pas couverte par la garantie Consultez la guide d utilisation du propri taire IMPORTANT AU CLIENT UTILISATEUR Ga...

Page 21: ...d g t n est caus aux placards environnant assurez vous d utiliser des vis boulons de fixation de la taille appropri dont la longueur ne d passe pas l paisseur de votre porte Information sur la concept...

Page 22: ...oit tre au moins 440 mm du sol L appareil est quip d un cordon d alimentation Une prise secteur doit tre disponible en dessous de l ouverture du comptoir respectant toutes les r gulations et r glement...

Page 23: ...ue l alimentation lectrique a t correctement install e ou si l appareil n a pas t correctement reli la terre L appareil est quip avec un cordon trois conducteurs et une prise terre trois fiches pour s...

Page 24: ...eil du secteur avant de r parer Ne modifiez pas la prise attach e l appareil N utilisez qu avec un r ceptacle mise la terre Lorsqu il n est pas utilis ou d sinstall l appareil doit tre gard dans un en...

Page 25: ...s pieds desserrez simplement et d vissez le pied R glez les pieds l g rement plus bas que la hauteur propos e afin que l appareil se fixe dans l espace r serv facilement Vous souhaiterez peut tre lais...

Page 26: ...es micro interrupteurs lorsque vous fermez la porte le tiroir D gagement du plan de travail pour enlever la corbeille de collecte principale Pendant l installation de l appareil vous devrez valuer l e...

Page 27: ...age de la porte en page 16 AVERTISSEMENT Faites attention ne PAS percer un trou transper ant la porte Tous les mod les accueilleront soit une porte en acier inoxydable Kr shr soit une autre porte meub...

Page 28: ...e crochet tape 3 Si vous installez une porte en acier inoxydable Kr shr vous aurez peut tre besoin d attacher la poign e en la positionnant et en serrant compl tement les boulons de fixation Installez...

Page 29: ...UK FR 29 tape 4 Puis suspendez la porte en position en alignant les 4 crochets sur la plaque de crochet sur les fentes rainure sur la cage de la porte sch ma 4 Sch ma 4 4 Crochets Cage de la porte...

Page 30: ...plaque de fixation de porte et faites la coulisser vers le bas jusqu ce que le rebord du bas soit juste en dessous de la porte sch ma 5 tape 6 Vissez les deux bases restantes en position sch ma 6 Sch...

Page 31: ...h ma 7 La porte n est pas dessin e pour plus de clart Sch ma 7b tape 8 Attachez les crochets de rigidit de la porte dans les positions indiqu e sur le sch ma 7b Assurez vous bien que le crochet est po...

Page 32: ...reil doit tre fermement ancr Cela peut tre fait en fixant l appareil aux placards adjacents en vissant l appareil sur les c t s dans la carcasse placards de jointure sch ma 8 Sch ma 8 CROCHET DE FIXAT...

Page 33: ...3 74 F86 400 F86 410 398 41 52 F86 600 F86 610 598 242 253 POIGN E AU TRAVERS DES TROUS POSITION COMME APPROPRI POSITION DU CROCHET DE RIGIDIT DE PROTE TROU PILOTE POUR LES VIS SEULEMENT NON TRANSPERC...

Page 34: ...Krushr plc www krushr com...

Reviews: