


13
•
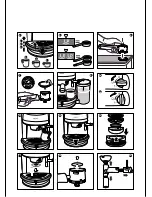
Clean the seal of the percolation head (h)
regularly using a damp cloth.
. The auto-cappuccino accessory
After each use, we advise that you rinse the
auto-cappuccino accessory as follows:
• Turn the function selector (d) to the position
«
».
• Turn the adjustable steam tap (k1) to the
position « ».
•
Immerse the flexible tube (k3) into the clean
milk container 1/3 filled with water.
•
Place a container under the nozzle (k2). If
necessary, adjust the height of the grid
support
(4)
. The tube must not touch the
bottom of the container so as not to prevent
the passage of water.
As soon as the appliance reaches the right
temperature, the temperature control
indicator light (f) will illuminate.
•
Turn the function selector (d) to the position
«
».
•
When all the water has run through, turn
the function selector (d) to the off position
O
.
•
Once this operation is complete, clean the
nozzle (k2) using a damp cloth.
We advise that you completely dismantle the
auto-cappuccino accessory at regular intervals
and clean it with water, a little non-abrasive
liquid soap and a small brush. Rinse and dry
before reassembling
(15)
.
Pay attention to the direction of the
fitting of the flexible tube :
place the
straight-cut end in the Auto Cappuccino
accessory and the angled end into the
container.
Descaling
It is vital that you descale your espresso maker
in order to guarantee its continued operation.
•
Descale your espresso maker at regular
intervals using the descaling powder
included with your machine.
We advise you to use the
KRUPS descaling
accessory, reference 054,
which is available
from approved KRUPS Service Centers. This
accessory includes, in addition to two doses of
descaler, a water hardness test strip to
evaluate the frequency of descaling for your
appliance in normal use. The amount of
scaling depends on the hardness of the water
you use and also on how often it is used. The
frequency of descaling indicated by accessory
054 is thus given by way of indication only.
You must never, under any circumstances, use
classic sulphamic acid or other products
containing this acid as there is a risk of
damaging the appliance. Carefully check the
composition of the descaling products you
intend to use.
- Then use the following method:
•
Remove the filter cartridge (p) by unscrewing
it using the key (p1).
•
Unscrew the grid of the percolation head (h)
and clean it
(13)
.
•
Dissolve 2 tablespoons of descaler or one
sachet of accessory 054 in half a litre of
lukewarm water and pour the mixture into
the empty water tank.
•
Set the switch (e) to «I». The indicator light
(e1) will come on.
As soon as the appliance reaches the correct
temperature, the temperature control
indicator light (f) will illuminate.
•
Place a container under the nozzle (k2), then
switch the steam/hot water button (g) to
«
».
•
Turn the tap (k1) to the position «
».
•
Run through 1/3 of the mixture by setting
the function selector (d) to the position
«
». Then reset the function selector (d) to
the off position
O
.
• Move the container under the percolation
head (h) and run through the second third
of the mixture by setting the function
selector (d) to the position «
».
•
Set the switch (e) to «0» and wait 10 to 15
minutes to allow the descaler to work.
•
Then set the switch (e) to « I ».
•
With the function selector (d) in the position
«
», allow the remainder of the mixture
to run into the container placed beneath the
percolation head (h).
•
Then, reset the function selector (d) to
O
.
•
Run through two tanks of fresh water to
rinse the percolation head and the nozzle. To
do this :
. F
ill the tank


