background image

9

EN  Application sheet

EN  Application sheet

KITCHEN HOODS

kitchen, smells, char and soot pas through reus-

able aluminum grease trap filters and are removed 

outside the premises. With this working mode, it is 

not necessary to install charcoal acrylic scent-trap 

filters. Extraction mode is the most efficient as the 

kitchen hood removes all the evaporations from 

the kitchen to the air shaft.

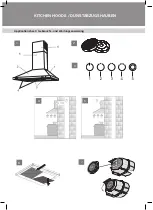
In the recirculation mode (see Fig. 5), the kitchen 

hood is not connected to the air shaft, and thus the 

air is just passed through the kitchen hood inside 

the kitchen.

In this mode, charcoal acrylic disposable scent-

trap filters should be installed on the kitchen hood. 

These filters are not included in the set and are 

bought separately. The use of the kitchen hood in 

the recirculation mode reduces its productivity.
We recommend using the kitchen hood in the 

mode of air extraction to the air shaft.

MAINTENANCE AND SERVICE  

OF THE KITCHEN HOOD

Disconnect the power supply before you 

start any operation related to cleaning or re-

pair of the kitchen hood.

Use the cloth damped in warm water with a neutral 

detergent for external cleaning of painted kitchen 

hoods. Use special detergents and follow the rele-

vant instructions for external cleaning of steel, cop-

per and brass surfaces. Never use the detergents 

that contain acids or chloride, abrasive products or 

sponges that may scratch the surface.

The aluminum grease trap filter becomes polluted 

as it traps the particles of fat coming through it. It 

should be cleaned with products that do not con-

tain acids or washed after preliminary soaking in 

hot water using an efficient detergent or, if possible, 

in the dish-washer (at a temperature of 65°C). Ex-

tremely polluted grease trap filters should not be 

washed in the dish-washer along with kitchenware. 

Aluminum filters should be cleaned once in 1.5-2 

months, which will be reminded by a relevant signal 

on the display of the kitchen hood remote control 

(see the remote control description in the para-

graph “Kitchen hood control”).

Simultaneously with cleaning of the grease trap fil-

ter, clean all the accessible elements of the kitchen 

hood case from grease deposits.

To disconnect the aluminum filter (Fig. 6), press the 

spring lock on the filter and pull it and then press 

down to remove. When you remove the filter, do not 

apply the effort to the aluminum surface of the filter 

as it may lead to dents on its surface, affecting the 

external appearance of the filter.

Do not install the filter in the kitchen hood until it 

is completely dry. 

The filter is installed in the reverse order. Press the 

spring lock on the filter and put it in place, after 

which release the lock.

Installation of carbon filters

Coal filters, if they are installed and the hood 

works in recirculation mode, should be changed 

every 5 months. For your hood, two coal filters 

are installed. They are mounted on the protective 

grilles of the motor duct by lightly pressing and 

turning them clockwise. To remove the carbon 

filter, it should be slightly squeezed and turned 

counter-clockwise (Fig. 7).

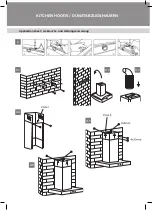
Replacing the backlight

To replace the backlight, it is necessary (see Fig. 

8) to:

–  disconnect the hood from the power supply and 

find the burned out lamp wire;

–  disconnect the power cable in the connector 

by pressing the two lobes of the hood plafond, 

removing the burned out lamp 

–  insert a new one into the place of the burned out 

backlight;

–  connect the lamp power lead in the connector;

–  connect the hood to the mains and check the 

operation of the backlight.

Replacement of bulbs and filters is not included 

in the warranty service.

Summary of Contents for 00022882

Page 1: ...TABZUGSHAUBEN DUNSTABZUGSHAUBEN KITCHEN HOODS HOTTES DE CUISINE CAMPANAS DE COCINA DE Gebrauchs und Wartungsanweisung EN Application sheet FR Guide de l utilisateur ES Guía del usuario www krona steel com BELLA EU 600 inox PB ...

Page 2: ...Application sheet Gebrauchs und Wartungsanweisung KITCHEN HOODS DUNSTABZUGSHAUBEN 5 7 1 2 3 4 6 Рис 7 ...

Page 3: ...Application sheet Gebrauchs und Wartungsanweisung KITCHEN HOODS DUNSTABZUGSHAUBEN 8 9 1 9 3 9 5 9 6 9 2 9 4 ...

Page 4: ...schen vorbeugen Das Symbol auf dem Erzeugnis bzw auf Begleitpa pieren weist darauf hin dass man es bei der Entsorgung nicht wie einen normalen Haushaltsmüll behandeln darf Statt dessen ist es an eine entsprechende Annah mestelle für elektrische und elektronische Geräte für eine weitere Entsorgung abzugeben Die Müllentsorgung soll nach örtlichen Vorschriften für Müllentsorgung erfolgen Bitte sich a...

Page 5: ... STEUERUNG DER DUNSTABZUGSHAUBE Ihre Dunstabzugshaube verfügt über 3 Belüftungs geschwindigkeiten Je nachdem wie intensiv die Ausdünstungen während des Kochens sind kön nen Sie die passende Geschwindigkeit auswählen Für eine bessere Luftsauberkeit schalten Sie den Dunstabzug und den Kochherd gleichzeitig an Das macht den Ventilationsprozess effektiver Lassen Sie den Dunstabzug für etwas Zeit nach ...

Page 6: ...Geschirrspüler zusammen mit Geschirr zu waschen Alu Filter sind einmal in 1 5 2 Monaten zu waschen worauf ein entsprechendes Symbol auf dem Dis play des Steuerfeldes der Dunstabzugshaube hin weist siehe die Beschreibung des Steuerfeldes im Pkt Steuerung der Dunstabzugshaube Gleichzeitig mit einer Reinigung des Fettfangfilters reinigen Sie von den Fettablagerungen alle zugäng lichen Gehäuseele ment...

Page 7: ...Anhängen der Dunstabzugshau be und der Befestigungsleiste des Dekorluftkanals sind Schrauben und Dübel zu verwenden die dem Typ der Wand Ihrer Küche entsprechen Stahlbe ton Gipskarton etc Wenn Schrauben und Dübel im Liefersatz inbegrif fen sind ist es sicherzustellen dass sie für diesen Wandtyp passen an die die Dunstabzugshaube an gehängt wird MONTAGE Zur Montage der Dunstabzugshaube 1 Löcher für...

Page 8: ...montieren 13 Den Innenteil so hoch heben um die Befesti gungen der Haube und der Schiene auszurich ten und nach dem Ausrichten diese zu verbin den Abb 9 6 ANSCHLUSS AN DAS STROMNETZ Die Dunstabzugshaube wird an ein Stromnetz mit der Spannung von 220 240 V 50 Hz angeschlos sen Um einen elektrischen Schlag zu vermeiden ist die Dunstabzugshaube an eine Schutzkontakt steckdose anzuschließen Es ist aus...

Page 9: ...mney 2 Ø 150 mm adapter flange with non return valve 1 Panel for external chimney wall mounting 2 Wall mounting kit 1 User s manual 1 Package contents are subject to change without notice TECHNICAL FEATURES Model BELLA EU PB Overall dimensions mm Width 600 Length depth 465 Height min max 753 900 Mains voltage frequency 220 240 V 50 Hz Power consumption W Motor 65 Lamps Type 2 x 1 5 LED Ventilation...

Page 10: ...d from a retailer COOKER HOOD OPERATION The cooker hood has 3 ventilation speeds You can choose the most suitable ventilation speed de pending on the fumes intensity during the cooking process For a more efficient air filtering switch on the cook er hood and the kitchen range simultaneously This will make the ventilation process high effective Let the cooker hood function for some more time after ...

Page 11: ...ly polluted grease trap filters should not be washed in the dish washer along with kitchenware Aluminum filters should be cleaned once in 1 5 2 months which will be reminded by a relevant signal on the display of the kitchen hood remote control see the remote control description in the para graph Kitchen hood control Simultaneously with cleaning of the grease trap fil ter clean all the accessible ...

Page 12: ...rting to drill the holes for the dowels in the wall markings must be made Place the hood bracket horizontally on the wall so that when the hood is stretched to it the necessary distance to the table top is obtained Make a marking of the holes for fixing the bar Figure 9 1 2 Drill a hole of the required diameter The depth of the hole must correspond to the length of the dowel 3 Screw the installati...

Page 13: ...connected to the power net work with the voltage of 220 240V 50 Hz The kitchen hood should be connected to a wall outlet with earthing to avoid electrocution It is absolutely prohibited to cut off the plug during kitchen hood installation The damaged electrical cord should be re placed by a qualified service specialist For additional protection of the kitchen hood from voltage drops in the network...

Page 14: ...ndeur Pour l utilisateur ATTENTION Installez et utilisez la hotte confor mément aux instructions Remarques importantes La hotte est destinée seulement à un usage do mestique La garantie de produit est limitée et ne peut s étendre aux cas si vous n utilisez pas le pro duit selon sa destination directe Veuillez vous assurez de la fonctionnalité de pro duit à tous les modes avant de monter la hotte e...

Page 15: ...cessoires supplémentaires pour la hotte regardez l imm 2 Ils sont utilisés pour filtrer l air au mode de recyclage regardez le paragraphe Exploitation de hotte Vous pouvez acheter les filtres à charbon chez un vendeur des hottes CONTRÔLE DE HOTTE La hotte a 3 vitesses de ventilation Le choix de vi tesse dépend de l intensité de vapeur lorsque vous cuisiniez Il est nécessaire d éteindre la plaque d...

Page 16: ...rop sales avec la vaisselle dans le lave vais selle Le filtre doit être nettoyé une fois par 1 5 2 mois lorsque le système d indication de satura tion des filtres indique cette nécessité regardez la description de pupitre dans la partie EXPLOITA TION DE HOTTE Nettoyez en même temps tous éléments de la carrosserie de graisse Pour démonter le filtre anti graisse tirez la poignée de décrochement à re...

Page 17: ...ur Le montage de la hotte produire dans l ordre sui vant 1 Avant de procéder à des trous de forage sous les chevilles dans le mur vous devez faire le marquage Placez à l horizontale sur le mur la barre de fixation de la hotte de sorte que lorsque la fixation de la hotte la distance né cessaire jusqu à la table soit conservée Faite le marquage des trous de fixation de la barre fig 9 1 2 Percez des ...

Page 18: ...vez la partie intérieure du capot en haut jusqu à ce que les nœuds de fixation du capot et de la barre de fixation seront bien accro chés fig 9 6 BRANCHEMENT ÉLECTRIQUE La hotte se connecte au réseau électrique de la tension 220 240 V 50Hz Il est recommandé de faire le branchement via la prise à contact de protection pour éviter les risques d électrocution Il est interdit de couper la fiche de con...

Page 19: ...ico Es inad misible utilizar el producto para otros propósitos y para estos casos la garantía no cubre Antes de la instalación y la retirada de la película asegurarse que la campana está funcionando co rrectamente en todos los modos véase la sección Instalación de la campana Todos los trabajos relacionados con la instalación conexión y reparación de la campana de cocina COMPOSICIÓN Modelo Bella EU...

Page 20: ...mpanas de cocina Se utilizan para filtrar el aire circulante en el modo de recirculación véase la sección Descripción de los mandos Los filtros de carbón se puede adquirir en un distri buidor de las campanas DESCRIPCIÓN DE LOS MANDOS La campana extractora tiene 3 velocidades de ven tilación Usted puede elegir el más adecuado velo cidad de ventilación dependiendo de los humos de la intensidad duran...

Page 21: ... vez al 1 5 2 me ses lo que será recordado por una señal per tinente en la pantalla del control remoto de la campana véase la descripción de la consola en el apartado Descripción de los mandos Simultáneamente con la limpieza del filtro de gra sa limpie de grasa todos los elementos de la car casa de la campana Para desconectar el filtro de aluminio Fig 6 pre sione en la cerradura de resorte del fil...

Page 22: ...tipo de pared en la que se suspenderá la campana La instalación de la campana se realiza en la si guiente secuencia 1 Antes de perforar agujeros para tacos en la pared haga la marcación Coloque en la pa red el soporte de fijación de la campana hori zontalmente de tal modo que al ser colgada la campana resulte la distancia requerida hasta la encimera Haga la marcación de los aguje ros de fijación d...

Page 23: ... para alinear los puntos de fijación de la caja y el soporte de fijación de la caja y conéctelos dibujo 9 6 CONEXIÓN ELÉCTRICA Campana extractora está conectada a la tensión de red 220 240 VAC 50 Hz Para evitar la electrocución la campana extractora se debe conectar a una toma de la red eléctrica con una conexión de tierra Está absolutamente prohibido cortar el conec tor durante la instalación de ...

Page 24: ...ei der Diagnostik durch den Spezialisten des Servicezentrums das Erzeugnis intakt sein wird behält sich das Servicezentrum vor von dem Verbraucher die Ent geltung der unnötigen Anfahrt zu verlangen die nach Tarif bewertet wird Der Hersteller ist für keinerlei Schaden verantwortlich der seinem Verbraucher oder seinem Besitz angerichtet wird führt auch keine kostenlose Reparatur in den folgenden Fäl...

Page 25: ...e trade or ganization and seller s signature including tear off cou pons model and serial number of the product Before calling a service center specialist read the in struction manual of the product carefully If a specialist of the service center correctly diagnoses the product the service center will have the right to demand payment of a false call from the consumer according to the price list Th...

Page 26: ...alement marqués sur le bon de garantie Avant d appeler le technicien de SAV nous vous deman dons de lire attentivement l instruction d exploitation Si lors du diagnostic le technicien trouve que le ptoduit est operationnel le SAV se réserve le droit de demander au client de payer les frais de fausse alarme selon liste de prix Nous ne serons en aucun cas tenus responsable pour tout dommage spécial ...

Page 27: ...delo y el número de serie del producto Antes de llamar al especialista del centro de servicio léa con atención el manual de operación del producto Si durante el diagnóstico con el especialista del centro de servicio el producto resulta que funciona correctamente entonces el centro de servicio está en el derecho de exigir al usuario el pago de la flasa llamada de acuerdo con la lista de precios El ...

Page 28: ...www krona steel com ...
Reviews: