7/8
Test of signal converter 7.6
Always switch off power source before opening the housing !
Required measuring instruments and tools
Multimeter, DC and AC voltage, > 20 kohms / V
Crosstip screwdriver
Preparatory work
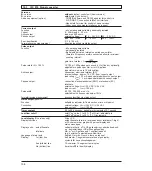
Measuring and test points on
•
Switch off power source.
amplifier PCB, see Sect. 8.9
•
Remove transparent cover (unscrew 4
MP
= measuring point
recessed head screws) and black plastic
TP
= test point
cover (unscrew 1 recessed head screw),
X1
= socket connector, 20-pin
see Fig. A and B in Sect. 8.5.
X3, X5
= plug connector
•
If provided, remove display PCB,
see Sect. 8.7.
•
Switch power source on again.
Please note: When carrying out measurements, do not produce any short-circuits between the
components !
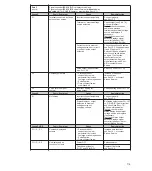
Action
Typical result
Faulty result
Voltage measurements on
amplifier PCB, see Sect. 8.9
1
between TP 1 (solder pin)
15 . . . 30 V DC
and Pin 11 of X1
2
between TP 1 (solder pin)
30 . . . 40 V DC
and Pin 9 of X1
3
between MP 5 (solder pin)
19 . . . 26 V DC
and Pin 15 of X1
4
between MP 5 (solder pin)
-20 . . . -27 V DC
and Pin 18 of X1
5
field current supply
> 1.5 V AC
between Pin 7 and Pin 8
of X3
6
input voltage between
-10 . . . +10 V DC
If outside range, input
MP 1 and MP 5
amplifier overranged,
measuring tube
empty or primary head
defective; check acc.
to Sect. 7.5.
7
Short Pin 1, 2 and 3
-10 . . . +10 V DC
If outside range,
of X5, measure input
signal converter
voltage between
defective.
MP 1 and MP 5
If measured
voltages lower,
signal converter
defective,
replace, see Sect. 8.4,
or contact Krohne
Service.
Note:
A thermostatic switch is installed in the transformers of the AC versions.
In the DC version, the PCB is equipped with a thermofuse. All signal converters
contain PTR fusible links (typically 100 overload cycles). This allows cyclic
switching on and off of the signal converter under overload conditions.
The cool-down phase may be anything up to one hour.


