background image

2    Krell Showcase DVD

Krell Showcase DVD    3

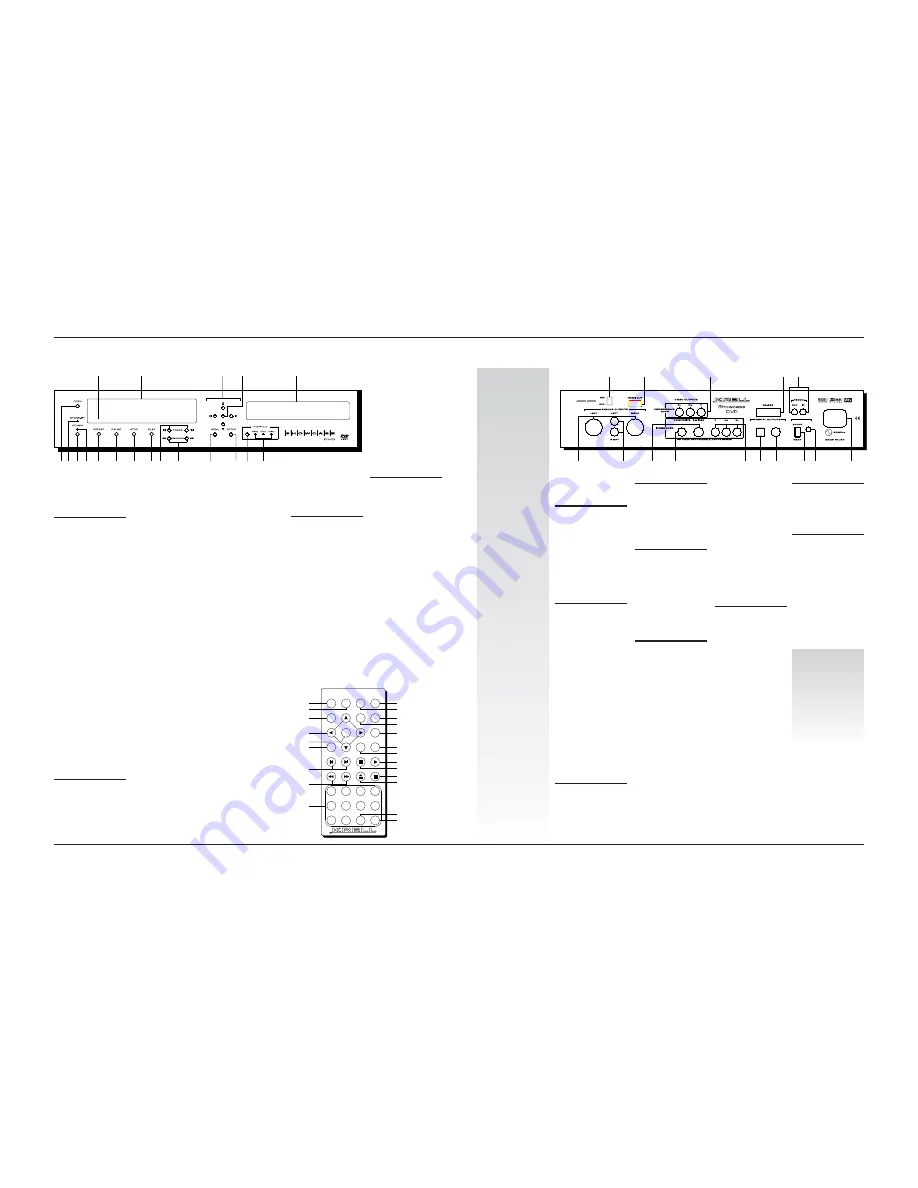
Figure 1  The SHOWCASE DVD Front Panel

1

11

6

5

8

7

10

9

17

16

12

14

19

18

4

13

3

2

15

Figure 2  The Showcase DVD Remote

Disp

Ret

Title

Menu

A-B

Repeat

Setup

8

7

4

3

2

Subtitle

Audio

Angle

Power

Prog

6

Clr

0

9

5

1

1

22

21

17

5

25

16

not active*

23

14

15

not active*

9

10

24

20

8

6

7

26

11

not active*

*This key does not activate a function
  on the Showcase DVD.

Figure 3  The Showcase DVD Back Panel

27

28

40

41

32

30

29

31

33

34

35

37

36

38

39

This product is manufactured in the United States of America. Krell

®

is a registered trademark of Krell Industries, Inc., and is restricted for use by Krell

Industries, Inc., its subsidiaries, and authorized agents. Krell Current Mode

and Krellcoat

are trademarks of Krell Industries, Inc. HDMI, the HDMI logo, and

High-Definition Multimedia Interface are trademarks or registered trademarks of HDMI Licensing LLC. "DTS" and "DTS Digital Out" are registered trademarks of
Digital Theater Systems, Inc. Manufactured under license from Dolby Laboratories. "Dolby," and the double-D symbol are trademarks of Dolby Laboratories.
DCDi” is a trademark of Faroudja, a division of Sage, Inc. All other trademarks and tradenames are registered to their respective companies.

© 2003 by Krell Industries, Inc., All rights reserved  

This product incorporates copyright protection technology that is protected by method claims of certain U.S. patents and other property rights owned by
Macrovision Corporation and other rights owners. Use of this copyright protection technology must be authorized by Macrovision Corporation, and is intended
for home and other limited viewing uses only unless otherwise authorized by Macrovision Corporation. Reverse engineering or disassembly is prohibited.

Front Panel
and Remote

Back Panel

DISC FUNCTIONS, 

continued

Repeat, 

continued

REPEAT OFF C

lears the

repeat function.

6 Pause Button or Key 

Pauses disc playback.
The video status box
indicates 

PAUSE

in the

top right corner. To
resume playback as sin-
gle frame stills, press the
pause button again. To
resume normal play-
back, press the play but-
ton or key (8)

.

7 Stop Button or Key

Stops DVD playback.

8 Play Button or Key 

Begins or resumes DVD
playback.

9 Track Forward and

Back Button or Key

Selects the track that
follows or precedes the
current track.

10 Search Forward and

Back Button or Key

Accesses two fast for-
ward or two fast back-
ward playback modes,
while in the play mode.
Press once to access
the first mode. Press
again to access the sec-
ond mode. While in the
pause mode, press once
to access one fast for-
ward or backward play-
back mode.

11 Open/Close Button 

or Key

Opens and closes the
disc transport.

12 Disc Transport

Holds the disc.

POWER

1 Power Button and Key

Switches the Showcase
DVD between stand-by
and operational modes.

2 Power LED

The blue power LED illu-
minates when the
Showcase DVD is in the
operational mode.

3 Stand-by 

LED

The red stand-by LED
illuminates when the
Showcase DVD is
plugged into a standard
AC wall receptacle,
indicating that the
Showcase DVD is in
the stand-by mode and
ready to be switched to
the operational mode.

4 Front Infrared Sensor

Receives commands
from the Showcase DVD
remote. When the IR
Select Switch (37) is in
the up position, the front
infrared sensor is active.
For proper remote con-
trol operation, make sure
that nothing is obstruct-
ing the infrared sensor.

DISC FUNCTIONS

5 Repeat Button or Key

Repeat the currently
playing chapter, repeat
chapters in a current
title, or repeat the entire
disc.

DISC FUNCTIONS, 

continued

13 Front Panel Display

Shows currently playing
title and chapter num-
bers, elapsed time, and
repeat mode.

14 Directional Buttons 

or Keys

Navigate the disc menu
and setup menus.

15 Enter Button or Key

Selects menu items,
program items, returns
to previous setup menu,
and suppresses setup
menu.

16 Menu Button or Key

Accesses the disc
menu. The directional
buttons or keys navi-
gate the menu (14). 

17 Setup Button or Key

Accesses the setup
menu, to configure dis-
play, audio, language,
parental control, and
other functions. Press
the setup button or key
again to exit the setup
menu.

18 HDMI Button

(Optional, located on
front panel only)

Scrolls through avail-
able resolutions.

19 HDMI LEDs

(Optional, located on
front panel only)

Illuminated LED indi-
cates component video
format and resolution of
signal/video display.

Remote 
Only

ADVANCED DISC 
FUNCTIONS

20 Audio Key

Cycles between lan-
guages on the disc
soundtrack.

21 Subtitle Key

Activates subtitles on
the currently playing
disc. 

22 Angle Key

Selects alternate cam-
era angles, when they
are available on the
disc.

23 Title Key

Access the title number.

ANALOG AUDIO
OUTPUTS

27 Left and Right

Balanced Audio
Outputs

One pair via XLR con-
nectors.

28 Left and Right Single-

ended Audio Outputs

One pair via RCA con-
nectors.

STANDARD VIDEO 
OUTPUTS

29 Composite Standard

Video Output

One composite standard
video output via an RCA
connector. 

30 S-Video Standard

Video Output

One S-video output via 
a 4 pin mini-DIN 
connector.

31 Component Standard

Video Output

One component stan-
dard video output via
RCA connectors.
Component video uses
three wires (labeled Y,
Pb, and Pr on the back
panel) to convey the
video signal.

Note

The Showcase DVD auto-
matically switches to NTSC
or PAL, depending on the
disc format. The default
standard is preset, and not
selectable by the user.

PROGRESSIVE SCAN
VIDEO OUTPUT

32 Progressive Video

Output Pr, Pb, Y.

One progressive video
output via RCA connec-
tors.

DIGITAL AUDIO
OUTPUTS

33 Optics Digital Output

One EIAJ optics digital
audio output via a
TosLink connector.

34 Coaxial Digital Output

One S/PDIF coaxial digi-
tal audio output via an
RCA connector. 

BACK PANEL 
REMOTE
CONNECTIONS

35 RS-232

Communication Port

For application develop-
ers who want to control
the Showcase DVD
using an external com-
puter-based device. For
more information, see

RS-232 Port: Sending
Commands and
Interpreting Data,

the

developer’s reference
shipped with the
Showcase DVD.

36 12 VDC In/Out 

(12 V Trigger)

Allows you to turn the
Showcase DVD on, or
off, or to and from stand-
by from other compo-
nents.

REMOTE BACK PANEL 

CONNECTIONS,

12 VDC In/Out,

continued

Out. 

The output sends 

12 VDC power on/off
signals to other compo-
nents and devices that
incorporate a 12 V trig-
ger.

In. 

The input receives 

12 VDC power on/off
signals from other com-
ponents and devices
that incorporate a 12 V
trigger.

Notes

When the Showcase DVD
is in the operational mode, 
12 VDC output provides 
12 V of DC output. When
the Showcase DVD is in 
the stand-by mode or off,
DC output is 0 V.

12 VDC Out (12 V trigger)
current is limited to 30 mA.

37 IR Select Switch

Front.

The switch in the

up position indicates that
the front infrared sensor
is active.

Rear.

The switch in the

down position indicates
that the back infrared
sensor is active.

38 Back Infrared Sensor

Receives commands
from the Showcase DVD
remote control. 

POWER

39 IEC Connector

Use the provided IEC
standard 15 amp power
cord.

HDMI CONNECTION
(Optional)

40 AUDIO SYNC

Synchronizes audio and
video when using the
HDMI output (41). Turn
this function off, if you
are not using the HDMI
output.

41 HDMI OUT

Interfaces with an A/V
receiver or a video 
monitor.

24 Numeric Keys

Press a numeric key to
select a disc track dur-
ing playback. The tool-
bar menu opens with
the cursor at the title
and chapter number
that is playing. Press
the numeric key for the
title and chapter num-
ber you want to play.
Playback resumes at
the selected title and
chapter.

PROGRAMMING
FUNCTIONS

25 A-B Key

Press this key to define
the start of a continuous
loop. Press again to
define the end of a con-
tinuous loop. Playback
begins immediately 
and continues until you
press the A-B key a third
time, to clear the loop.

26 Prog(ram) Key

Programs tracks to play-
back in sequence .
Press this key to access
the FTS configuration
menu. Select a track,
and press enter. Use the
directional buttons or
keys (14) to add tracks.
Press the play button or
key (8) to begin play-
back of the sequence. 

Setup Menu

Although the Showcase
DVD is shipped as an easy
to use, “plug and play”
component , the setup
menu allows you to access
and modify video, audio,
and playback functions.
After your DVD player is
connected to your system: 

1. Access the setup menu

by pressing the setup
button on the front
panel or the setup key
(17) on the remote. 

The setup menu
appears, including a
toolbar with the configu-
ration menus at the top,
and a help screen at the
bottom. 

When you press the
down directional arrow
(14), a left hand column
including the categories
within each configura-
tion menu appears,
along with a right hand
column displaying the
items in each category.

When you press the
right directional arrow in
the item list, selections
appear for each item.

2. Modify the on screen

display (OSD) while the
disc is stopped.

3. Modify other functions

while the disc is playing.

You can configure the fol-
lowing menus on the tool-
bar, if the disc you are play-
ing allows access to them:

On screen display (OSD),
Subtitle, Language, Color,
Sound, Frame by Frame,
Slow Motion, Scan
Speeds, Camera Angle,
Enlarge Picture, Title ,
Chapter, Time Search, and
Favorite Track Selection.

For an expanded list of
functions and details on
how to use them, see the
Showcase DVD Owner’s
Reference 

Setup Menu 

on the Krell website at:
www.krellonline.com

Navigating 
the Setup Menu

Black menu items are the
current selection. Blue
menu items are available
selections. White menu
items are not selectable.
Use the directional arrows
on the front panel or
remote control (14) to navi-
gate the menu. The last
item selected is active. 

Summary of Contents for DVD Player

Page 1: ...Showcase DVD Player Instructions for Use Owner s Reference THE LEADER IN AUDIO ENGINEERING ...

Page 2: ...ABLE PARTS INSIDE ANY KRELL PRODUCT Please contact your authorized dealer distributor or Krell if you have any questions not addressed in this reference manual This product incorporates copyright protection technology that is protected by method claims of certain U S patents and other property rights owned by Macrovision Corporation and other rights owners Use of this copyright protection technolo...

Page 3: ...Temporary Feedback Field Icons 29 SETUP MENU OVERVIEW 31 SHOWCASE DVD SETUP MENU 32 To Access the Setup Menu 32 Navigation Conventions 34 On Screen Display OSD Menus 35 Example To Change the TV Shape 40 Multiple Toolbar Icons 42 SPECIAL MENU OPERATIONS 46 How To Write a Title Chapter Program for a DVD or VCD 46 How To Write a Track Program for an Audio CD 48 How to Create an A B Loop for a DVD VCD...

Page 4: ...iv Krell Showcase DVD Illustrations FIGURE 1 The Showcase DVD Front Panel 8 FIGURE 2 The Showcase DVD Remote Control 8 FIGURE 3 The Showcase DVD Back Panel 14 ...

Page 5: ...ange articulation and high fre quency extension The wireless infrared remote control and RS 232 and 12 VDC remote connection options on the back panel allow you to integrate the Showcase DVD into advanced control systems The user friendly setup menu provides a variety of audio video and access control options for optimum configuration and enjoyment of your Showcase DVD and home theater system This...

Page 6: ...ns are more immune to induced noise from the system or the environment Single ended A two wire input or output circuit Use care when using single ended connections Turn the system off prior to making or breaking single ended connections Single ended connections are not recommended for connections requiring long cable runs Off When the AC power cord is unplugged from the AC power source the compone...

Page 7: ...or PrPbY One way to designate the three signals used in component video Y the luma signal Pb the blue minus luma B Y chroma signal and Pr the red minus luma R Y chroma signal S Video Signal 2 Signals Two separate signals transmit the luma Y and chroma C S video signals bypass television circuitry required by composite video and reduces video noise as well as cross contamination of luma and chroma ...

Page 8: ...case the Showcase DVD and lift it straight out of the shipping box 3 Place the Showcase DVD in a safe location and remove the end caps and protective plastic wrapping Only one person needed Notes If any of these items are not included in the shipping box please contact your authorized Krell dealer distributor or Krell for assistance Save all packing materials If you ship your Showcase DVD in the f...

Page 9: ...tem and does not require additional mass coupling or isolation You may experiment with feet or cones as long as they are not permanently affixed to the unit Any unauthorized modifications to the unit or electronics will void the war ranty Do not attach enhancement accessories such as rings mats or dampers to individual discs These accessories may interfere with the disc transport resulting in erra...

Page 10: ...ls See Definition of Terms on page 3 for a detailed description of video signals The progressive PrPbY outputs will provide the best quality pic ture because they build video screen content in one pass To achieve this picture quality the progressive PrPb Y outputs need to be connected to a television with a 31 5 kHz horizontal scan rate capable of accepting a progressive signal of 480p or better M...

Page 11: ...status window which indicates the playing condition of the Showcase DVD 2 If a disc is in the transport 12 pause 6 or stop 7 disc play back 3 Press the setup button or key 17 to access the setup menu The setup menu multiple toolbar appears on the video screen 4 Use directional buttons or keys 14 to navigate to the OSD icon on the multiple toolbar When an item on the menu is selected it is highligh...

Page 12: ...Key 2 Power LED 3 Stand by LED 4 Front Infrared Sensor Disc Functions 5 Repeat Button or Key 6 Pause Button or Key 7 Stop Button or Key 8 Play Button or Key 9 Track Forward and Track Back Button or Key 10 Search Forward and Search Back Button or Key 11 Open Close Button or Key 14 Directional Buttons or Keys 15 Enter Button or Key 16 Menu Button or Key 17 Setup Button or Key 18 HDMI Button 19 HDMI ...

Page 13: ...e PAUSE appears briefly in the status window in the upper left corner of the television To resume playback press the pause button or key again or press the play button or key 8 7 Stop Button or Key Use this button or key to stop disc playback A status window appears in the upper left corner of the television screen followed by a RESUME temporary feedback field icon If you are playing a DVD or VCD ...

Page 14: ...ton or key to access the two fast reverse playback modes when in the play mode On DVD VCD or Audio CD playback the mode selected appears in the status box in the upper left corner of the television screen Use the search back button or key to switch between the slower and faster modes Press the play button or key to resume normal playback See also To Play a DVD or VCD page 20 To Play an Audio CD pa...

Page 15: ...menu The setup menu allows you to customize your Showcase DVD on screen display OSD audio soundtrack and select spe cial features such as access control Press the setup button again to reveal sub menus or press the enter key to exit the setup menu See Showcase DVD Setup Menu pp 31 54 for information on configuring the Showcase DVD 18 HDMI Button Optional Use this button to scroll through three out...

Page 16: ...e control finish Replace batteries when remote control function becomes intermittent Remove batteries if the remote control is not used for a long time Battery leakage can damage the remote control The Showcase DVD remote control provides all the power standard disc functions menu access and menu setup functions available on the front panel Additional advanced disc and programming functions are ac...

Page 17: ...back The setup menu opens with the cursor at the title and chapter number or track number that is playing Press the numeric key for the next chapter title or track number you want to play Playback resumes at the selected title chapter or track If a title chapter or track is not available on the disc the number you select is not displayed on the menu 25 A B Key Press this key to define the start of...

Page 18: ... Composite Video Output 30 S Video Video Output 31 Component Video Output Y Pb Pr Progressive Scan Video Output 32 Progressive Scan Video Output Pr Pb Y Digital Audio Outputs 33 Optics Digital Output 34 Coaxial Digital Output Remote Back Panel Connections 35 RS 232 Communication Port 36 12 VDC In Out 12 V Trigger 37 IR Select Switch 38 Back Infrared Sensor Power 39 IEC Connector HDMI Connection Op...

Page 19: ... Video Video Output The Showcase DVD is equipped with an S video output via a 4 pin mini DIN connector Composite video uses two wires to convey the video signal 31 Component Video Output Y Pb Pr The Showcase DVD is equipped with a component video output via RCA connectors Component video uses three wires to con vey the video signal 32 Progressive Scan Video Outputs Pr Pb Y The Showcase DVD is equi...

Page 20: ...gers to easily coordinate allowing whole systems or parts of sys tems Output The 12 VDC output sends a 12 Volt power on off signal to other Krell components via a 12 V cable as well as to other devices that incorporate a 12 V power on off trigger input Input The 12 VDC input receives 12 Volt power on off signals from other Krell components and devices that incorporate a 12 V trigger When the Showc...

Page 21: ...D is equipped with a standard female IEC power connector for use with the AC power cord 40 AUDIO SYNC SWITCH Use this switch to synchronize audio and video when using the HDMI output 41 Turn this function off if you are not using the HDMI output 41 HDMI OUT Digital video output that interfaces with an A V receiver or a video monitor equipped with an HDMI input Power HDMI Connection Optional BACK P...

Page 22: ...ted noises from being introduced into the system 3 Match and connect the video outputs from Showcase DVD to the video inputs of the television The Showcase DVD supports com posite S Video and component interlaced video signals and pro gressive 480p component video signals See Definition of Terms on page 3 for more information on video signals The progressive PrPbY outputs will provide the best qua...

Page 23: ...DTS audio playback is available only from the digital outputs 6 Plug the AC power cord into the IEC connector 39 on the back panel then plug the AC power cord into the wall socket The red stand by LED 3 on the front panel illuminates When powering up any system always turn amplifiers on last When powering down always turn amplifiers off first Showcase DVD Connections to Your System continued Note ...

Page 24: ...ories such as rings mats or dampers to individual discs These accessories may interfere with the disc transport resulting in erratic playback and or poor performance Adjust the volume level through your system volume control All functions outlined on pages 8 11 are available when you play a DVD or VCD 1 Press the power button on the front panel or the power key 1 on the remote The blue power LED 2...

Page 25: ...n or key 7 to end disc playback 8 To turn the Showcase DVD off press the power button on the front panel or the power key on the remote The red stand by LED illuminates and the Showcase DVD is in the stand by mode See Front Panel Description on page 9 and Special Operations on page 46 for more information on disc playback options The status window icon reports the current operating condition of th...

Page 26: ...PEAT disappears from the front panel display 9 Track Forward and Track Back Buttons or Keys Press this button or key to move to another title or chapter or move to the beginning of the current title or chapter Direction and title or chapter number are displayed on the front panel dis play window 13 or in a status window on the television screen Track Forward Press the track forward button or key f...

Page 27: ...es x 4 and x 32 Press once and the phrase X4 appears in the status window in the upper left corner of the television screen Press again and the phrase X32 appears in the status window in the upper left corner of the television screen Press the play button or key 8 to resume normal playback DVD AND VCD FUNCTIONS continued Krell Showcase DVD 23 Showcase DVD Operation continued ...

Page 28: ... window displays READING and the television screen displays the audio CD menu Playback begins from the first track 5 As the Showcase DVD plays the audio CD tracks the television screen and the front panel display window continually report the current track and time elapsed on the track 6 Playback stops at the end of the disc To stop playback at any other time press the stop button or key 7 To turn...

Page 29: ... on page 10 9 Track Forward and Track Back Button or Key Press this button or key to move to another track or move to the beginning of the current track Direction and track number are displayed on the front panel display window 13 or in a status window on the television screen Track Forward Press the track forward button or key firmly dur ing playback to move to the next track Press track forward ...

Page 30: ...this function see Front Panel Description on page 10 25 A B Key See How to Create an A B Loop on page 49 26 Program Key See How to Write a Track Program for an Audio CD on page 48 The Showcase DVD supports the following MP3 CD formats ISO 9660 format A maximum of 30 characters Nested director up to eight levels A maximum ALB number of 32 VBR bit rate supported Sampling frequencies supported 32 44 ...

Page 31: ...en close button or key again to close the disc trans port Playback begins from the first title or track The front panel window displays READING and the video screen displays the MP3 menu Krell Showcase DVD 27 Showcase DVD Operation continued MP3 Disc Formats continued To Play MP3 Discs MP3 Menu on Screen 5 The Showcase DVD starts playing the MP3 tracks and the front panel window displays the curre...

Page 32: ...en repeat is off there is no repeat phrase on the television screen 6 Pause Button or Key 7 Stop 8 Play Button or Keys For descriptions of these functions see Front Panel Description on page 10 9 Track Forward and Track Back Buttons or Keys This function allows you to move to the next or previous disc album or track Both the front panel window and the MP3 menu display the current track information...

Page 33: ...ed the icon is inte grated in the toolbar not shown Icons describe the following Showcase DVD functions Krell Showcase DVD 29 Showcase DVD Operation continued Interpreting Temporary Feedback Field Icons Temporary Feedback Field Icon on Screen A B A B A repeat chapter ACTION PROHIBITED ANGLE CHILD LOCK ON REPEAT CHAPTER CHILD SAFE REPEAT A B REPEAT A TO END REPEAT ALL title track resume RESUME REPE...

Page 34: ...equested Some discs only allow limited function operation during playback RESUME The resume feature applies to the disc currently in the transport well as the last four discs played To start playback of a disc from the point where it was last stopped press play 8 when the resume icon appears on the screen 30 Krell Showcase DVD Showcase DVD Operation continued Interpreting Temporary Feedback Field ...

Page 35: ...rize yourself with the navigation conventions See page 34 3 Select the OSD icon on the toolbar See page 35 4 Configure the OSD functions See pages 36 38 Initially you may wish to change the picture view on your video screen before playing your Showcase DVD See Example To Change the TV Shape on page 40 5 Access other toolbar icons and their functions See page 42 For detailed information on limiting...

Page 36: ...connected to your system and in the operational mode See Connecting the Showcase DVD to Your System on page 18 1 Pause 6 or stop 7 the disc or make sure that it is not in the transport 12 A status window appears on the television screen To Access the Setup Menu Status window shows disc status Status Window on Screen ...

Page 37: ...menu appears including the multiple toolbar the cursor arrows and the help text bar The status window continues to be displayed To Access the Setup Menu continued Active icon in black Unavailable icon in white Available icon in blue Multiple Toolbar Menu Screen Multiple toolbar Cursor arrows Help menu ...

Page 38: ...to display The cursor arrows move up and down between the multiple tool bar menu and the main menu Within the main menu the cursor arrows move left right up or down Within the main menu when the cursor arrows move to the right they open sub menus with options Some sub menus access additional sub menus Navigation Conventions MENU COLOR Color indicates selection status in the setup menu An active me...

Page 39: ... main menu is comprised of 3 sec tions a left column a middle column and a right column Function categories are displayed in the left column and include TV Audio sound Audio mode language selection Special features The center column contains a list of functions for each category The right column displays the function selected and links to one or more sub menus that optimize each function TV Audio ...

Page 40: ...a NTSC format television only The PAL format does not have a pedestal or setup for black level shift The choices are oN and OFF VIDEO SHIFT Use the sliders to scroll the picture to the left or right on the screen The factory default centers the picture on the screen COLOR SETTINGS Choose one of five color settings numbered 1 through 5 Choices 2 through 5 are preset options Choice 1 is user adjusta...

Page 41: ... output The choices are OFF PCM ONLY and ALL The factory default is ALL which means that the coaxial output is on If you are not connecting to a device with a digital input change the setting to OFF If you are not connecting to a digital multi channel decoder set the digital output to PCM ONLY PCM The abbreviation for pulse code modulation a digital repre sentation of an audio signal ANALOG OUTPUT...

Page 42: ...reviations on the toolbar under the subtitle icon after you resume disc playback If the selected subtitle language is unavailable subtitles will appear in the first subtitle language on the disc The subtitles can be selected from the toolbar audio icon where the subtitles show up as abbreviations The Showcase DVD resets the subtitle icon in the multiple menu toolbar to OFF when it is in the stand ...

Page 43: ...ing playback of DVD and SVCD discs The choices are ON and OFF PLAYBACK CONTROL PBC Access the menu on a VCD gives navigation information about MP3 files or allows the viewing of computer discs If a VCD is pro grammed for PBC this function must be ON in order th access the PBC menu The choices are ON and OFF HELP TEXT View a description of a toolbar icon when the icon is selected The description ap...

Page 44: ...ears The main menu has three columns left center and right The cursor arrows are in the left column highlighting the TV category Left column Center column Right column Main Menu Screen 3 Press the right directional button or key to access the function TV SHAPE 4 Press the right directional button or key a second time to access the picture view function in the right hand column A sub menu appears d...

Page 45: ...r column main menu Sub menu Sub Menu Screen 5 Choose a picture view The video screen will show the picture you select if the television supports the format 6 After selecting the picture view you may wish to navigate through the main menu to select other OSD functions 7 Exit the setup menu by pressing the setup button or key ...

Page 46: ...st motion Camera angle Zoom Toolbar 3 Title Chapter Time search FTS favorite track selection Press the setup key 17 once to scroll through Toolbar 1 Toolbar 2 and Toolbar 3 When there is no disc in the transport only Toolbar 1 is accessible There is an abbreviated phrase below each toolbar icon This phrase is the function that is active when the toolbar icon is selected Scroll through the list of ...

Page 47: ...ges available on the disc and audio will play in the selected language See page 38 for more information SMART COLOR Scroll through one of five color settings numbered 1 through 5 Choice 1 is user adjustable See page 36 for more information SOUND MODE Adjust the analog audio output See page 37 for more information TOOLBAR 1 Toolbar 1 on Screen OSD SUBTITLE AUDIO LANGUAGE SMART COLOR SOUND FRAME BY ...

Page 48: ...return to normal playback speed access the fast motion settings selection box again and highlight the number 1 CAMERA ANGLE If the disc currently playing contains scenes recorded from different camera angles the angle icon displays the angle being shown and displays the number and kind of angles you can select This icon is inactive if there are no alternate camera angles recorded on disc ENLARGE P...

Page 49: ...chapter selected TIME SEARCH Use the time search function to begin playing from a desired time on the DVD Enter the time in the time edit box using the numeric key pad 24 and the disc plays at the time selected FTS FAVORITE TRACK SELECTION Store up to 20 of your favorite DVD or VCD titles and chapters or Audio CD tracks If this function is off you can program a loop If this function is on you can ...

Page 50: ...own directional button 14 on the front panel or the down directional key on the remote control to move the cursor arrows to the FTS main menu The FTS selection in the main menu is OFF 2 Press the down directional buttons or keys to move the cursor arrows to TITLE or CHAPTER on the left FTS screen Notice the disc title and chapter number s on the right program screen The cur sor arrow is at the sel...

Page 51: ...u is checked Press the down directional arrow which is located to the right of the word ON The FTS screens appear The FTS selection in the right program screen is ON 2 Press the down directional button or key 14 and scroll to the bot tom of the program box to select CLEAR ALL which changes from blue to black Press enter The selected program tracks disappear and the FTS selection on the right hand ...

Page 52: ...5 The track numbers are added to the program list The number of tracks and the playing time of the program are displayed in the front panel window and in the audio mode menu on the video screen The Showcase DVD automatically memorizes the FTS program 5 Use the right or left directional buttons or keys to select ON or OFF 6 When the FTS program is complete press play 8 to start play back or press s...

Page 53: ... When you see or hear the selection you want as the end of the loop press the A B key again to insert the finish position REPEAT A B appears on the television screen 3 Playback of the loop begins automatically and continues until you press the A B key a third time REPEAT disappears on the video screen Pause and resume play functions are active within an A B loop How to Create an A B Loop for a DVD...

Page 54: ...y 14 The main menu appears on the screen with the cursor arrows at the TV category 3 Navigate to the ACCESS CONTROL function in the main menu 4 Select ENTER CODE from the main menu The enter code dialog box appears 5 Enter the code of your choice The confirm code dialog box appears 6 Confirm the code The access control dialog box appears 7 Navigate to CHILD LOCK using the directional buttons or ke...

Page 55: ...sc is authorized for play and the child safe temporary field icon is dis played even if the child lock function in the setup menu is ON If you select PLAY ALWAYS the player will remember the disc for future use The Showcase DVD keeps a list of 80 child safe disc titles in memory A disc is placed at the top of the list when you select PLAYBACK ALWAYS in the child protection dialog box When the list...

Page 56: ...ren or allows you to play certain discs with alternative scenes A disc may be programmed to contain parental control infor mation on the entire disc or on certain scenes These scenes are rated from 1 to 8 and alternative scenes more suitable to viewing by children are available on the disc These ratings are country depen dent 1 Open the setup menu 17 2 Navigate to the OSD main menu 3 Select ACCESS...

Page 57: ... 10 Press the enter button or key 15 or press the left directional button or key again to exit the menu 1 Open the setup menu 17 2 Navigate to the OSD main menu 3 Select the SPECIAL FEATURES category 4 Select ACCESS CONTROL 5 Select ENTER CODE The enter code dialog box appears 6 Enter your 4 digit code The access control dialog box appears 7 Navigate to CHANGE CODE 8 Press the right directional bu...

Page 58: ...ATURES category 5 Select ACCESS CONTROL 6 Select ENTER CODE The enter code dialog box appears 7 Cancel the 4 digit code by pressing the stop button or key 7 4 times in the access control dialog box 8 Enter the new code The confirm code dialog box appears 9 Enter the new code a second time The access control dialog box reappears 10 Press the enter button or key 15 or press the left directional butt...

Page 59: ...within the United States U S A is included in the warranty If you have purchased your Krell product outside the U S A and wish to have it serviced at the factory all freight and associated charges to the factory are your responsibility Krell will pay return freight to the U S A based freight forwarder of your choice Freight and other charges to ship the unit from the freight forwarder to you are a...

Page 60: ...arrangements with the Service Department have been made in advance Proof of purchase will be required for warranty validation at the time of hand delivery Use the original packaging to ensure the safe transit of the product to the factory dealer or distributor Krell may at its discretion return a product in new packaging and bill the owner for such packaging if the product received by Krell was bo...

Page 61: ...Krell Industries Inc 45 Connair Road Orange CT 06477 3650 USA TEL 203 799 9954 FAX 203 891 2028 E MAIL krell krellonline com WEB SITE www krellonline com Showcase DVD v 03 0 ...

Page 62: ...uminates try pressing the HDMI button anyway Some video displays do not provide intelligible information to the auto detect circuitry in the Showcase DVD Despite this condition it is likely that you will succeed in adjusting the resolution to your preference by pressing the HDMI button The lack of initial auto detection does not compromise the operation of the circuit in any way Please contact you...

Page 63: ... board video scaler that converts standard DVD video from the native 480i resolution to high def inition resolutions 480p 720p or 1080i Contact your authorized Krell dealer or distributor for more information on adding HDMI functionality to your Showcase DVD THE LEADER IN AUDIO ENGINEERING Krell Technical Bulletin Showcase DVD withHDMI September 2004 Krell Industries Inc 45 Connair Road Orange CT ...

Page 64: ...wo inches 5 cm of clearance above and below the component to provide adequate ventilation Installations inside cabinetry may need extra ventilation AC Power Guidelines The Showcase DVD has superb regulation and does not require a dedicated AC circuit Operate the Showcase DVD only with the power cord supplied Avoid connections through extension cords or multiple AC adapters High quality 15 amp grou...

Page 65: ...Audio Outputs One pair via XLR con nectors 28 Left and Right Single ended Audio Outputs One pair via RCA con nectors STANDARD VIDEO OUTPUTS 29 Composite Standard Video Output One composite standard video output via an RCA connector 30 S Video Standard Video Output One S video output via a 4 pin mini DIN connector 31 Component Standard Video Output One component stan dard video output via RCA conne...

Page 66: ...307124 TK 1 6 pin 12 inch JST cable 307294 1 8 pin 12 inch JST cable 307295 1 22 pin 4 inch flat FFC cable 307297 1 22 pin 2 inch flat FFC cable 307296 4 4 40 x 1 2 inch SHSC 301413 3 4 40 x 1 4 inch SHSC 301416 1 4 40 x 3 4 inch SHSC 302600 1 4 40 x 3 8 inch FHTS 304972 1 1 4 hex 4 40 x 1 1 2 inch standoff 307291 1 4 40 Kepnut 302660 4 Ty Wraps 302816 1 Installation and Setup Guide 308022 1 HDMI ...

Page 67: ...the cable F Unscrew the 4 40 x 7 16 inch hex screw 5 from the pin standoff at MT1 on the front left corner of the analog output PCB see Figure 2 inset and remove the screw and its washer Notice the MT1 through hole and the pin standoff below the through hole not illustrated The pin standoff is attached to the chassis G Turn the DVD Standard on its side to perform Steps H and I H Insert and thread ...

Page 68: ...The pin standoff is below this screw Figure 2 Inset Analog Output PCB Left Front Corner 5 4 40 x 7 16 inch hex screw The pin standoff is below this screw Showcase DVD 3 HDMI Upgrade 4 3 5 5 Lift the cables to expose the through hole at MT1 on the ana log output PCB Progressive output PCB Analog output PCB Position the HDMI power PCB here See pages 4 5 ...

Page 69: ...4 inch SHSC 28 onto the standoff to support the front left corner of the HDMI adapter PCB see Figure 4 Steps N P Install the HDMI Power PCB N Mount the supplied HDMI power PCB onto the Showcase DVD chassis using the four supplied 4 40 x 1 2 inch SHCS 8 one in each corner of the board see Figure 4 O Secure the regulator to the chassis with the supplied 4 40 x 3 8 inch FHTS 9 and cap it with the sup...

Page 70: ... power PCB 8 28 8 8 8 9 10 Figure 4 Showcase DVD Interior With HDMI Adapter PCB and HDMI Power PCB Installed 8 4 40 x 1 2 inch SHCS 9 4 40 x 3 8 inch FHTS below Kepnut 10 4 40 Kepnut 28 4 40 x 1 4 inch SHSC HDMI adapter PCB Regulator ...

Page 71: ... the HDMI adapter PCB to connector J1603 23 on the drive PCB Orient the con tacts from J1603 26 to face the front of the Showcase DVD X Connect the 22 pin 7 inch flat digital video cable 3 previously disconnected in Step E to connector J1506 27 on the HDMI adapter PCB Orient the contacts so that they are facing toward the back of the unit Y Position jumper JMP2 on the faceplate board so that it is...

Page 72: ...nnector J1 18 Connector J2 19 8 pin JST cable 20 Connector J12 Showcase DVD 7 HDMI Upgrade 17 16 16 16 12 13 23 14 15 19 18 22 20 21 25 24 26 3 27 21 Connector J6 22 22 pin 10 inch flat cable 23 Connector J1603 on the drive PCB 24 Connector J29 25 22 pin 4 inch flat cable 26 Connector J1603 on the HDMI adapter PCB 27 Connector J1506 11 4 Progressive output PCB Front panel PCB HDMI power PCB Main p...

Page 73: ...tputs if desired 6 Plug the AC power cord into the IEC connector 39 on the back panel then plug the AC power cord into the wall socket The red stand by LED 3 on the front panel illuminates Power on the Showcase DVD and turn on your HDCP compatible display device The HDMI Digital Video Output Stage detects the HDMI or DVI compatible circuitry in the display device and one of the three HDMI LED s on...

Reviews: