13
KRAUSMANN POWER TOOLS
8711
3
6
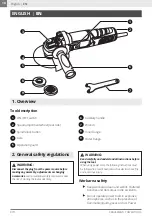
5
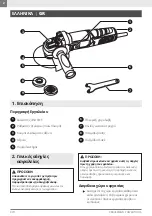
Fixing screw
English |
EN
SAVE THESE INSTRUCTIONS
4. Functional description
and specifications
WARNING:
M
isuse or failure to follow the safety rules stated in this
instruction manual may cause serious personal injury.
WARNING:
I
f the replacement of the supply cord is necessary, it has
to be done by a professional to avoid a safety hazard.
Intended use
The angle grinder is intended for grinding and
cutting masonry and metal.
with a different axle diameter.
M
ake sure the piece is properly supported or
tightened.
Never use cutting discs for edging or grinding.
M
ake sure the sparks do not get in contact
with an individual or flammable materials.
Always wear safety goggles, earplugs and
other protection gear, like working gloves,
protective clothing, hard hat etc.
I
f the guard has not been installed, do not
operate the tool under any circumstances.
M
ake sure the ventilation openings are kept
clean. Especially when working in environ-
ments rich in dust.
Always remove the tool from the plug before
removing dust.
I
n order to prevent damage to the tool’s
internal parts, do not use cleaning brushes,
metallic or similar objects to remove dust.
Bear in mind that after you turn off the
machine, the axle or disc keeps rotating for a
short period of time.
Installing and removing the guard
WARNING:
B
efore plugging in the tool, always make sure the switch
trigger actuates properly and returns to the OFF position.
Axle threading
Weight
Power supply
Power input
No load speed
Disc diameter
Μ14
2.02kg
230V~50Hz
900W
0-11000 min
-1
Ø125mm
Tool
8711
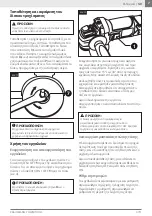
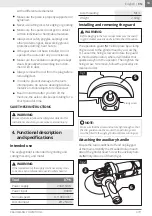
The operation guard
5
is held in place by a clamp
ring secured to the grinder head by a screw (fig
1). Loosen the fixing screw and rotate the guard
to the desired position, where it will deflect hot
sparks away from the operator. Then tighten the
fixing screw. To remove, follow the procedure in
reversed order.
fig 1
NOTE:
M
ake sure that the screw and nut are tight enough so that
the disc guard cannot be moved. Τhe operation guard
must be fitted to the angle grinder at all times during use.
i
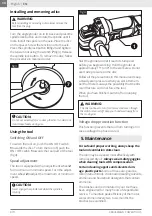
Attaching the auxiliary handle
Ensure the tool is switched off and unplugged
at the mains. Identify the threaded hole on each
side of the grinder head. Screw the auxiliary han-
dle
6
firmly into one of them (fig 2).
fig 2
Summary of Contents for 8711
Page 2: ...2 8711 KRAUSMANN POWER TOOLS ON OFF 1 2 3 7 8 9 1 GR 4 6 2 5 6 7 5 9 8 1 2 3 4...
Page 3: ...3 KRAUSMANN POWER TOOLS 8711 GR OFF...
Page 4: ...4 8711 KRAUSMANN POWER TOOLS GR ON OFF 3 1 2 3 4 5...
Page 5: ...5 KRAUSMANN POWER TOOLS 8711 GR M 10 11 12 13 14 6 7 8 9 80 M X E...
Page 7: ...7 KRAUSMANN POWER TOOLS 8711 1 7 GR 3 2 7 3 ON OFF 3 4 ON OFF 1 ON OFF 1 4 15 30 3 OFF ON 2 2...
Page 8: ...8 8711 KRAUSMANN POWER TOOLS GR 6 T T X K 7 5...
Page 16: ...16 8711 KRAUSMANN POWER TOOLS www krausmann gr 8711...

