Kraus Aplos KEF-15300 Installation Manual Download Page 9

8

Trouble - Shooting    

If you have followed the instructions carefully and your faucet still does not work 
properly, take the following corrective steps:

P R O B L E M

C A U S E

A C T I O N

Leakage under the 

handle

Locking nut (4) has 

come loose

Remove handle index 

button (1a). Loosen 

set screw (1b) with hex 

wrench (9). Remove 

metal handle (2). 

Unscrew cartridge 

cover (3) (by hand only). 

Tighten locking nut 

(4) with an adjustable 

wrench

Aerator drips or has 

inconsistent water flow 

pattern

Aerator (9) is dirty or 

not seated properly

Unscrew aerator (9) 

with aerator key (10) 

and clean out debris

Water will not shut off 

completely

Cartridge may need to 

be adjusted or replaced

Remove handle index 

button (1a). Loosen 

set screw (1b) with hex 

wrench (9).  Remove 

metal handle (2). 

Unscrew cartridge 

cover (3) (by hand 

only). Unscrew the 

locking nut (4) with 

an adjustable wrench. 

Remove ceramic disc 

cartridge (5). Check for 

cracks

Care & Maintenance

*To keep the product clean & shining, follow the steps below:

1. 

Rinse with clean water & dry with a soft cloth

2. 

Do not clean with soaps, acid, polish, abrasives, or harsh cleaners

3. 

Do not use  cloth with a coarse surface

4. 

Unscrew the aerator and clean when necessary

*This installation manual is subject to change without further notice.

1

10

279

10 31/32”

Minimum distanc

e 90mm

Less than 90mm

Cold Water

32 3/32”

Ø35~Ø38

1

2

3

10

9

11

12

13

Hexagon Nut

Hot

Water

Cold

Water

2 3

1

4

5
7

6
8

4

5

6

7

8

Ø1 3/8”~

Ø1 1/2”

815

194

7 5/8”

Ø1 3/8~Ø1 1/2”

30˚

10

11

Close

Open

Left

Hot Water

Push

25˚

90˚

12
13

8

7

Ø35~Ø38

M

ax35

217

8 17/32”

M

ax1 3/8”

9

11

12

13

2
3

4
5

6
7
8

Summary of Contents for Aplos KEF-15300

Page 1: ...Aplos Single Lever Vessel Faucet KEF 15300 INSTALLATION GUIDE www kraususa com I Toll Free 1 800 775 0703 I 2017 Kraus USA Inc I REV October 25 2017 ...

Page 2: ...ave any problems with your product Please contact our Customer Service Team 1 800 775 0703 customerservice kraususa com Have the model number available and retain a copy of your receipt with purchase date for reference If for any reason this product does not meet your expectations please be sure to repack this product in the original box and packaging material to avoid damage during transit DO NOT...

Page 3: ... any part is missing or damaged please contact Kraus Customer Service at 800 775 0703 for a replacement Turn off the hot and cold water lines at the angle stops and turn on the old faucet to release any built up pressure Pre drilled countertop hole size requirement 1 3 8 min Max countertop thickness 1 3 8 ...

Page 4: ...ent Parts 9 10 12 7 8A 8B 8C 8D 11 1B 1A 2 3 4 5 6 1 A Index Button B Set Screw 2 Metal Handle 3 Cartridge Cover 4 Locking Nut 5 Cartridge 6 Faucet Body 7 Rubber Washer 8 Mounting Hardware A Rubber Washer B Metal Washer C Mounting Nut D Mounting Screws 9 Aerator 10 Aerator Key 11 Hex Wrench 12 Hot Cold Waterlines ...

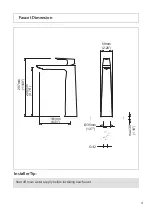
Page 5: ...4 Faucet Dimension Installer Tip Shut off main water supply before installing new faucet max30 1 18 Ø35mm 1 37 G1 2 297mm 11 69 9 76 248mm 161mm 6 33 2 28 58mm ...

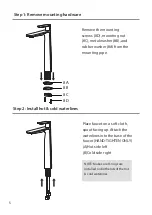
Page 6: ...ng pipe Step 1 Step 2 8A 8B 8C 8D Step 3 8A 8B 8C Step 2 Step 5 Step4 9 10 Step 2 Install hot cold waterlines Place faucet on a soft cloth spout facing up Attach the waterlines into the base of the faucet HAND TIGHTEN ONLY A Hot side left B Cold side right NOTE Make sure O rings are installed on both ends of the hot cold waterlines ...

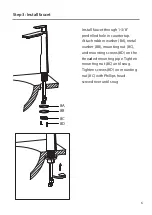
Page 7: ...all faucet through 1 3 8 predrilled hole in countertop Attach rubber washer 8A metal washer 8B mounting nut 8C and mounting screws 8D on the threaded mounting pipe Tighten mounting nut 8C until snug Tighten screws 8D on mounting nut 8C with Phillips head screwdriver until snug ...

Page 8: ...aucet remove aerator 9 with included aerator key 10 Turn water on for 30 seconds to remove any debris Reassemble aerator 9 Connect flex water supply lines to angle stops and tighten with adjustable wrench Turn on both hot and cold main valve Apply pipe tape optional p4 Step 5 9 10 ...

Page 9: ...lean out debris Water will not shut off completely Cartridge may need to be adjusted or replaced Remove handle index button 1a Loosen set screw 1b with hex wrench 9 Remove metal handle 2 Unscrew cartridge cover 3 by hand only Unscrew the locking nut 4 with an adjustable wrench Remove ceramic disc cartridge 5 Check for cracks Care Maintenance To keep the product clean shining follow the steps below...

Page 10: ... or replaced with a product of equal value at the option of Kraus This warranty extends to the original owner or end user and is not transferable to a subsequent owner RESTRICTIONS This warranty does not cover antediluvian discontinued or display products whether such items are purchased at discount outlets unauthorized dealers and or sold on clearance This warranty does not cover instances of neg...

Page 11: ... long an implied warranty lasts so the above limitations or exclusions may not apply to you This warranty gives you specific legal rights and you may also have other rights which vary from state to state If you are a homeowner please contact a Kraus Customer Service Representative at Kraus USA Inc 12 Harbor Park Drive Port Washington NY 11050 Toll free 800 775 0703 Customerservice kraususa com If ...

Page 12: ...IMPORTANT Register Your Kraus Product REGISTER TODAY http www kraususa com registration Activate Your Warranty Access Premium Customer Support Get Product Information www kraususa com ...

Reviews: