background image

Kramer Electronics Ltd. 


VS-88H2A 

– Connecting VS-88H2A 


Connecting VS-88H2A 


Always switch off the power to each device before connecting it to your 

VS-88H2A

. After 

connecting your 

VS-88H2A

, connect its power and then switch on the power to each device.  


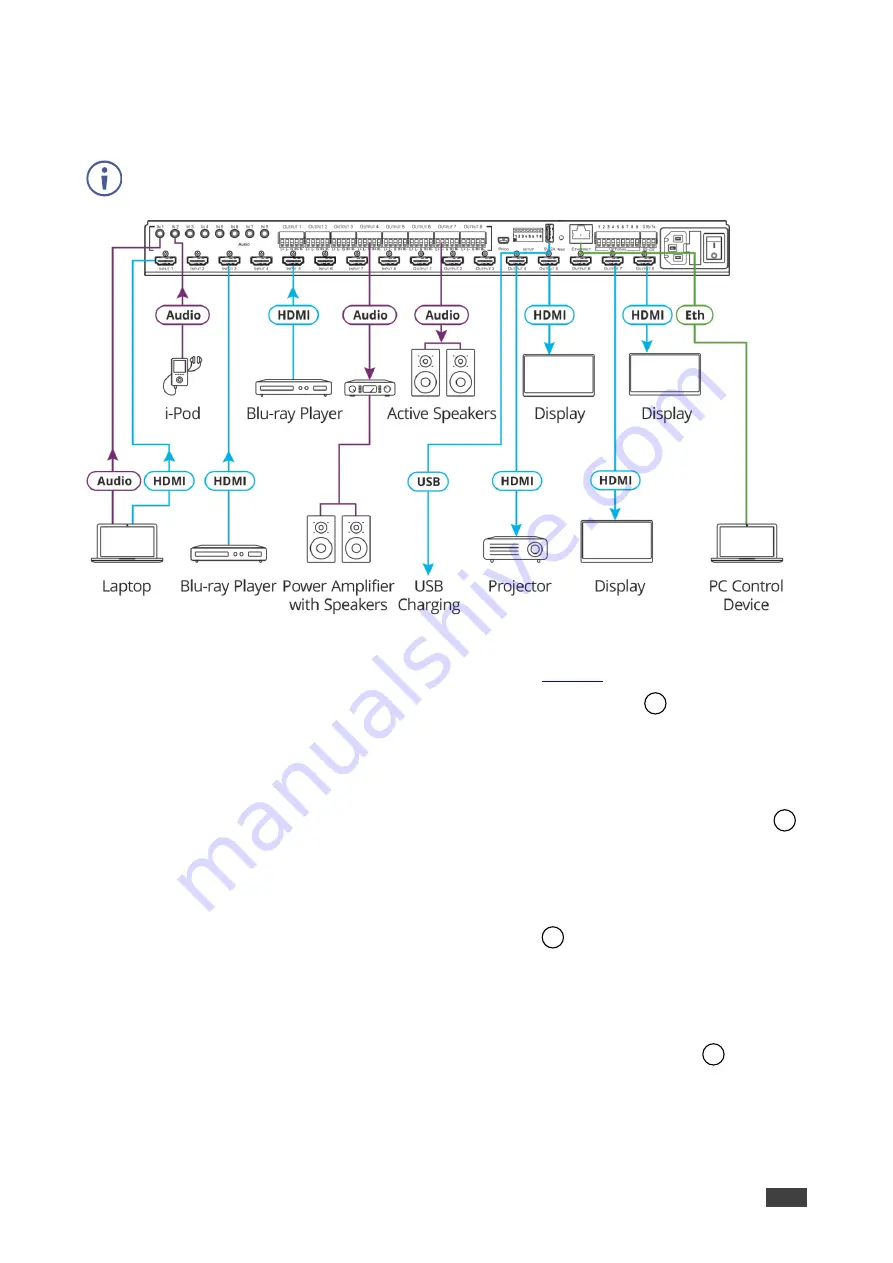
Figure 3: Connecting to the VS-88H2A Rear Panel 

To connect 

VS-88H2A

 as illustrated in the example in


Figure 3

: 

1.  Connect up to eight video sources to the HDMI INPUT connectors 

 (from INPUT 1 to 

INPUT 8). For example, connect: 


A laptop to INPUT 1. 


Blu-ray players to INPUT 3 and INPUT 5. 

2.  Connect up to eight analog stereo audio sources to the AUDIO IN 3.5mm mini jacks 


(from IN 1 to IN 8). For example, connect: 


The analog audio output of a laptop to AUDIO IN 1. 


An i-Pod to AUDIO IN 2. 

3.  Connect the eight video HDMI OUTPUT connectors 

 (from OUTPUT 1 to OUTPUT 8) 

to up to eight acceptors. For example, connect:  


OUTPUT 4 to a projector. 


OUTPUT 5, OUTPUT 7 and OUTPUT 8 HDMI each to a display. 

4.  Connect the eight balanced analog output 5-pin terminal block connectors 

 (from 

OUTPUT 1 to OUTPUT 8) to up to eight audio acceptors. For example, connect: 


OUTPUT 4 to a power amplifier with speakers. 


OUTPUT 7 to active speakers. 


13 

12 

15 

14 

Summary of Contents for VS-88H2A

Page 1: ...P N 2900 301168 Rev 1 www kramerAV com USER MANUAL MODEL VS 88H2A 4K HDMI 8x8 Matrix Switcher...

Page 2: ...18 Storing and Recalling a Setup 23 Setting Switching Mode 24 Setting Switching Speed 24 Setting HDCP 24 Copying EDID 25 Operating via Ethernet 26 Using Embedded Web Pages 29 Switching and Setting Po...

Page 3: ...nal quality due to poor matching and elevated noise levels often associated with low quality cables Do not secure the cables in tight bundles or roll the slack into tight coils Avoid interference from...

Page 4: ...ted to any embedded digital or analog audio output in addition to 8 ARC sources to produce an equivalent 24x24 audio matrix The VS 88H2A provides exceptional quality advanced and user friendly operati...

Page 5: ...Common Configurations Save up to 16 preset configurations EDID Management Individual EDID management per input Captures and stores the EDID from a display device Smart Switching Active source accepto...

Page 6: ...witching power supply Typical Applications The VS 88H2A is ideal for the following typical applications Presentation and multimedia applications Systems that require automatic HDMI routing Controlling...

Page 7: ...ut on page 16 ALL Button Press to perform an action on all outputs for example setting Mute mode Pattern mode and so on For switching press ALL and then a specific IN button to route the selected inpu...

Page 8: ...Connectors Connect to HDMI acceptors from 1 to 8 PROG Mini USB Port Use for firmware upgrade or communication connecting to a PC or a serial controller SETUP DIP Switches For future use 5V 2A USB Por...

Page 9: ...g Caution Mount VS 88H2A before connecting any cables or power Warning Ensure that the environment e g maximum ambient temperature air flow is compatible for the device Avoid uneven mechanical loading...

Page 10: ...o INPUT 1 Blu ray players to INPUT 3 and INPUT 5 2 Connect up to eight analog stereo audio sources to the AUDIO IN 3 5mm mini jacks from IN 1 to IN 8 For example connect The analog audio output of a l...

Page 11: ...owing are the pinouts for connecting the output to a balanced or unbalanced stereo audio acceptor Figure 4 Connecting to a Balanced Stereo Audio Acceptor Figure 5 Connecting to an Unbalanced Stereo Au...

Page 12: ...general the front panel buttons indicate the device operation modes follows Button LED Status Operation Mode VIDEO On Video inputs are switched to video outputs D AUDIO On Digital inputs HDMI input au...

Page 13: ...al HDMI Output on page 14 Switching Video and Audio Signal Simultaneously on page 15 Muting Unmuting an Output on page 16 Routing a Pattern on page 17 Operating in ARC Mode on page 18 Switching the Vi...

Page 14: ...erally analog routing is enabled by pressing A AUDIO When it is illuminated the HDMI input embedded audio is the audio source When it flashes the 3 5mm analog audio input is the audio source To switch...

Page 15: ...that the display that is connected does not support audio or that a display is not connected at all On the 7 segment display d under an output number indicates that an embedded digital audio is curre...

Page 16: ...D audio or AC 3 audio signal from a DVD player is detected on that input An illuminated output button means that a display that supports LPCM audio is connected to that output A dark button means eith...

Page 17: ...analog audio input switching state 2 While D AUDIO is on select an output button for example 3 and then an input button for example 1 analog audio input 1 is routed to HDMI audio output 3 and on the 7...

Page 18: ...selected output or to all the outputs if ALL was pressed instead and the 7 segment display shows the current status Muting Unmuting an Output You can mute unmute an audio signal and a video signal se...

Page 19: ...uttons An illuminated output button means that a display is connected on that output An illuminated input button indicates the current pattern selected On the 7 segment display P under an output numbe...

Page 20: ...Audio Outputs on page 18 Routing HDMI Audio Output Signals to HDMI Input Ports on page 20 Routing Analog Audio Inputs to HDMI Input Ports on page 21 Routing HDMI Audio Output Signals to Balanced Audio...

Page 21: ...on means that the corresponding output port is ARC enabled On the 7 segment display under an output number indicates that arc is enabled on the corresponding output outputs 1 to 4 in this example A un...

Page 22: ...nate and the device enters ARC mode On the front panel button A flashing output button means that the audio of that output is set to ARC mode An illuminated Output button means that the output is not...

Page 23: ...to that output d under an output number indicates that the embedded audio is routed to that output 0 under an output number indicates that the audio output is muted 3 Press an ARC enabled input button...

Page 24: ...ng mode for example HDMI OUT 1 2 3 and 4 are enabled 2 Press A AUDIO until it flashes The out HDMI Arc enabled outputs illuminate as before The ARC enabled inputs flash for example 1 5 and 7 are ARC e...

Page 25: ...1 IN 1 corresponds to setup 9 and so on Figure 7 VS 88H2A 4K HDMI 8x8 Matrix Switcher Front Panel To store a setup 1 Press STO The STO button illuminates 2 Press an IN or an OUT button from 1 to 8 Fo...

Page 26: ...output and exit Switching mode Switching mode is selected Setting Switching Speed Set the following switching speed modes separately for each output Ex Fast switch speed IN 1 Fast switch speed IN 2 No...

Page 27: ...nder an output number indicates that the EDID was uploaded externally from a file via Web page A digit under an output number indicates the output from which the EDID was copied 2 Press one or more in...

Page 28: ...Ethernet port of VS 88H2A directly to the Ethernet port on your PC using a crossover cable with RJ 45 connectors This type of connection is recommended for identifying VS 88H2A with the factory confi...

Page 29: ...nt Panel Buttons 27 5 Click Properties The Internet Protocol Properties window relevant to your IT system appears as shown in Figure 9 or Figure 10 Figure 9 Internet Protocol Version 4 Properties Wind...

Page 30: ...2 168 1 1 to 192 168 1 255 excluding 192 168 1 39 that is provided by your IT department Figure 11 Internet Protocol Properties Window 7 Click OK 8 Click Close Connecting Ethernet Port via a Network H...

Page 31: ...fox Chrome Safari Windows 10 IE Edge Firefox Chrome Mac Safari iOS Safari Some features might not be supported by some mobile device operating systems VS 88H2A enables performing the following Switchi...

Page 32: ...3 Switching Page with Navigation List on Left 4 Click the desired Web page or click the arrow to hide the navigation list You can browse webpages Switching and Setting Ports The Switching Web page ena...

Page 33: ...DCP 1 4 or HDCP 2 2 View the input switched to the output for example 2 Switching speed normal fast or extra fast Output status an acceptor is connected or not connected to the output To adjust the ou...

Page 34: ...es that the device is in the auto switch mode and AFV status cannot be altered Setting the AFV mode icons to AFV or Breakaway modes reflects the next switching step and not the current status Output s...

Page 35: ...Input 1 Settings Window 4 If required type the label name in the Label text box and click 5 Set HDCP HDCP 2 2 HDCP 1 4 or No HDCP 6 Click ARC to set input to ARC mode or click Step In to set input to...

Page 36: ...the image 1 In the Navigation pane click Switching The Switching page appears 2 Select the AFV tab Figure 20 Switching Page AFV Tab 3 Click an output button or check the Outputs box The button turns...

Page 37: ...vigation pane click Switching The Switching page appears 2 Select the AFV tab Verify that Patterns and not Inputs is selected The list of patterns appears Figure 21 Switching Page Switching a Pattern...

Page 38: ...a digital input to a digital or analog output and an analog input to a digital or analog output If ARC mode is enabled you can switch a selected ARC to any of the analog outputs To switch an audio in...

Page 39: ...r example output 1 is set to ARC mode so the output 1 audio signal returns to the input and can be switched to any analog output Once an output is set to the ARC mode the Inputs ARC button on the righ...

Page 40: ...hanging the Ethernet Settings To change the Ethernet settings 1 In the Navigation pane click Device Settings The Device Settings page appears Figure 24 Device Settings Page 2 Uncheck check the DHCP ch...

Page 41: ...window appears Figure 25 Device Settings Page Factory Reset 3 Click OK to start factory reset and follow the instructions on screen VS 88H2A resets to its factory default settings Performing Firmware...

Page 42: ...assword protected or free access By default security is set to off To access Web pages using the password 1 Check the current security status Figure 26 Authentication Page Security Deactivated 2 Set A...

Page 43: ...s required to access Web pages Figure 29 Authentication Page Security Log In 6 Type the User Name Admin by default and Password left empty by default Figure 30 Authentication Page Password Protection...

Page 44: ...on Page Password Warning 11 Click OK The page is reloaded and can be accessed by entering the password The top right side of the Web page displays the security icon Figure 34 Authentication Page Admin...

Page 45: ...urrent password and click confirm The following message appears Figure 37 Authentication Page Deactivating the Security 4 Click OK The page reloads and can be accessed without entering the password Th...

Page 46: ...t the specific output delay time If you do not want a specific output to shut down if an input signal is not detected check the Never box next to the desired output 3 Set audio support ON if you want...

Page 47: ...nnected you can set the time the device waits before it switches to the next source Video lost timer is set Setting Switching Modes Use the Auto Switch Settings page to set the switching mode per outp...

Page 48: ...ts are then switched according to the set priority to the selected output Figure 41 Auto Switch Settings Page Setting the switching Priority In the Last connected mode select the inputs that are inclu...

Page 49: ...ing page appears Figure 43 Step In Settings Page Step in Device is not Connected To manage a step in device 1 Connect the HDMI output of a step in device for example DIP 30 to an HDMI input on the VS...

Page 50: ...1 HDMI IN 2 or VGA The respective button on DIP 30 illuminates You can also press an input button on the DIP 30 The selected input will be displayed on the webpage 5 Check the outputs to which the inp...

Page 51: ...ing EDID from an Output on page 49 Reading Default EDID on page 52 Reading EDID from an Input on page 52 Reading EDID from a File on page 53 Reading EDID from an Output To copy an EDID from an output...

Page 52: ...Ltd VS 88H2A Using Embedded Web Pages 50 2 Select the EDID source a connected output When reading from an output make sure that the output is connected to an acceptor Figure 47 EDID Management Page Se...

Page 53: ...pied Figure 48 EDID Management Page Select an Input 4 Click COPY The EDID message appears Figure 49 EDID Page EDID Copy Message 5 Click OK The following message appears Figure 50 EDID Management Page...

Page 54: ...ge appears Figure 51 EDID Page EDID Copy Message 4 Click OK The following message appears Figure 52 EDID Management Page Loading the EDID from Output to Input 5 Click OK 6 EDID is copied from a select...

Page 55: ...anagement Page Loading the EDID from input to Input 4 Click COPY and follow the instructions on screen The EDID is read from an input to the selected inputs Reading EDID from a File To read the EDID f...

Page 56: ...Loading the EDID from a File to the Input 4 Click UPLOAD The following message appears Figure 55 EDID Management Page EDID Message 5 Click OK 6 Follow the instructions on screen EDID is copied from a...

Page 57: ...Kramer Electronics Ltd VS 88H2A Using Embedded Web Pages 55 Viewing About Us Page The VS 88H2A About page lets you view the webpage version and Kramer Electronics Ltd details Figure 56 About Page...

Page 58: ...bedded webpages see Performing Firmware Upgrade on page 39 or via Kramer Network The latest version of K UPLOAD and installation instructions can be downloaded from our website at www kramerav com sup...

Page 59: ...ep Color 3D ARC up to 7 1 uncompressed audio channels as specified in HDMI 2 0 HDCP 2 2 Control Front Panel Front panel buttons for input output selection audio embedding mute test pattern memory EDID...

Page 60: ...Menu Setup Factory Reset press Enter to confirm IP Address 192 168 1 39 Subnet mask 255 255 0 0 Default gateway 192 168 0 1 Default TCP Port 5000 Default UDP Port 50000 Default username Admin Default...

Page 61: ...840 2160P60 720P59 1366 768P60 640 480P72 3840 2160P30 720P50 1366 768P60rb 640 480P59 3840 2160P29 576P50 1360 768P60 680 480P60 3840 2160P25 576i50 1280 1024P60 1440 480I60 3840 2160P24 480P60 1280...

Page 62: ...t 50 All setups All empty No preset status EDID data All input ports use the default EDID data Switch mode Manual Switch speed Ex fast switch ARC or de embedded De embedded Video Priority settings Low...

Page 63: ...imings supported 720 x 400p at 70Hz IBM VGA 720 x 400p at 88Hz IBM XGA2 640 x 480p at 60Hz IBM VGA 640 x 480p at 67Hz Apple Mac II 640 x 480p at 72Hz VESA 640 x 480p at 75Hz VESA 800 x 600p at 56Hz VE...

Page 64: ...p at 75Hz VESA 800 x 600p at 60Hz VESA 800 x 600p at 72Hz VESA 800 x 600p at 75Hz VESA 1024 x 768p at 60Hz VESA 1024 x 768p at 70Hz VESA 1024 x 768p at 75Hz VESA 1280 x 1024p at 75Hz VESA 1600 x 900p...

Page 65: ...center No Front left right center No Rear left right center No Rear LFE No CE vendor specific data VSDB IEEE registration number 0x000C03 CEC physical address 1 0 0 3 Maximum TMDS clock 165MHz Report...

Page 66: ...ix nn Command Parameter CR LF Command parameters Multiple parameters must be separated by a comma In addition multiple parameters can be grouped as a single parameter using brackets and Command chain...

Page 67: ...eset according to the video switch settings COMMAND AFV CR FEEDBACK nn AFV afv_mode CR LF afv_mode Front panel AFV mode 0 afv sets the unit to the audio follow video switching mode 1 brk sets the unit...

Page 68: ...h state for HDMI OUT 3 AUD 3 CR AV Switch audio and video COMMAND AV in out_id in out_id CR FEEDBACK nn AV in out_id in out_id CR LF in Number that indicates the specific input 0 disconnect output 1 H...

Page 69: ...00 increase current value decrease current value Set the speaker output balance to 12 BALANCE 1 12 CR BALANCE Get balance level COMMAND BALANCE out_index CR FEEDBACK nn BALANCE out_index balance_level...

Page 70: ...cates that EDID data is copied to this destination safe_mode Safe mode 0 device accepts the EDID as is without trying to adjust 1 device tries to adjust the EDID default value if no parameter is sent...

Page 71: ...CP mode Set HDCP working mode on the device input HDCP supported HDCP_ON default HDCP not supported HDCP OFF COMMAND HDCP MOD in_index mode CR FEEDBACK nn HDCP MOD in_index mode CR LF in_index Number...

Page 72: ...unit Get number of video and audio presets INFO PRST CR LABEL Set input output label COMMAND LABEL io_mode io_index switch label_txt CR FEEDBACK nn LABEL io_mode io_index switch label_txt CR LF io_mod...

Page 73: ...ocks EDID 1 On locks EDID Unlock front panel LOCK FP 0 CR LOCK FP Get the front panel lock state COMMAND LOCK FP CR FEEDBACK nn LOCK FP lock unlock CR LF lock unlock On Off 0 Off unlocks EDID 1 On loc...

Page 74: ...me CR LF model_name String of up to 19 printable ASCII chars Get the device model MODEL CR MTX MODE LEGACY COMMAND Set auto switch mode Not recommended for new devices COMMAND MTX MODE out_id connecti...

Page 75: ...is KRAMER_ 4 last digits of device serial number COMMAND NAME RST CR FEEDBACK nn NAME RST ok CR LF Reset the machine name S N last digits are 0102 NAME RST kramer_0102 CR NET DHCP Set DHCP mode Only 1...

Page 76: ...0 0 NET MASK 255 255 000 000 CR NET MASK Get subnet mask COMMAND NET MASK CR FEEDBACK nn NET MASK net_mask CR LF net_mask Format xxx xxx xxx xxx Get the subnet mask NET MASK CR PASS Set password for l...

Page 77: ...ce protocol version PROT VER CR PRST AUD LEGACY COMMAND Get audio connections from saved preset In most units video and audio presets with the same number are stored and recalled together by commands...

Page 78: ...on character between in and out parameters out_id Output number All outputs 1 HDMI OUT 1 2 HDMI OUT 2 3 HDMI OUT 3 4 HDMI OUT 4 5 HDMI OUT 5 6 HDMI OUT 6 7 HDMI OUT 7 8 HDMI OUT 8 Get video connection...

Page 79: ...o Channels SET IN CAP 0 2 1 CR SET IN CAP Get input EDID status COMMAND SET IN CAP stage stage_id CR FEEDBACK nn SET IN CAP stage stage_id mode CR LF stage Input 0 Input stage_id Number that indicates...

Page 80: ...data_bits parity stop_bits_mode serial_type 485_term CR LF com_id 1 to n machine dependent baud_rate 9600 115200 data_bits 5 8 parity Parity Type 0 No 1 Odd 2 Even 3 Mark 4 Space stop_bits_mode 1 1 5...

Page 81: ...tput 1 HDMI OUT 1 2 HDMI OUT 2 3 HDMI OUT 3 4 HDMI OUT 4 5 HDMI OUT 5 6 HDMI OUT 6 7 HDMI OUT 7 8 HDMI OUT 8 flag Video Mute 0 Video enabled 1 Video disabled 2 Blank picture Disable the video output o...

Page 82: ...enough space for data firmware FPGA ERR_FS_NOT_ENOUGH_SPACE 11 Not enough space file system ERR_FS_FILE_NOT_EXISTS 12 File does not exist ERR_FS_FILE_CANT_CREATED 13 File can t be created ERR_FS_FILE...

Page 83: ...ized dealer from which it was purchased or any other party authorized to repair Kramer Electronics products this product must be insured during shipment with the insurance and shipping charges prepaid...

Page 84: ...nd a list of Kramer distributors visit our website where updates to this user manual may be found We welcome your questions comments and feedback The terms HDMI HDMI High Definition Multimedia Interfa...

Reviews: