

VS-411XS
and
VS-211XS
Quick Start
P/N: 2 9 0 0 - 3 0 1 4 9 1 QS
Rev: 3
Scan for full manual
VS-211XS and VS-411XS Quick Start Guide
This guide helps you install and use your
VS-211XS
/
VS-411XS
for the first time.
Go to
www.kramerav.com/downloads/VS-411XS
to download the latest user manual and check if firmware
upgrades are available.
Step 1: Check
what’s in the box
VS-211XS
/
VS-411XS
4K Auto Switcher
4 Rubber feet
1 Quick start guide
1 Power adapter and cord
1 Bracket set
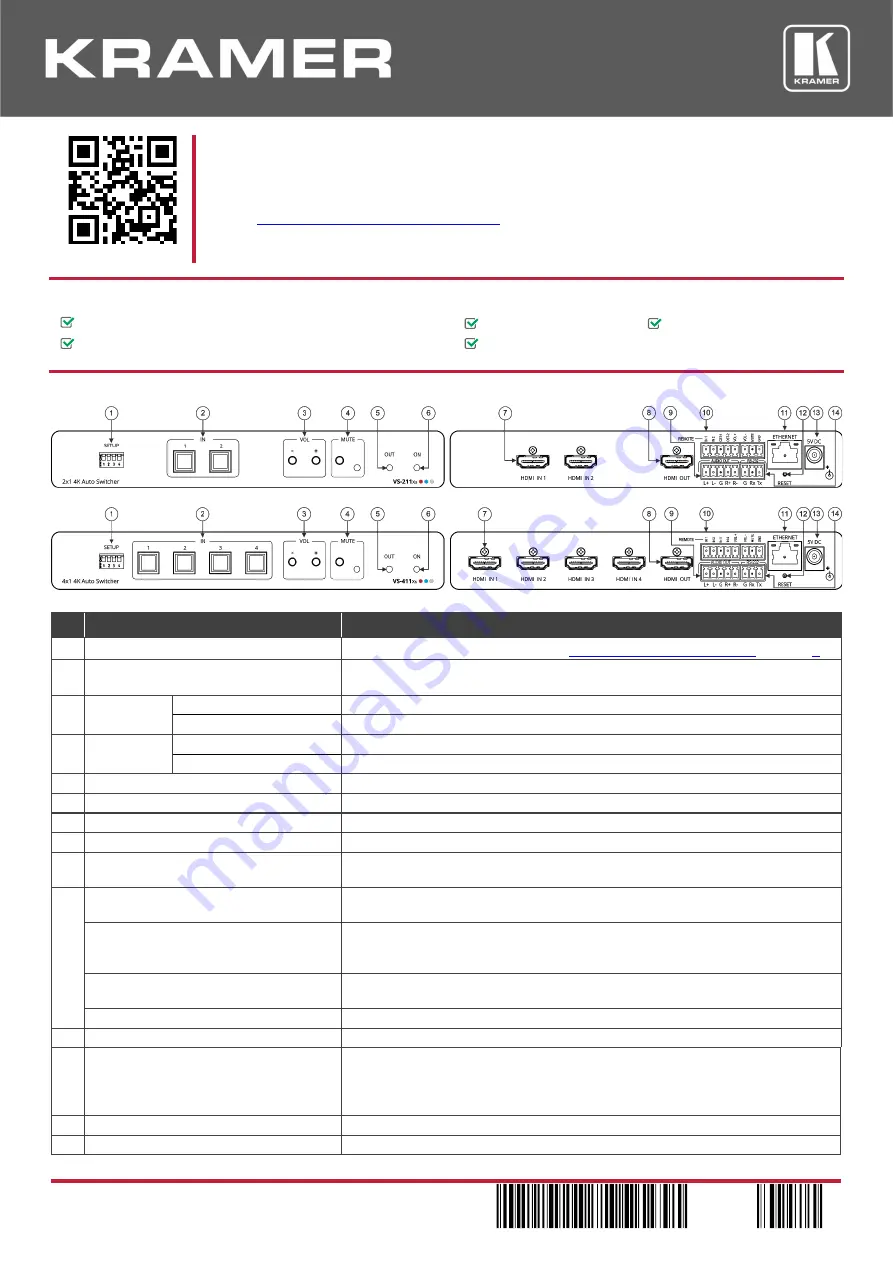
Step 2: Get to know your VS-211XS / VS-411XS
The terms HDMI, HDMI High-Definition Multimedia Interface, and the HDMI Logo are trademarks or registered trademarks of HDMI Licensing Administrator, Inc.
#
Feature
Function
1
SETUP 4-way DIP-Switches
Set the operation DIP-switches (see
Connect the inputs and outputs
on page
2
IN Buttons
Press to select an HDMI input (button lights orange). (2 for
VS-211XS
, 4 for
VS-411XS
).
3
VOL Push
Buttons
-
Press to decrease audio output volume.
+
Press to increase audio output volume.
4
MUTE
Push Button
Press to mute the audio output.
LED
Lights red when audio output is muted.
5
OUT LED
Lights green when an HDMI output is connected.
6
ON LED
Lights green when the device receives power.
7
HDMI IN Connectors
Connect to an HDMI source (2 for
VS-211XS
, 4 for
VS-411XS
).
8
HDMI OUT Connector
Connect to an HDMI acceptor.
9
AUDIO OUT 5-pin Terminal Block
Connector
Connect to a balanced stereo audio acceptor.
10
REMOTE Terminal block Connector:
Connect to contact closure switches by momentary contact between the desired
pin and common GND pin.
VS-211XS
: IN 1, IN 2/ CST-1, CST-2
Select input 1 or input 2 (IN 1 or IN 2), or alternatively activate custom triggers
(by momentarily connecting IN 1, IN 2, CST-1 and CST-2 to GND) set up in
Maestro. (Configured via the embedded web pages).
VS-411XS
: IN 1, IN 2, IN 3, IN 4
Select input 1 to input 4 (IN 1 to IN 2), or alternatively activate custom triggers
set up in Maestro. (Configured via the embedded web pages).
VOL+, VOL -, MUTE
Set the volume up or down (VOL+/-) and mute the audio output (MUTE).
11
ETHERNET
RJ-45 Connector
Connect to a PC via a LAN to control the device.
12
RESET Recessed Button
Press briefly to reset the device parameters to their factory default values,
excluding
ETH parameters.
Press and hold (5 seconds) to fully reset the device parameters to their default
values,
including
ETH parameters.
13
5V DC Power Connector
Connect to the power supply and to the mains electricity.
14
RS-232 3-pin Terminal Block Connector
Connect to a PC or a remote controller to control the device.