Controlling the VP-410 Video-Audio to HDMI Scaler
7
7
6.1 Controlling the Output Resolution
The OUTPUT RES button has two functions:
•
Repeated pressing of the OUTPUT RES button cycles through the available
output resolutions. The resolution in current operation is indicated by the lit LED
•
Holding down the OUTPUT RES button for three seconds displays a list of
available output resolutions with the currently selected resolution
highlighted
6.2 Using the OSD to Change the Display Parameter Values
The control buttons let you set the
VP-410
display parameters via the OSD menu
as follows:
•
Press the MENU button to enter or exit the menu
•
Press the ENTER button to enter or exit a parameter to change its value
•
The + and – buttons have two functions:
Press the buttons to move up or down through the parameters
Press the buttons to increase or decrease, or cycle through the parameter
values
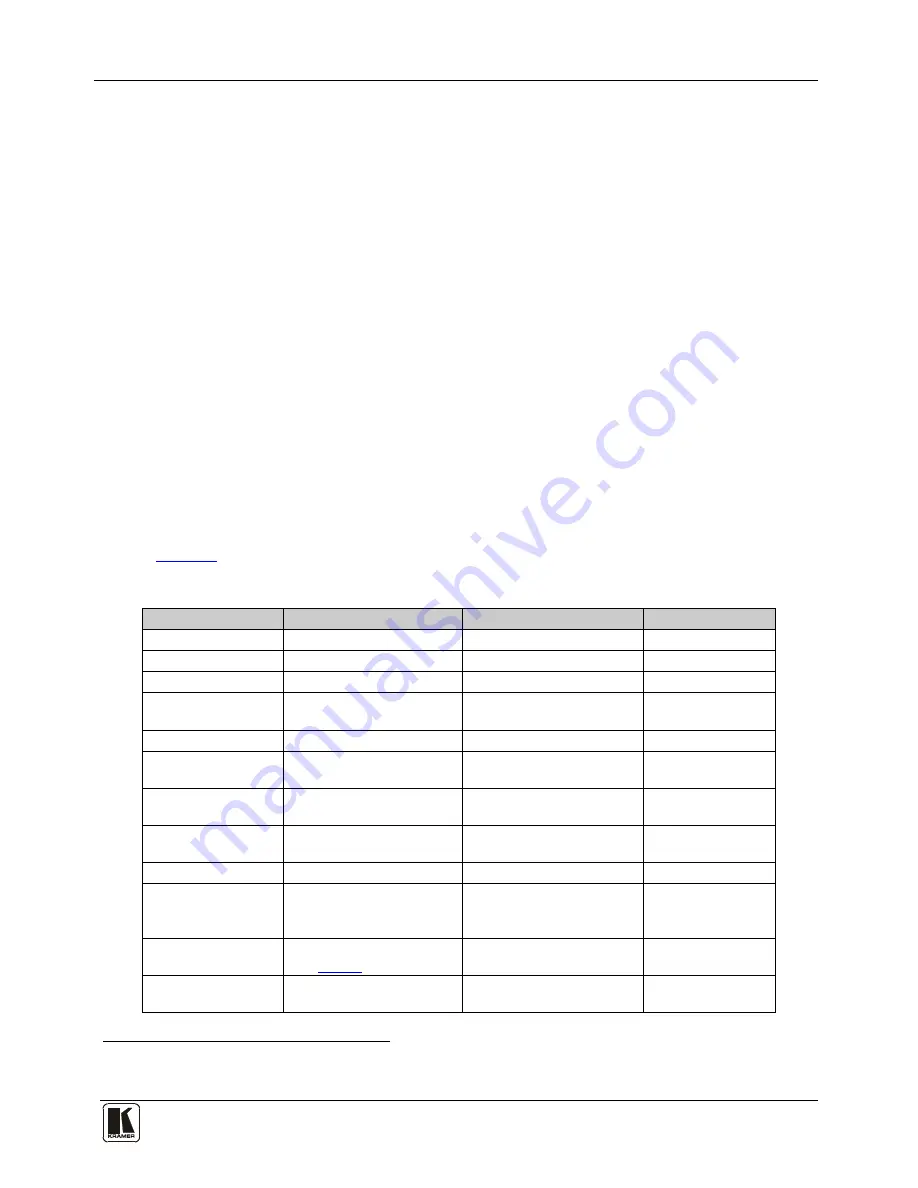
Table 2
defines the Display Menu and parameters.
Table 2: The Display Menu and Parameters
Parameter
Function
Value Range
Factory Default
CONTRAST
Adjusts the contrast
From 0 to 255
128
BRIGHTNESS
Adjusts the brightness
From 0 to 255
128
SATURATION
Adjusts the saturation
From 0 to 255
128
HUE
Adjusts the hue
From -128 to 128
Not available in PAL
00
AUTO SYNC OFF
Turns auto sync on/off
1
ON/OFF
OFF
ASPECT RATIO
Adjusts the aspect ratio of
the output
FULL/4:3/16:9
FULL
OVER SCANNING
Adjusts the over scanning
value
OFF/5%/10%/15%/20%
5%
NOISE REDUCTION Adjusts the noise reduction
filter
Off/Typ/Min/Max
Typ
OUTPUT
Adjusts the output resolution 480p/576p/720p/1080i/1080p 720p
REFRESH RATE
Sets the output refresh rate FOLLOW/50Hz/60Hz
50Hz/60Hz not available with
480p and 576p resolutions
FOLLOW
OSD SETTINGS
Enter OSD Settings menu
(see
Table 3
)
FACTORY DEFAULT Reverts settings to factory
defaults
1 When on, the VP-410 disables its output syncs after a few minutes when no input source is detected. This feature is useful for
applications where the projector should automatically shut down when no source is present.


