

K-CamHD
Quick Start
P/N: 2 9 0 0 - 3 0 1 5 2 9 QS
Rev: 2
Scan for full manual
K-CamHD Quick Start Guide
This guide helps you install and use your
K-CamHD
for the first time.
www.kramerav.com/downloads/K-CamHD
to download the latest user manual and check if firmware
upgrades are available.
Step 1:
Check what’s in the box
K-CamHD
PTZ Camera
Lens cover
1 USB 3.0 cable
Remote control transmitter with batteries
Wall bracket
1 Quick start guide
Power adapter and cord
Screws set
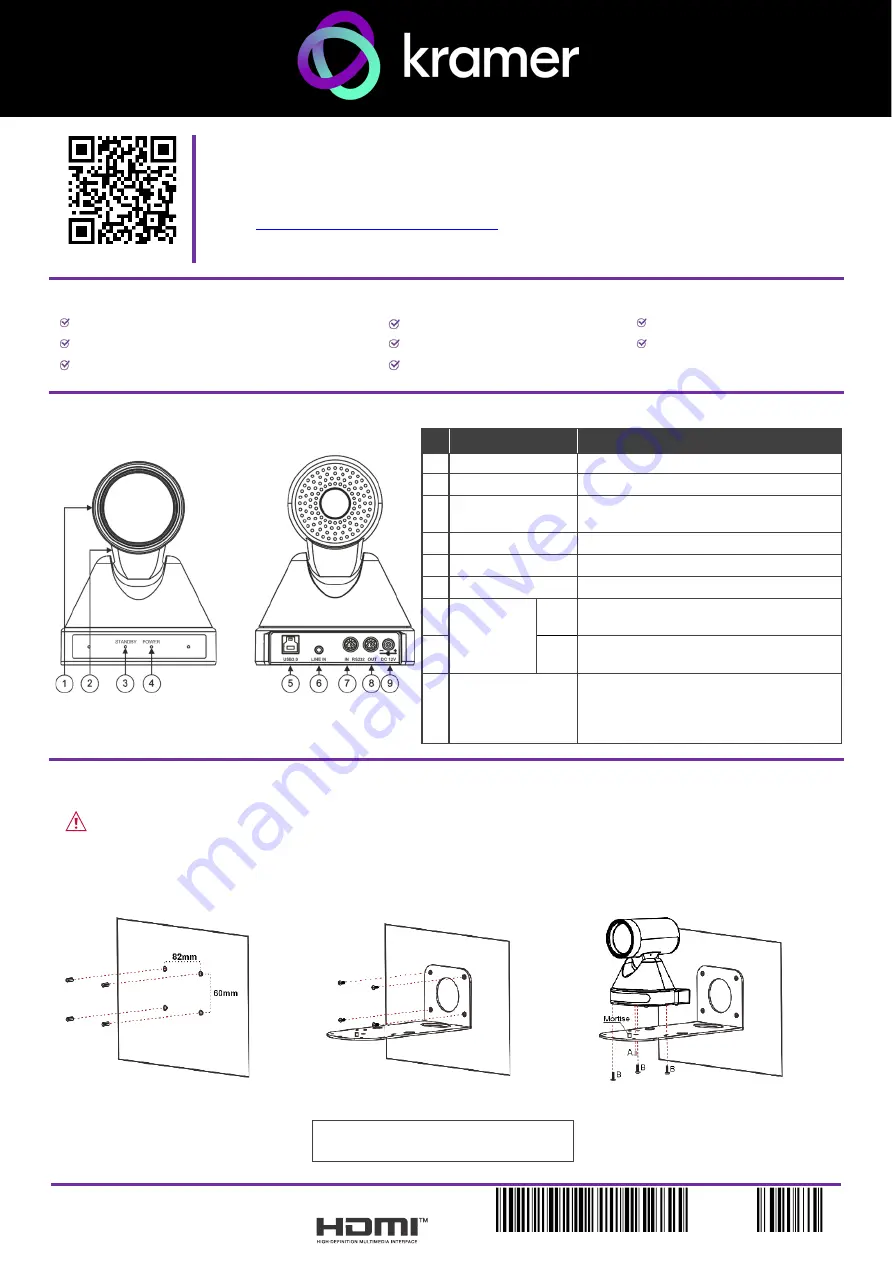
Step 2: Get to know your K-CamHD
#
Feature
Function
1
Camera
High quality Camera.
2
Tilting Mechanism
Can be set to any of 255 preset positions.
3
STANDBY LED
Lights green when the camera is in
standby mode.
4
POWER LED
Lights blue when the power is on.
5
USB 3 Type B Port Connect to a PC.
6
LINE IN
Connect to a microphone.
7
RS-232 8-
pin DIN
Connectors
IN
Connect to a device with an RS-232 port
(for example, a system controller).
8
OUT
Connect to a device with an RS-232 port
(for example, a camera).
9
12V DC Power
Connector
Press and hold to toggle the
locking/release of the front panel buttons.
When storing or recalling presets, press to
store or recall the preset.
Step 3: Mount K-CamHD
You can mount
K-CamHD
on the wall, the ceiling or place it on a tabletop. The built-in gravity sensor automatically corrects the image orientation.
•
Ensure that the environment (e.g., maximum ambient temperature, humidity & air flow) is compatible for the device.
•
Avoid exposing the product to direct sunlight or any other heat source.
•
Keep away from children
– product includes small accessories and components.
•
Avoid uneven mechanical loading.
•
Do not insert any sharp objects into the product.
•
Avoid dropping or hitting the product to avoid damaging the product.
•
For maintenance, call tech support.
To attach K-CamHD onto a wall:
1. Find the correct location on the wall.
2. In the desired location, mark the hole locations, then
drill 4 holes 82mm and 60mm apart (using a 6mm
drill-bit) to fit the 4 holes of the wall-mounting bracket.
3. Insert the four expansion-plugs into the holes.
4. Attach the wall bracket to the wall, using the four wall-
bracket screws.
5. Attach the device to the wall bracket by fitting the
mortise (on the bracket) into the tenon (on the
camera).
6. Fix the camera by screwing (A) Nickel screw to the
center and (B) then tighten with 3 black screws.
Note that you can also attach the device upside
down, from under the bracket.