Kramer Galil 6-CO SPK-C613, User Manual
The Kramer Galil 6-CO SPK-C613 is a versatile and powerful audio control unit. Ensure optimal use of this product by downloading the comprehensive User Manual free of charge from our website. Explore the extensive features and functions of the Galil 6-CO SPK-C613 to enhance your audio experience.
Share
Download


Reviews:
No comments
Related manuals for Galil 6-CO SPK-C613

L7
Brand: JBL Pages: 2

Grand
Brand: Dali Pages: 8

IG108
Brand: Ecler Pages: 2

NDS-1210
Brand: Naxa Pages: 3

PL-DC Series
Brand: Q-SYS Pages: 26
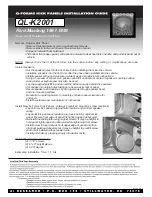
QL-K2001
Brand: Q-Logic Pages: 3

Twin6 Be
Brand: Focal Pages: 2

DN-303ST
Brand: Monacor Pages: 2

DuraVibePro
Brand: Jarv Pages: 12

SO41005
Brand: HQ Power Pages: 13

10548
Brand: Louisiana Grills Pages: 128

BB5-Ci
Brand: PMC Pages: 32

1Ci
Brand: VANDERSTEEN Pages: 8

HTB4
Brand: Sanus Pages: 14

215XL
Brand: Samson Pages: 4

BT ELITE 3500
Brand: MAC Audio Pages: 5

MD1U
Brand: China Electronics Pages: 6

PORT12VHF-MKII
Brand: Ibiza sound Pages: 40


