


To install the OSP SFP+ transceiver (not included)
:
Make sure the bail is pushed up, in the closed position.
Insert the
OSP SFP+
transceiver into the relevant optical device SFP+
slot and push it in until it clicks.
Remove the protective cap and store it in a safe place for future use.
Warning:
Connecting the
OSP SFP+
connector to an LC(APC) fiber
connector may cause poor performance and damage the connector!
Refer to
www.kramerav.com/downloads/OSP-MM1
Warning: Class 1 Laser Product
Invisible laser radiation present.
Avoid long-term viewing of laser.
Avoid the use of magnifying viewing aids or instruments (such as binoculars, telescopes, microscopes and magnifying
lenses, but not spectacles or contact lenses).
Avoid placing optical devices in the emitted beam that could cause the concentration of the laser radiation to be increased.
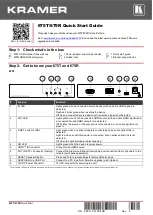
Step 5: Connect the power
Connect the power cord to
675T
/
675R
and plug it into the mains electricity.
Safety Instructions (See
for updated safety information).
Caution:
•
There are no operator serviceable parts inside the unit.
Warning:
•
Use only the power cord that is supplied with the unit.
•
Disconnect the power and unplug the unit from the wall before installing.


