background image

6

USING THE DETACHABLE FRONT PANEL

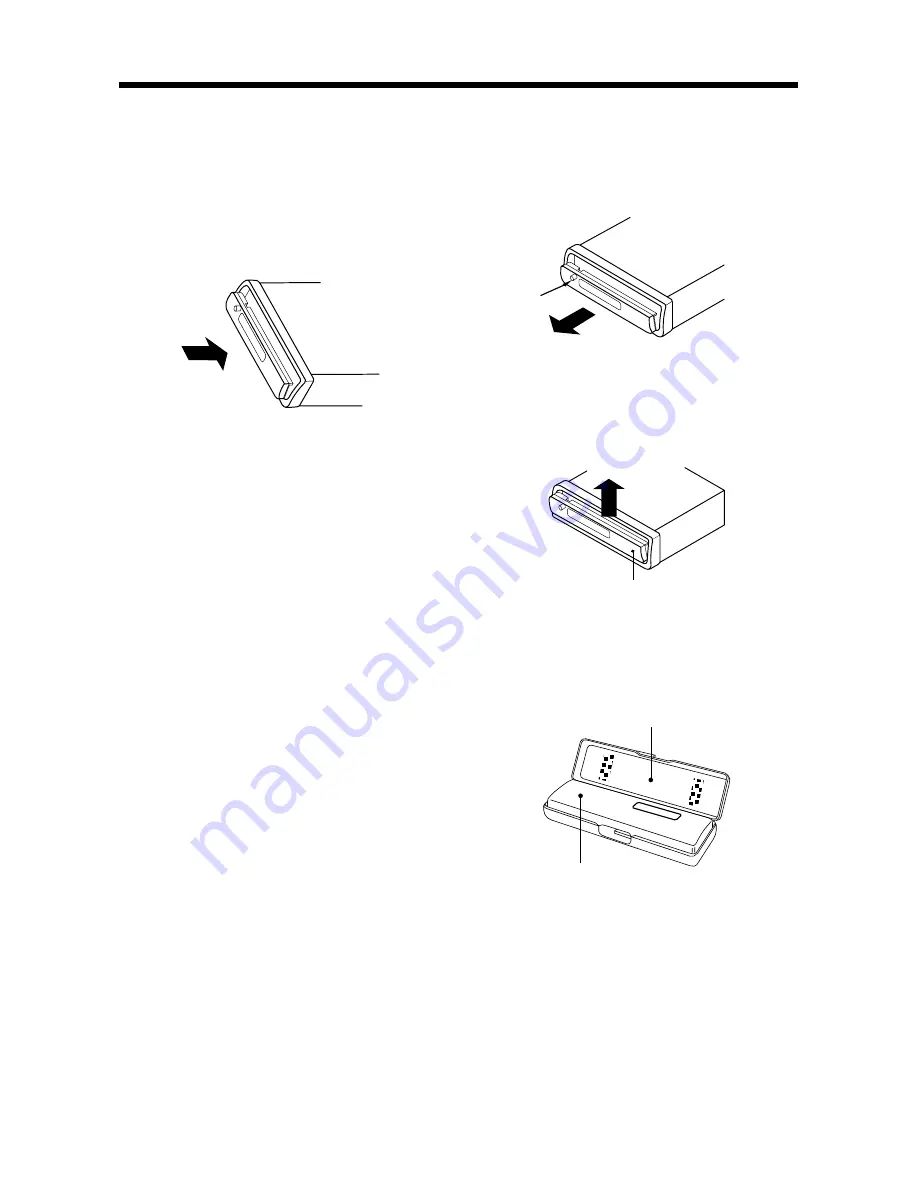
To Detach the Front Panel

1. Press the open button (OPEN) and the

front panel will release on the left side.

2. Remove the front panel by pulling

outwards.

3. For safekeeping, store the front panel

in the supplied protective case
immediately after removal.

Protective Case

Front Panel

Front Panel

Open

To Install the Front Panel

1. Carefully open the front panel’s

protective case.  Insert the right of the
front panel into the radio body.  Then
press the left side into place. You will
hear a click when it is in position.

2. If the panel is not properly in place,

some or all functions will not operate
and the LCD display will be either
partially or completely dead.  Remove
and reinstall the front panel if this
occurs (see instructions on Detaching
the Front Panel).

Precautions When Handling

1. Do not drop the front panel.

2. Do not put pressure on the LCD display

or control buttons when detaching or
reinstalling the front panel.

3. Do not touch the contacts on either

the back of the front panel or on the
face of the of the radio body.

4. If any dirt or foreign substance

accumulates on the contacts, it can
be removed with a clean and dry cloth.

5. Do not expose the front panel to high

temperatures or direct sunlight.

6. Do not allow any volatile agent (e.g.

benzene, thinner, or insecticides) from
touching the surface of the front panel.

7. Do not attempt to disassemble the

front panel.

Summary of Contents for MS2010

Page 1: ...MANUAL Mobile Audio System PLL Synthesizer Stereo Radio Digital Compact Disc Player Automatic Memory Storing Full Detachable Panel Preset Equalization Electronic Shockproof ESP Function Remote Control...

Page 2: ...10 Mute 10 Equalization 10 Liquid crystal display 10 Remote sensor 9 Reset function 11 Radio operation 11 Switching to radio mode 11 Selecting the frequency band 11 Selecting station 11 Local distant...

Page 3: ...lling the unit where it would be subject to high temperature such as from direct sunlight or from hot air from the heater or where it would be subject to dust dirt or excessive vibration DIN FRONT REA...

Page 4: ...u can remove it Insert the keys as far as they will go with the notches facing up into the appropriate slots at the middle left and right sides of the unit Then slide the sleeve off the back of the un...

Page 5: ...tion is turned off then disconnect the cable from the vehicle battery s negative terminal 2 Remove the metal strap attached the back of the unit if attached 3 Press the release button to remove the fr...

Page 6: ...ctions will not operate and the LCD display will be either partially or completely dead Remove and reinstall the front panel if this occurs see instructions on Detaching the Front Panel Precautions Wh...

Page 7: ...LET VIOLET BLACK MAIN UNIT WHITE WHITE BLACK FRONT Lch SPEAKER REAR Lch SPEAKER FRONT Rch SPEAKER REAR Rch SPEAKER Rch RED Lch WHITE GREY RCA CABLE ANTENNA CONNECTOR RED YELLOW BLACK BLUE POWER ANTENN...

Page 8: ...L 11 Volume 12 Reset 13 BND LOU 14 Preset Buttons 15 Display Button DSP 16 TUNE TRACK Search DOWN Button 17 TUNE TRACK Search UP Button 18 Auto Memory Store Preset Scan Button AMS 19 EQ Button 20 Paus...

Page 9: ...9 OPERATION LOCATION OF CONTROLS BACK VIEW 12...

Page 10: ...displayed on the LCD display Then hold down the button until the clock flashes Then press the TUNE TRACK button 17 to change hours or TUNE TRACK button 16 to change minutes 10 OPERATION MUTE Press MU...

Page 11: ...F1 F2 F3 or AM To store a station into the memory select the desired band using BND LOU button 13 Either use the AUTO or MANUAL tuning mode to select the station you wish to enter into memory and then...

Page 12: ...your CD R CD RW recorder or CD R CD RW software for more information on finalization process 3 Depending on the recording status conditions of the disc and the equipment used for the recording some C...

Page 13: ...olume Up Button 5 VOL Volume Down Button 6 BND Band Select Button 7 MOD Mode Button 8 TUNE SEEK Tune Seek Down Button 9 TUNE SEEK Tune Seek Up Button 10 AMS Automatic Storing Program Scanning Button 1...

Page 14: ...Output Power 4 x 15 Watts Current Drain 15 Ampere max CD PLAYER Signal to Noise Ratio More than 55 dB Channel Separation More than 45 dB Frequency Response 40 Hz 18 KHz RADIO FM Frequency Coverage 87...

Page 15: ...r defective disc new one Temperature inside the car Cool off or wait until the is too high ambient temperature returns to normal Condensation Leave the player off for an hour or so then try again No s...

Page 16: ...T button ERROR 2 Playback errors Dirty disc Clean the disc and load it as instruction manual mentioned Disc is loaded up side down Load disc with label facing up Disc is scratched Try another disc Dis...

Reviews: