background image

E 12

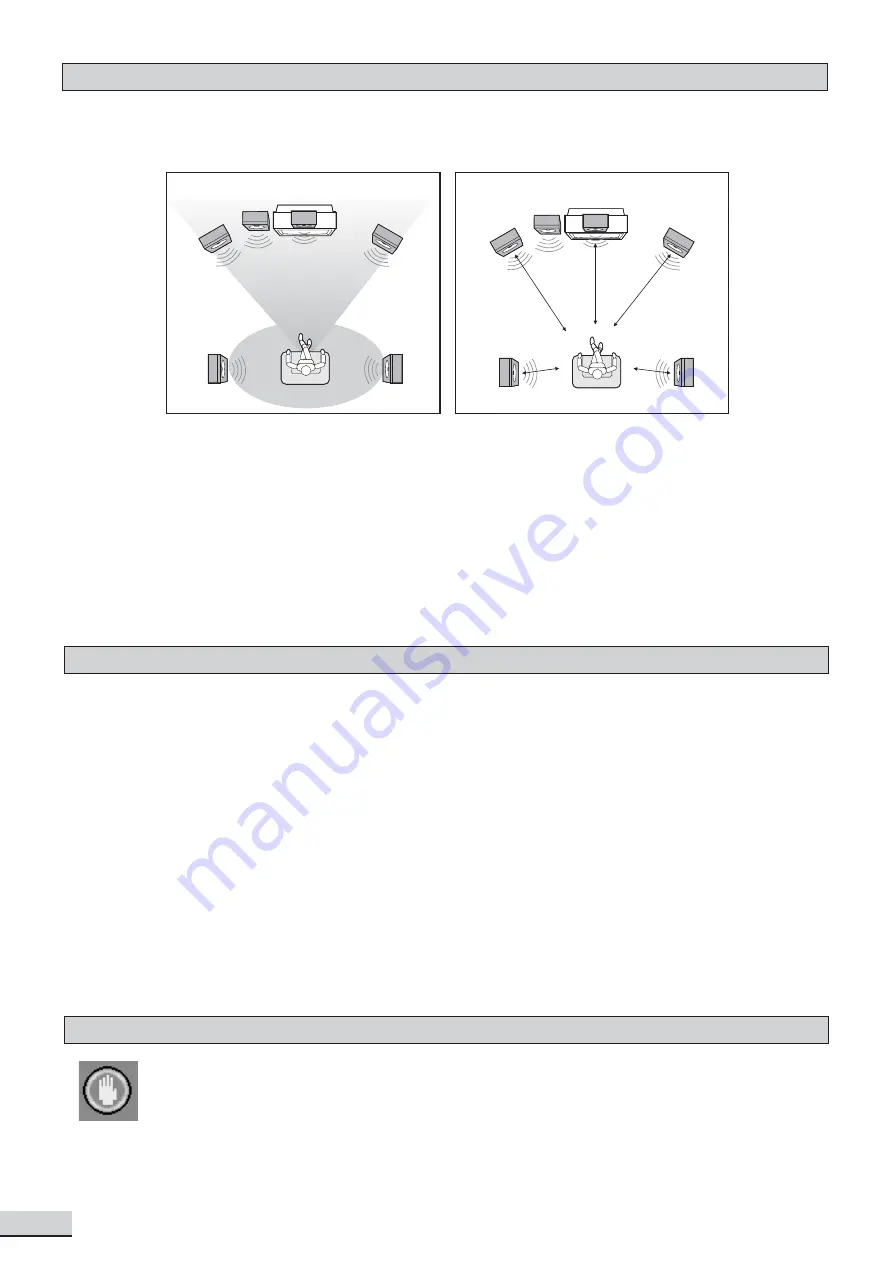
Placement of speakers play an important role in the reproduction of surround sound.  Particular attention
should be taken when designing the speaker layout.  For the best surround effects, all speakers should be
installed.

A typical room layout will have the left, center, and right speakers placed across the front and the left surround
and right surround speakers placed along the sides towards the rear as shown in the above left picture.  The
center speaker can be positioned above or below the video screen or TV.   A subwoofer can be installed for
powerful bass sounds and can be positioned anywhere in the room.
The ‘speaker to listener dimensions’ shown in the above right picture is used for proper setup of the surround
system (

Please refer to Speaker Setup on P.16

).

Note:

Do not connect more than one speaker to any one pair of +/- speaker terminals.

Do not connect speakers with an impedance lower than the speakers supplied.

Special On Screen Message

This symbol when displayed, means that the key you have pressed is not available at this time, or
that this action is not allowed by the disc at this time.

Speaker Placement

Switch on for the First Time

TV

Front

speaker

( left )

Front

speaker
( right )

VIEWING AREA

Subwoofer

Center Speaker

Rear speaker

( right surround )

Rear speaker

( left surround )

TV

Front

speaker

( left )

Front

speaker
( right )

DIM L

Subwoofer

Center Speaker

Rear speaker

( right surround )

Rear speaker

( left surround )

DIM C

DIM R

DIM RS

DIM LS

You have connected up the Home Theater System as shown in the preceding pages.

Connect Power to the DVD Player.

The DVD Player should have the Standby Light illuminated.

Press the Power on key (either on the panel or the remote control), the player will be in AV 1 mode.

Press DVD (either on the panel or the remote control), the DVD Player will switch on in DVD mode. After
a few seconds the panel will show “NO DISC”.

Switch on your TV and select the AV input that the DVD Player is connected to. You should see the DVD
Screen and a message “Insert a disc”.

Press the open key (on the panel or the remote control). The drawer will open. Place a DVD in the drawer,
and press close (same as open). The player will read the disc and start playing it. Before the movie starts
to play, a menu will be shown. You will need to select ‘PLAY MOVIE’ and press [OK] before the movie will
start.

Although you can watch a movie immediately, to get the best result from your Home Theater, you should
now press ‘STOP’ and proceed to do the system setup options on the next page. This will set up all the
functions on your theater. You only need to do this when you first install your Home Theater.

If you choose to watch the movie you can find out about DVD options and navigation of the DVD disc in the
section “Playing a DVD disc” and onward.

Summary of Contents for KS3102-2

Page 1: ...W 210MMx H 299MM COLOR PRINTED IN BLACK ON WHITE BACKGROUND KS3102 2 INSTRUCTION MANUAL GUIDE D UTILISATION DVD VCD CD HOME THEATRE SYSTEM WITH DIGITAL AM FM STEREO RECEIVER CIN MA MAISON DVD VCD CD...

Page 2: ...E 1 E SAFETY To ensure proper use of this product please read this owner manual carefully and retain for future reference Should the unit require maintenance con tact an authorized service location...

Page 3: ...has been spilled or objects have fallen into the apparatus the apparatus has been exposed to rain or moisture does not operate normally or has been dropped Disc Tray Keep your fingers well clear of th...

Page 4: ...separation between the equipment and receiver Connect the equipment to a supply outlet different from that to which the receiver is connected Consult the dealer or an experienced radio TV technician...

Page 5: ...oth sides They play for approximately 8 HOURS DVD discs have Titles and Chapters There can be several Titles on one disc and each Title can contain several Chapters Titles and Chapters are numbered e...

Page 6: ...TATE 1 displays the Title Menu if present on disc DVD mode only 2 rotates pictures when playing Picture CDs 8 MENU 1 enters Disc Contents Menu in DVD mode 2 enters System Setup for SPEAKER CLOCK or TI...

Page 7: ...7 TUNER selects tuner as the input source Also switches between AM and FM bands 8 stops playing 9 pauses playing 10 SKIP skips to previous chapter track in DVD CD mode 11 SKIP skips to next chapter t...

Page 8: ...om a TV VCR or other radiation source 2 Audio Inputs For connecting audio Left Right input signals from auxiliary sources such as VCR TV or Satellite Receiver and playing them through this Home Theate...

Page 9: ...equipment that has digital audio input jack such as a CDR recorder 11 Digital Optical Input For connecting an external equipment that has a digital optical output jack 12 Subwoofer Speaker Included C...

Page 10: ...n diagrams show the different video and audio connections to TV VCR or CD Recorder Important Make sure the AC Voltage matches your local voltage Connect the AC cord only after the speakers antennas an...

Page 11: ...E 10 2 Audio Connections...

Page 12: ...move excessive amount of insulation on the wire cords to avoid the stripped portion from touching each other The optimal length for the stripped part should be around 1 3 inch or 1cm Do not push the s...

Page 13: ...aker left surround TV Front speaker left Front speaker right DIM L Subwoofer Center Speaker Rear speaker right surround Rear speaker left surround DIM C DIM R DIM RS DIM LS You have connected up the H...

Page 14: ...browse and make selections in the menus Play Mode Lock Display Sound Languages Insert a disc Play Example shows how to select French as Disc menus language in the Languages menu Select Disc Menus Ope...

Page 15: ...ted Titles DVD discs have parental levels assigned to them The range of parental controls are from 1 to 8 The player can be set in a similar way by pressing If the unit s rating limit is set to 8 it w...

Page 16: ...ective of the player setting DISPLAY TV Image Three options available 1 4x3 Letter Box 2 4x3 Standard 3 16x9 Wide Screen Press OK to select a suitable one Select TV Image according to your TV type If...

Page 17: ...ture simultaneous instead of displaying odd and even lines alternatively such as a conventional TV Progressive Scan greatly enhances picture resolution while minimizing distortion and flickering To us...

Page 18: ...h Spanish German English Distance You can specify the distance changing the sound delay between speakers front center and surround speakers and the listener for optimal stereo sound The default distan...

Page 19: ...te the speaker output The Speaker Indicator will disappear on the display Press MUTE or the volume button on the remote or volume knob on the front panel to restore the speakers output OPTICAL ANALOG...

Page 20: ...nd modes as shown below Dolby Pro Logic Surround 3 Stereo Stereo Selecting EQ Modes There are 6 EQ modes available while you are listening to 2 channels output e g Music CD Press TONE repeatedly on re...

Page 21: ...nd system is a specially encoded two channels analog format which produces 4 channels front left center front right monaural surround when a Dolby Pro Logic Decoder is used It is also compatible with...

Page 22: ...ion easier to listen Preset Stations When a preset station is selected the preset number will appear next to the frequency on the display Selecting Preset Stations 1 In tuner mode press TUNER to switc...

Page 23: ...set the function ON or OFF 6 Press OK for confirmation Clock Setting the Clock 1 Start in either AV or TUNER mode Timer cannot be set in DVD mode 2 Press MENU button Remote Control only and also press...

Page 24: ...his feature allows you to select a time for the system to switch to the Standby mode automatically 1 Press SLEEP on the remote control repeatedly to cycle through the below sleep timer options The ava...

Page 25: ...rease decrease the search speed Note there is no sound in Fast Search Slow Motion and Frame by frame Advance modes Press to resume normal playing Quick keys MENU TITLE Press corresponding keys to go i...

Page 26: ...ation keys to select Play or Cancel in an index and press OK Press to select viewing angles if available on disc Note When the selection is completed exit the Navigation Bar by pressing INFO or EXIT W...

Page 27: ...Example shows how to add Title 1 and Chapter 1 in Title 2 to the program then save and start playing Program Press to Add Select Title 1 Select Title 2 Select Chapter 1 Press to Add Press to select Do...

Page 28: ...lose the tray The disc will start playing automatically There may be a short delay before playing while the player reads menu from the disc Playing Music CDs Edit Program Example shows how to delete t...

Page 29: ...ys to select Play or Cancel in an index and press OK Pause Press to stop playing temporarily Press again to resume playing Skip Press to skip forward or backward a track Fast search To search through...

Page 30: ...ously Multi Disc Resume To resume play simply press OK or Otherwise press once more and then to start playing from the beginning Play Mode Standard Press OK to set unit playing tracks in default order...

Page 31: ...ample shows how to delete the last selection in the program Press Clear to delete the last selection Press to select Done or press to save the Program List and start playing Press to select Done to sa...

Page 32: ...Press to play from where you stopped Not available with PBC On Press twice to stop playing completely and press will now start playing from the beginning Active Navigation Press INFO to display the co...

Page 33: ...xist press A root menu exist press More items available in menu press Track name Picture name Track name Picture name Track Name Folder Name Track Name Picture Name Track Name Folder Name Folder Name...

Page 34: ...e slideshow with the JPEG files in the currently selected folder At the same time it plays the selected MP3 file following the music only playback The slideshow stops when the picture playback has fin...

Page 35: ...he picture in and out during a picture slideshow Active Navigation Press INFO to display the info bar on TV screen to make menu selections without interrupting the playing When disc is stopped The TV...

Page 36: ...n random order Program Press OK to create or edit program Create Program Example shows how to add Folder 1 and Track 1 in Folder 2 to the program list then save and start playing Select Folder 1 Press...

Page 37: ...E 36 Edit Program Example shows how to delete the last selection from the program list Press Clear to delete the last selection Press to select Done to save the Program List...

Page 38: ...ould you try to repair the player yourself as this will invalidate the warranty Only qualified service personnel can remove the cover or service this player NO POWER Check if the on off button on the...

Page 39: ...e CD R disc recording JPEG Files CD R and CD RW with JPEG files Certain JPEG files including progressive JPEG files cannot be read by this player Your MP3 files should be ISO 9660 or JOLIET format ISO...

Reviews: