background image


V0.1                                                                                                     6 


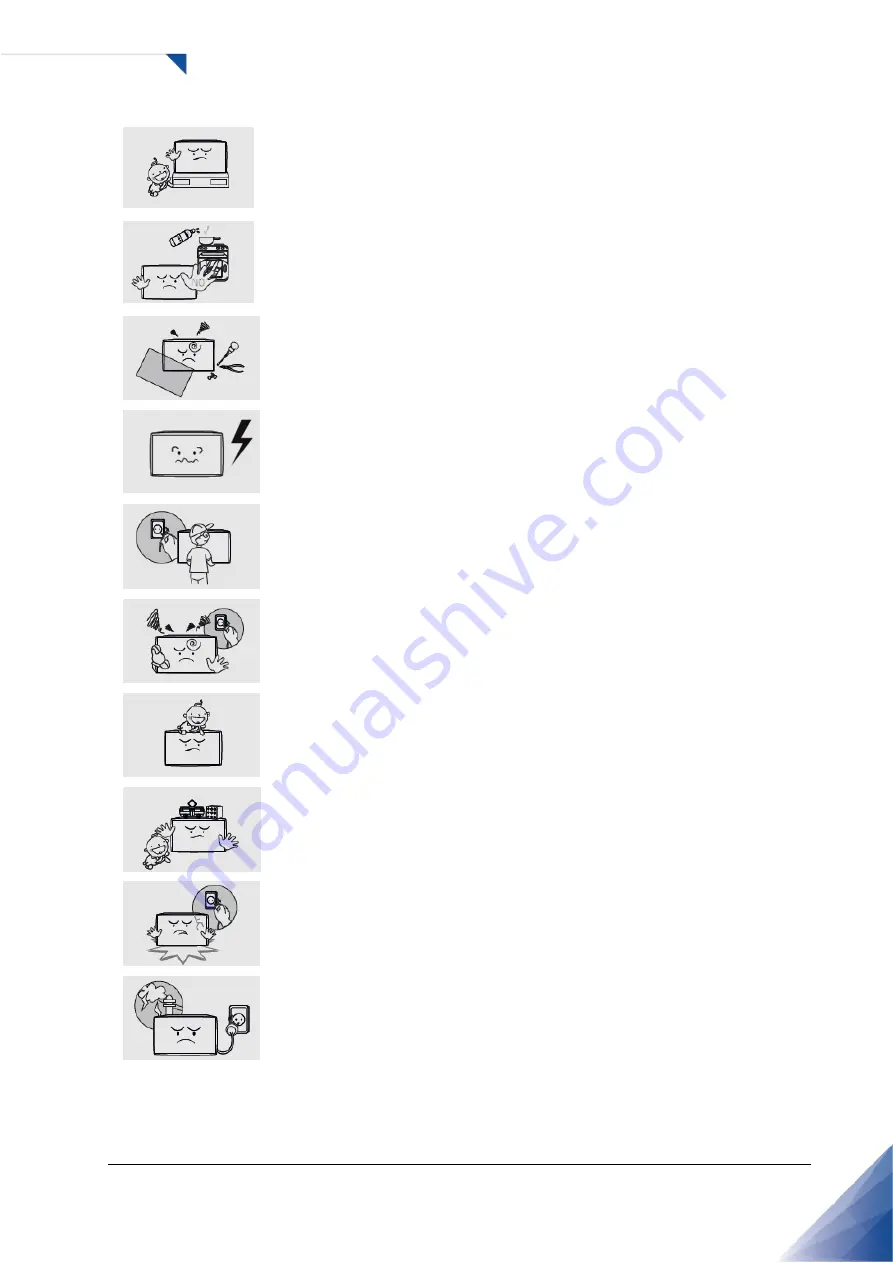
Do not install in the low place where a child can touch. 
- A child may be injured while playing and touching the product. 


Do not install near any kitchen or kitchen counter because it may cause damage or 
deformation of the product by the vapor or oil. 
- This may cause a fire. 


Do not try to repair or transform the product because the high voltage can flow inside the 
product. 
- This may cause a fire or electric shock. 
- When problem is found in the product, contact a service center. 


Do not use electrical equipment which uses high-voltage around the product. 
- This may result in poor quality of display or cause amblyopia.  
- This may cause a fire or electric shock. 


When moving the product, turn off the power and remove all of the cables including power 
cables connected to the product. 
- If the cable is damaged, it may cause a fire or electric shock. 


When smelling something burning or hearing strange sound from the product, disconnect the 
power cable immediately and contact a service center. 
- This may cause a fire or electric shock. 


Do not allow a child to get on or hang on the product. 
- If the product falls off, a child may result in injury or death. 


Do not place heavy object, toy or sweets that a child can play with on the product. 
- If a child hang the product and fall, it may cause personal injury or death. 


When the product is damaged or falls off, disconnect the power cable immediately and contact 
a service center. 
- This may cause a fire or electric shock. 


When lightning occurs, turn off the power switch and disconnect the power cable. 
- This may cause a fire or electric shock. 

Summary of Contents for KT-LL98ULIX-PD

Page 1: ...USER MANUAL KT LL98ULIX PD KT LL98ULIX PD1 KT LL98ULIX PD2 KT LL98ULIX PD3 LL98ULIX PD LL98ULIX PD1 LL98ULIX PD2 LL98ULIX PD3...

Page 2: ...g facility is ISO 9001 and 14001 certified REGULATORY The product has been tested and found to comply with the limits for a Class A digital device pursuant to Part 15 of the FCC Rules These limits are...

Page 3: ...llation 20 3 7 Remote Controller 21 3 8 Setup 21 4 REMOTE CONTROL 22 4 1 RS 232C Connection 22 4 2 Communication Command 23 4 3 Communication Command list 24 5 CONNECT THE EXTERNAL DEVICE 28 5 1 DP Di...

Page 4: ...Do not use a damaged power cable or plug which does not meet the standard This may cause a fire or an electric shock If you are using a power strip do not use several devices at the same time Due to...

Page 5: ...cause a fire Install the product at least 10 cm far from the wall Otherwise it may affect internal temperature to be increased and cause a fire After unpacking the product packaging vinyl should be ke...

Page 6: ...rn off the power and remove all of the cables including power cables connected to the product If the cable is damaged it may cause a fire or electric shock When smelling something burning or hearing s...

Page 7: ...e power can cause an explosion or fire Do not store or use flammable material and flammable sprays near the product This may cause an explosion or fire Please do not block a vent with the curtain or c...

Page 8: ...t carefully not to occur the twist and drop This may cause a malfunction or injury Put the product s screen faces upwards The screen may be damaged Work together more than one person if the product is...

Page 9: ...olding only the stand or lift the product upside down The stand might be split from the product and it may cause damage or injury Look at the screen from a distance of about longer 2 5 times than the...

Page 10: ...tteries with new one If it is different from the polarity of the battery it may cause a fire or injury to break or leak This may also contaminate the surrounding The depleted Battery and rechargeable...

Page 11: ...r service center The following images may differ from the image shown Other parts not packed in contents may cause performance degradation or problem during use Power Cable 1 8M Option VGA Cable 1 8M...

Page 12: ...ff button To move to the upper menu or select To move to the lower menu To move to the right menu or turn up the volume To move to the left menu or turn down the volume M To display or hide the on scr...

Page 13: ...roduct using two screws as shown in the figure below 2 Connect the cable of the external remote controller receiver to the IR In input terminals on the back of the product Remote Controller Receiver P...

Page 14: ...o the input output terminals check the above picture of the input output terminal and connect in the right direction If connected incorrectly it may cause damage or breakdown of the input output termi...

Page 15: ...ation PC AC Power Input Power connector AC 100 240V 50 60Hz or Power Switch O AC off AC on Internal speaker max 10W x 2ea 2 4 Remote Controller Button Description Button Description The following imag...

Page 16: ...he product has touch function it may cause of malfunction of touch install the product in the shady environments or in the opposite direction of the source of the sunshine or the artificial light Ambi...

Page 17: ...acking Process The following mages may differ from the actual items 1 Remove the outer packing box 2 Remove the top foam 3 Lower down or remove the wrapping 4 four or more people remove the packing fr...

Page 18: ...the product Correct method The product should be supported by at least 4 people respectively to safely move the product Incorrect method When moving the product no part of the screen area on the front...

Page 19: ...oduct horizontally and slowly on the floor If firstly laying the edge of the bezel of the product the screen panel of the product may be fragile or damaged Incorrect method Put down carefully not to d...

Page 20: ...crew M8 max length 25mm Warning We are not responsible for the product damage or personal injury caused by user s own installation 3 6 Wall mounting Installation Install the product only on the robust...

Page 21: ...remote controller becomes narrow or does not work replace the battery with new one In case of the product is exposed to direct sunlight or fluorescent light it may not operate 3 8 Setup Turning on th...

Page 22: ...Pin Txd Rxd Gnd Bit rate 9600 bps Data bits 8 bit Parity None Stop bits 1 bit Communication codes ASCII RS 232C Cable Pin Description P1 P2 Stereo 3 5 Tx 1 2 Rx D SUB 9P female Rx 2 3 Tx Gnd 3 5 Gnd C...

Page 23: ...for command refer to page 24 VALUE Adjusted value It consists of 3Bytes ranging from 000 to 100 END Represents the end of a statement Put a always Status confirmation command It is to send commands to...

Page 24: ...CTU Direct Control Contrast 1step Down CTD Direct Control Black Level 1step Up BRU Direct Control Black Level 1step Down BRD Direct Control Color 1step Up STU Direct Control Color 1step Down STD Dire...

Page 25: ...e Select Off UA0 Direct Control RS 232 UA1 Direct Control OPS RS 232 UA2 Direct Control Factory Reset FTR Direct Control Multi Window Mode Off WM0 Direct Control Multi Window Mode PBP WM1 Direct Contr...

Page 26: ...tatus check Selected Window Status WIN 001 Window1 002 Window2 003 Window3 004 Window4 Status check Picture Mode PMT 000 Standard 001 Dynamic 002 User Status check Brightness Setting BLT 0 100 Status...

Page 27: ...ow1 Source Status W1S 000 DP 001 HDMI1 002 HDMI2 003 HDMI3 004 HDMI4 005 OPS HDMI 006 OPS DP Status check Window2 Source Status W2S 000 DP 001 HDMI1 002 HDMI2 003 HDMI3 004 HDMI4 005 OPS HDMI 006 OPS...

Page 28: ...ly to output the optimal resolution In order to operate the plug and play after connecting the product connect the video cable of the PC to the product before turning on your PC and turn on the power...

Page 29: ...ion which helps the PC recognize the product automatically to output the optimal resolution In order to operate the plug and play after connecting the product connect the video cable of the PC to the...

Page 30: ...matically to output the optimal resolution In order to operate the plug and play after connecting the product connect the video cable of the PC to the product before turning on your PC and turn on the...

Page 31: ...vigate to the sub menu move to the desired sub menu using the or buttons Press the button to navigate to the adjust menu adjust the value using the or buttons Press the MENU button to complete Input D...

Page 32: ...color area 6 3 Adjust Settings Press the MENU button then navigate to the ADJUST menu using the or buttons Press the button to navigate to the sub menu move to the desired sub menu using the or butto...

Page 33: ...buttons Press the button to navigate to the adjust menu adjust the value using the or buttons Press the MENU button to complete Sub Menu Value Descriptions Audio Input Audio In DP HDMI1 HDMI2 HDMI3 HD...

Page 34: ...on to navigate to the sub menu move to the desired sub menu using the or buttons Press the button to navigate to the adjust menu adjust the value using the or buttons Press the MENU button to complete...

Page 35: ...ave OFF ON If set to ON the sleep mode energy saving mode is activated when no image input lasts for 120 seconds Movie Mode OFF Low Mid High Adjusts the degree of screen vibration and blurring 1 Off a...

Page 36: ...ulti screen setting to Off Dual Sets the multi screen setting to 2 split screen Quad Sets the multi screen setting to 4 split screen Window 1 DP HDMI1 HDMI2 HDMI3 HDMI4 OPS HDMI OPS DP Selects the inp...

Page 37: ...nge is displayed Check if a signal with other resolution which the product does not support is input to the product and refer to the details in the page 40 Images is not displayed correctly or noise i...

Page 38: ...not separated From the menu try making the value of the black level lower on the screen menu setting Or try to initialize the screen menu settings The dark area of the screen is too bright From the me...

Page 39: ...4 Service In Touch In IR In OPS OPS HDMI OPS DP OPS RS232 Communication Terminals RS232C In IR In OPS RS232 Internal Speaker Input max 1Vrms Output 10W x 2 Cosmetic Dimensions 2 194 2 x 1 249 1 x 121...

Page 40: ...O O 1360 x 768 47 712 60 015 85 5 O O O O O 1920 x 1080 67 5 60 148 5 O O O O O ED 480p 31 5 60 27 03 O O O O 576p 31 25 50 27 O O O O HD 720p 37 5 50 74 25 O O O O 44 995 59 94 74 176 O O O O 45 60...

Page 41: ...nformation for the prevention of image sticking When external device PC is not used for a long time please use screensavers The screensaver should be monochrome or moving image If 4 3 aspect ratio is...

Reviews: