background image

153

Pad Record mode

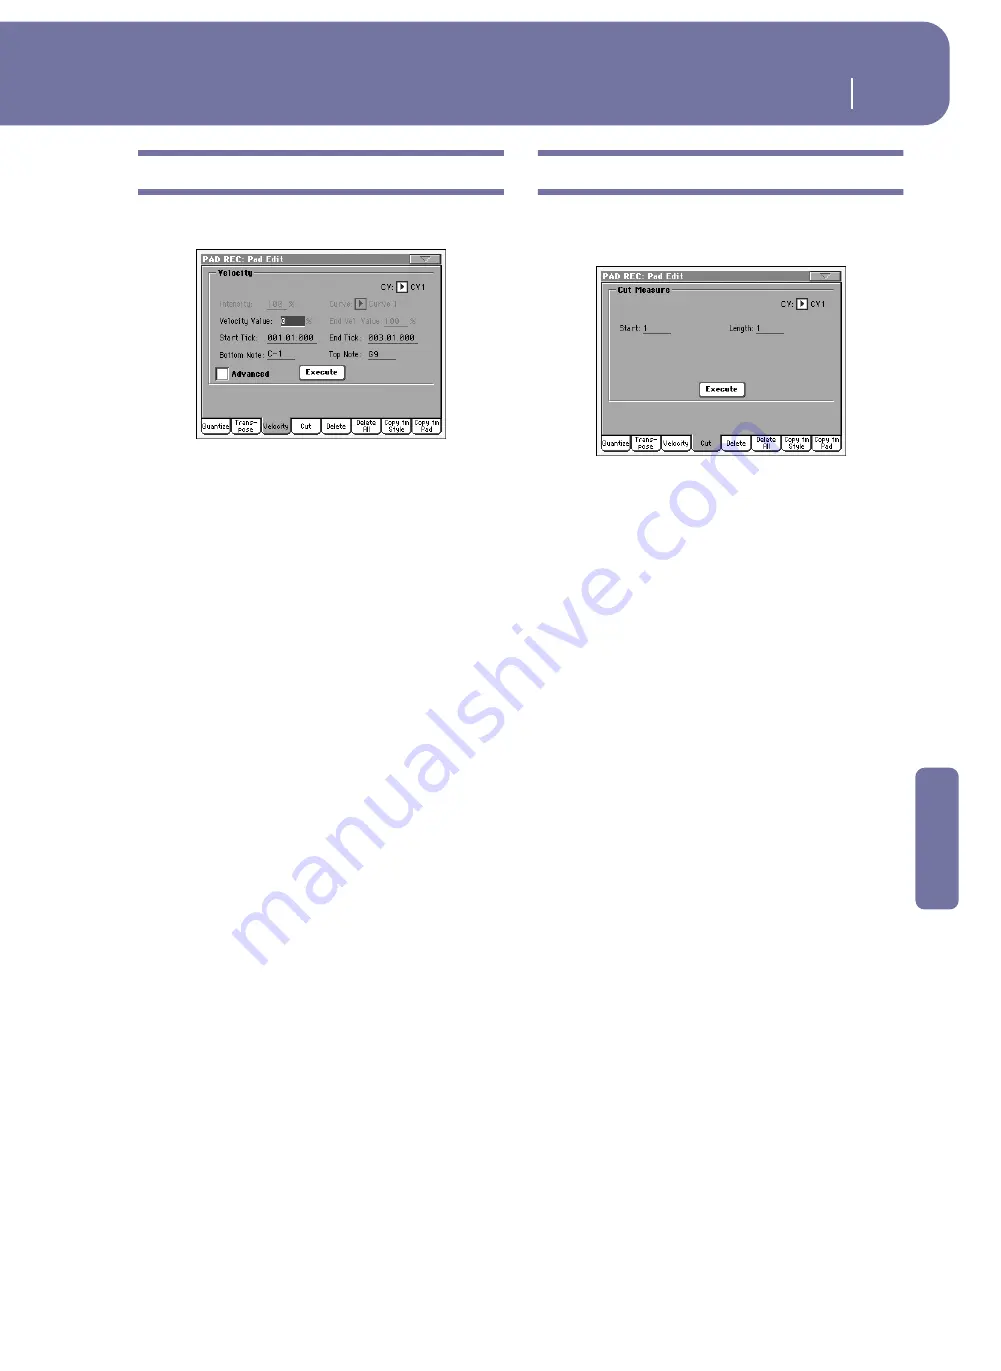
Pad Edit: Velocity

Reference

Pad Edit: Velocity

In this page you can change the velocity (dynamics) value of
notes in the selected track.

After setting the various parameters, touch Execute.

CV (Chord Variation)

Use this parameter to select the Chord Variation for editing.

Value

Velocity change value (±127).

Intensity

(Only available in Advanced mode).

 Use this parameter to specify

the degree to which the velocity data will be adjusted toward the
curve you specify in “Curve”.

Curve

(Only available in Advanced mode).

 Use this parameter to select

from six types of curve, and specify how the velocity will change
over time.

Start / End Vel. Value

(Only available in Advanced mode).

 Velocity change at the start-

ing and ending ticks of the selected range.

Start / End Tick

Use these parameters to set the starting and ending points of the
range to be modified.

Bottom / Top Note

Use these parameters to set the bottom and top of the keyboard
range to be modified.

Advanced

When this checkbox is checked, the “Intensity”, “Curve”, “Start
Velocity Value” and “End Velocity Value” parameters can be
edited.

Execute

Touch this button to execute the operation set in this page.

Pad Edit: Cut

This function lets you quickly delete a selected measure (or a
series of measures) from the selected Chord Variation. All fol-
lowing events are moved back, to replace the cut measure(s).

After setting the various parameters, touch Execute. 

CV (Chord Variation)

Use this parameter to select the Chord Variation for editing.

Start

First measure to be cut.

Length

Number of measures to be cut.

Execute

Touch this button to execute the operation set in this page.

Summary of Contents for pa2X pro

Page 1: ...User s Manual ENGLISH OS Ver 2 0 MAN00010019 4 E ...

Page 2: ... persons The exclamation point within an equilateral tri angle is intended to alert the user to the pres ence of important operating and maintenance servicing instructions in the literature accompa nying the product Important safety instructions THE FCC REGULATION WARNING for U S A This equipment has been tested and found to comply with the limits for a Class B digital device pursuant to Part 15 o...

Page 3: ...improve our products the specifications might differ to those in the manual Korg is not responsible for any eventual differences found between the specifications and the contents of the instruc tion manual the specifications being subject to change without prior notice Liability Korg products are manufactured under strict specifications and voltages required by each country These products are warr...

Page 4: ...splay and keep children away while using it This instrument is not a toy so please don t let children play with the display Keep your keyboard up to date Your instrument can be constantly updated as new versions of the operating system are released by Korg You can download the operating system from www korgpa com Please read the instructions supplied with the operating system The X FADER slider Wh...

Page 5: ...ving Performances 42 Selecting a Performance 42 Saving your settings to a Performance 43 Selecting and playing Styles 46 Selecting and playing a Style 46 Tempo 48 Intro Fill Variation Ending 48 Single Touch Settings STS 49 The Pads 50 Adjusting balance between the Style and the keyboard 50 Adjusting volume of each single track 51 Turning Style tracks on off 52 Adding harmony notes to your right ha...

Page 6: ...yle 133 Style Edit Copy from Pad 134 Style Element Track Controls Sound Expression 135 Style Element Track Controls Keyboard Range 136 Style Element Track Controls Noise Guitar 136 Style Element Chord Table Chord Table 136 Style Track Controls Type Trigger Tension 137 Import Import Groove 137 Import Import SMF 138 Export SMF 140 Page menu 141 Write Style dialog box 141 Copy Key Chord dialog box 14...

Page 7: ...rt 215 Preferences Sequencer Setup 215 Page menu 216 Write Global Sequencer Setup dialog box 217 Song Select window 217 Save Song window 217 Global edit mode 219 What is it and how the Global is structured 219 Main page 219 Edit menu 219 Edit page structure 219 General Controls Basic 220 General Controls Transpose Control 221 General Controls Scale 222 General Controls Lock 222 General Controls In...

Page 8: ...06 Performances 312 Pads 314 Effects 317 MIDI Setup 319 Assignable parameters 320 List of Footswitch and EC5 functions 320 List of Assignable Pedal and Assignable Sliders functions 321 List of Assignable Slider Mic functions 322 List of Assignable Switch functions 322 Scales 323 MIDI Data 324 MIDI Controllers 324 Program Change messages used as remote commands 325 Control Change and Program Change...

Page 9: ...Introduction ...

Page 10: ... Audio Input when it is sent to the Voice Pro cessor It control the signal entering the LEFT and RIGHT Audio Inputs when it is sent to the MP3 Recorder see Audio Setup Audio In on page 233 5 BALANCE While in Style Play and Song Play mode this slider balances the volume of the Keyboard tracks against the Style Accompani ment Pad and Song tracks This is a relative control whose effective maximum val...

Page 11: ...e freely programmed in Global mode see Controllers Assignable Sliders on page 227 VOLUME When in this mode each of the first eight sliders controls the volume of the corresponding track in the display The ninth slider marked MP3 Vol controls the volume of the MP3 player DRAWBARS Each slider controls the corresponding drawbar of the selected Digital Drawbars Sound MIC While this mode is active the ...

Page 12: ...ard Off The sound and chords are released as soon as you raise your hand from the keyboard You can jump to the Style Play Style Preferences page by keeping SHIFT pressed and pressing the MEMORY button B BASS INVERSION This button turns the Bass Inversion function on or off Note This function can be automatically activated by playing the keyboard harder See Velocity Control on page 109 On The lowes...

Page 13: ... one of the four variations of the current Style Each variation can vary in patterns and sounds You can jump to the Style Play Drum Fill page by keeping SHIFT pressed and pressing one of the VARIATION buttons I FILL 1 3 BREAK buttons These buttons trigger a fill in Press them twice LED blinking to let them play in loop and select any other Style element Fill Intro Variation to exit the loop Note F...

Page 14: ...it pressed while gently adjusting the tilt manually then release the button to reconnect the motor This is particularly useful when you turned the instrument off and forgot to lower the display down Warning Do not force the display if it doe not move Press the button and try again Note The last position is recalled when turning the instrument on again Q RECORD This button sets the instrument to th...

Page 15: ...ut selecting any item return to the main page of the current operating mode exit the Global or Media edit environment and return to the current page of the current operating mode exit from the SongBook mode exit from the Lyrics page exit from a Style Performance or Sound Select window MENU This button opens the edit menu page for the current operating mode or edit mode After opening an edit menu y...

Page 16: ...es while Performance banks are identified by num bers 1 20 A note about Sound banks and names Sounds in banks from PIANO to SFX are standard Sounds the user can t directly modify Sounds in banks USER1 and USER2 are locations where you can load new Sounds from an external device or save new or edited Sounds The USER DK bank is where you can load new Drum Kits or save new or edited Drum Kits Each So...

Page 17: ...About Pads and the Players Play command When you press one of the PLAY buttons to start the corresponding Player all Pads will stop playing You can jump to the Style Play Pad Assignable Switch page by keeping SHIFT pressed and pressing one of the PAD buttons j TRANSPOSE These buttons transpose the whole instrument in semitone steps Master Transpose The transposition value is usually shown on the p...

Page 18: ...ntom power is also automatically turned off each time you turn the Pa2X off The microphone signal is sent to the Voice Pro cessor Whether it is sent to the main or the sub outputs depends on the Mic Out parameter see page 233 Use the GAIN knob to adjust the input gain and set the volume level using the MIC IN slider while watching at the MIC IN LED on the control panel see MIC SETTING section on p...

Page 19: ...nder s or computer s MIDI IN THRU This connector sends an exact copy of the data received on the IN connector Use it to cascade the Pa2X with other MIDI instruments 8 PEDALS EC5 This connects to a Korg EC5 multiswitch pedal board to control many functions in realtime To program the EC5 see EC5 A E on page 227 ASSIGNABLE Use this port to connect a continuous or foot switch type pedal like the Korg ...

Page 20: ...yles Style Record and Edit including Guitar Mode Pad Record and Edit Full featured 16 track sequencer Fully editable music database for fast song retrieving sup plied by the SongBook Onboard sampling to create and edit new sounds and audio grooves 128 MB of Sample RAM as standard easy to expand to 256 MB by using the optional Korg EXB M256 expansion board Sophisticated Voice Processor with effects...

Page 21: ... of the original Operating System and Musical Resources About this manual This manual is divided in four sections An Introduction containing an overview of the instru ment and of basic operations A Quick Guide containing a series of practical guides A Reference Guide with each page and parameter described in detail An Appendix with a list of data and useful information for the advanced user Additi...

Page 22: ...stems is installed in your Pa2X by going to the Utility page of the Media mode see OS Version Number on page 263 Warning Do not install an OS other than the official OS supplied by Korg for the Pa2X Trying to install an OS created for different models may cause data loss and permanent damage to the instru ment Korg is not responsible for any damage caused by improper installation of the OS Loading...

Page 23: ...ep the volume at an uncomfortable level for too long Keyboard Style and Song Volume By default this slider balances the volume of the Keyboard RT Realtime tracks against the Style ACC Accompaniment Pad and Song SEQ tracks When in Style Play mode this slider bal ances between the Keyboard tracks and the Style and Pad tracks When in Song Play mode this slider bal ance between the Keyboard tracks and...

Page 24: ...nt to the Voice Processor for sophisticate processing The internal 48V Phantom Power on the MIC input also allows to connect any condenser microphone Use the GAIN knobs next to the MIC input to set the input sen sitivity While you play the external source look at the MIC IN LED indicator on the front panel to see when the audio level is correctly set Off No signal entering Green Low to mid level s...

Page 25: ...ay on the keyboard Again any Sound you choose may be assigned to any track in a Style Variation For each Style there are four Variations In general each Varia tion is a slightly different version of the others As you progress from Variation one to Variation four the arrangements will become more complex and more parts Tracks may be added This allows your performance to have a more dynamic arrange ...

Page 26: ...s This can be a big help in getting a song recorded quickly The sequencer can also behave as a traditional 16 track linear sequencer where each track is recorded individually one at a time Player The two Players act as two music player so you can playback your performances or any Standard MIDI File or MP3 file Like a DJ console you can mix two songs with the X Fader slider The LOGO decoder On the ...

Page 27: ...ad or Song means that you can select it and replace it with a different ele ment Touch the item s name and make the corresponding Select window appear Overlapping windows When you touch a Sound Style STS Pad or Song name a selecting window overlaps the current page After you select an item in the window or press the EXIT button the window closes and the underlying page is shown again Dialog boxes ...

Page 28: ...es Editable names When the Text Edit button appears next to a name touch it to open the Text Edit window and edit the name Lists and scrollbars Files on storage media as well as other kinds of data are shown as lists Use the scrollbar to scroll the list content Keep the SHIFT button pressed while touching one of the arrows to scroll to the next or previous alpha numeric section Sliders To change a...

Page 29: ...g mode is marked with a different color code that helps you understand at first sight where you are Three special modes Global Media and SongBook overlap the current operating mode that remains active in the background The SongBook mode can recall the Style Play or Song Play modes Selected highlighted items Any operation carried on on parameters data or list entries is executed on highlighted item...

Page 30: ...ered Turning the Easy Mode off The instrument will stay in this mode even after having been turned off Repeat the above operation when you want to deacti vate the Easy Mode Switching between Styles and Songs Depending on what you want to play you must switch to Style Play mode or Song Play mode Press the STYLE PLAY button to switch to the Style Play mode and play Styles This is the mode you are in...

Page 31: ... Sound is in mute and cannot be heard If the icon does not appear the Sound is in play and can be heard page 35 Sounds assigned to the right hand UP1 to UP3 and to the left hand LOW Touch the Sound s name to open the Sound Select window and choose a different Sound page 82 Style name and info Touch the Style s name to open the Style Select window and choose a different Style page 83 Tempo Use the ...

Page 32: ...he Sound is in mute and cannot be heard If the icon does not appear the Sound is in play and can be heard page 35 Sounds assigned to the right hand UP1 to UP3 and to the left hand LOW Touch the Sound s name to open the Sound Select window and choose a different Sound page 82 Song assigned to Player 1 Touch it to open the Song Select window and choose a dif ferent Song page 84 Tempo Use the DIAL to...

Page 33: ...Lyr ics of the Song assigned to Player 1 Player 2 or the Style page 166 Chord if included in the Song Lyrics are shown in this area Use this tab to set the display options page 169 STS Either touch them to select or use the SINGLE TOUCH SET TING buttons under the display page 10 Name of the Song in play Use these tabs to see Markers set for the Song assigned to Player 1 or Player 2 page 167 Master...

Page 34: ...30 Easy Mode The Lyrics page in detail ...

Page 35: ...Quick Guide ...

Page 36: ...r of the Pa2X 1 To open the Demo page press the STYLE PLAY and SONG PLAY buttons at the same time 2 Follow the instructions in the display That s it Turning the instrument on and listening to the demos Power switch Display Demo buttons Volume sliders They can be controlled by selecting one of them and using the DIAL to change the value or by touching and dragging them in the display Songs assigned...

Page 37: ... 3 are muted and are not play ing If you hear more than one sound see also page 35 for how to mute tracks 2 If you want to play the Sound on the whole keyboard be sure the key board is in Full Upper mode If it is split in two parts press the SPLIT but ton to turn its LED off Playing Sounds Sound Select section Split button i A selected track is shown with a white background In this example the Upp...

Page 38: ...his case press the EXIT button to exit from a selection window i The selected Sound is high lighted Touch a Sound s name to select it Touch one of the side tabs to select a different Sound bank Touch one of the lower tabs to select a different Sound page A Previous and Next Page pair of button may appear in this area when more than five pages are available The currently selected Sound also appears...

Page 39: ...icon appears in the Upper 2 and Upper 3 status boxes These tracks will not be heard After touching in this area the icon disap pears The Upper 2 track will be set to play and will be heard Note how the Dark Pad sound assigned to the Upper 2 track has been layered with the Grand Piano assigned to the Upper 1 track As above after touch ing in this area the icon disap pears The Upper 3 track will be ...

Page 40: ... 7 Touch the bank icon in the Upper 2 status box to mute the Upper 2 track again 8 Play the keyboard Note how the StringEns2 sound assigned to the Upper 3 track has been muted again Only tracks Upper 1 and Upper 2 can be heard at this time Note how the Dark Pad sound assigned to the Upper 2 track has been muted again Only track Upper 1 can be heard at this time ...

Page 41: ...to Lower left hand and Upper right hand parts 2 Be sure the Lower track is set to play 3 Play the keyboard Hint You can select a different Sound for the Lower part by follow ing the same procedure used for the Upper 1 track See page 33 4 Return to the full keyboard playing mode by pressing the SPLIT button to turn its LED off Lower Upper If the Lower track is muted touch its icon to make it disap ...

Page 42: ... any key 1 Touch the Split tab to see the Split Point panel 2 Touch the keyboard in the display then play a note on the keyboard Or touch the Split Point parameter to select it and use the DIAL to select the new split point 3 Touch the Volume tab to go back to the Volume panel Note how the keyboard once again plays the Upper tracks for the entire length of the keyboard Upper ...

Page 43: ...Drawbars This sound simulates the classic tonewheel organs of the past You can use the Assignable Sliders of the Pa2X to adjust each drawbar and then save these settings to a Performance see Saving your settings to a Performance on page 43 1 Mute all Upper tracks apart for the Upper 1 track Select the Upper 1 track 2 Touch the Sound name to open the Sound Select window Note You can select a Digita...

Page 44: ...hange the sound When a Drawbar Organ is assigned to a Keyboard track the sound can be changed also while in the main page pro vided that the DRAW BARS LED is turned on 5 Select different parameters in this page and change their settings to see how each setting affects the sound Hint As an alterna tive to using Assignable Sliders to change draw bar values you can touch a drawbar in the display and ...

Page 45: ...41 Playing Sounds Digital Drawbars Quick Guide 7 Press the EXIT button to go back to the main page ...

Page 46: ...ns under the display As far as Style tracks are concerned you can save settings in a third object called the Style Perfor mance Please note that settings saved in Performance 1 are automatically selected when the instrument is turned on This means you can save your preferred startup settings to Performance 1 Selecting a Performance 1 Touch the Performance area in the display to open the Performanc...

Page 47: ...d track settings selected effects and Voice Processor Preset can be saved to a single Performance to be quickly recalled at a later time Note To open the Write Performance dia log box you can press the SHIFT one of the PERFORMANCE buttons 1 Touch the page menu icon to open the page menu The Performance Select win dow closes and the main screen appears again provided the DISPLAY HOLD LED is turned ...

Page 48: ...enu item the Write Performance dia log box appears Touch the T symbol to open the Text Edit dialog box Use alphabetical characters to enter text Use the and buttons to move the cursor Use the SHIFT but ton to switch between capitals and small charac ters Touch Clear to delete the whole string Delete to delete just a single charac ter Touch Symbol to enter special charac ters When done touch OK to ...

Page 49: ...hat location The old data are lost Make a backup of all your important data To select the target Bank and Performance location select the Bank and Performance parameters and use the TEMPO VALUE section A B The selected Perfor mance location is highlighted Touch a Performance s name to select it Touch one of the side tabs to select a different Performance bank Touch one of the lower tabs to select ...

Page 50: ...elected too and Keyboard tracks pads effects and some other useful parameters are automatically configured Use the Style controls to start or stop the Style Selecting and playing a Style 1 Touch the Style area in the display The Style Select window appears Note You can open the Style Select window also by pressing one of the buttons in the STYLE SELECT section This will let you jump directly to th...

Page 51: ...with your playing on the key board Therefore it may be considered a more musical way of starting a Style 5 Play the keyboard 6 Press START STOP to stop the Style The Style Select window closes and the main screen appears again with the selected Style ready to go i For chord scanning to work either of both LEDs must be turned on Lower chords are recognized on the left of the split point Upper chord...

Page 52: ...ected or you are in any other page keep the SHIFT button pressed and use the DIAL to change the Tempo The selected tempo will be shown in a small window Press the UP and DOWN buttons at the same time to recall the saved Tempo Intro Fill Variation Ending When playing Styles you can select various Style Elements to make your playing richer A Style is made of up to four basic patterns Variations thre...

Page 53: ...s STS Each Style or SongBook entry may come with up to four Keyboard track settings called STS short for Single Touch Settings STS 1 is automatically selected when choosing a Style provided the SINGLE TOUCH LED is turned on STS 1 is also recalled when a SongBook entry is selected STSs are still available when switching to Song Play mode from Style play mode to let you select a dif ferent configura...

Page 54: ...sound Hint You can open the Pad Select window to assign a different sound or pattern to the Pads by pressing SHIFT one of the PADs 3 Select a different Style and see how the sounds or patterns assigned to the PADS change You can even press more Pads at once and play two or more sounds or patterns at the same time Pressing STOP stops them all at the same time Keeping STOP pressed and pressing one o...

Page 55: ...rack s area to select it then using the TEMPO VALUE con trols to change the vol ume Also you can just touch a track s slider in the display then move your finger up down 3 To return to Normal view press the TRK SEL button again The LED on the TRK SEL button will turn off In Normal view all Style tracks are seen as three grouped tracks To control the volume the VOLUME LED must be turned on If it is...

Page 56: ... to Mute 2 To set tracks back to the Play status touch the Mute icon on the ACCOMP track Hint When moving the slider of a muted track the track is auto matically set to play again 3 To mute unmute each single Style track press TRACK SELECT to switch to the Style Tracks view 4 Press the TRACK SELECT button again to go back to the Normal view Adding harmony notes to your right hand melody with the E...

Page 57: ...have been entering the Edit mode by pressing the MENU button then going to the Ensemble page 5 When the right harmonization type has been selected press the EXIT but ton to go back to the main page 6 Press the ENSEMBLE button again to turn its LED off The automatic har monization will be turned off Notice how the right hand is automatically harmonized according to the chords composed with your lef...

Page 58: ...nal VIF4 Video Interface installed Selecting a Song to play 1 Press the SONG PLAY button to switch to the Song Play mode Hint In Style Play mode you can pre select the Songs to be assigned to both players This way you will be ready to start them as soon as you switch to Song Play mode 2 Touch the Player 1 area to open the Song Select window Hint As an alterna tive you can open the Song Select wind...

Page 59: ...essed and touch the Up Down arrow to scroll to the next previous alphabetic section As an alter native you can use the DIAL Use the Open and Close buttons to browse through the folders Use the Device pop up menu to select one of the available mass storage devices SSD U hard drive Use the Sync P Synchronized Path button to see the selected Song again Touch the Select button to select the highlighte...

Page 60: ...automatically stop when the end of the Song is reached After pressing the PLAY STOP button the button s LED turns on and the measure counter begins to show the current measure number Press the REWIND button once to go to the beginning of the current measure Keep it pressed to go back several measures Press the FAST FORWARD button once to go to the begin ning of the next measure Keep it pressed to ...

Page 61: ...se the TEMPO VALUE controls to change its volume 2 Press the TRACK SELECT button once to see tracks 1 8 Track 1 8 view Note Changes to Song tracks will not be saved and will be reset each time you press the Home button They may also be reset while pressing the Rewind button To save changes you must edit the Song in Sequencer mode 3 Press TRACK SELECT once again to see tracks 9 16 Track 9 16 view i...

Page 62: ...g to the Song switch from Normal view to Track 1 8 and Track 9 16 view to see which tracks are playing To see if a track is playing look at its name and see if it changes color Touch each track s channel strip to see each track s detail in the Track Info line Keyboard tracks Selected track Assigned Sound Touch it to open the Sound Select window Sound bank Program Change ...

Page 63: ...g Song tracks works exactly as with Style tracks See Turning Style tracks on off on page 52 for more information Soloing a track Contrary to the above you may want to make a single track play alone This is called the Solo func tion 1 While the Song is playing keep the SHIFT button pressed and touch the track you want to listen to in Solo mode 2 To set all tracks back to the Play status keep the SH...

Page 64: ...ct to confirm 3 Keep the SHIFT button pressed and press any of the two PLAY STOP buttons to start both Players at the same time Hint You don t need to start both players at the same time You can start the first Song then start the second one when the first one is near to the end This way you can use the X FADER slider to gently crossfade between the end of one Song and the beginning of the follow ...

Page 65: ...there are no Lyrics events in the midifile or MP3 file or if you prefer to play the song live with the help of the Styles You can add your own entries to the SongBook as well as edit the existing ones Korg has already sup plied some hundred entries as standard Furthermore the SongBook allows you to create various cus tom lists that may suit your different shows Selecting the desired entry from the...

Page 66: ...Play Up to four STSs will also be recalled Any TXT file associated with the entry can be seen in the Lyrics STS page The selected Style SMF or KAR file or MP3 is shown in the higher part of the screen Displaying Artist or Genre For space matter either the Genre or Artist column can be seen in the display You cannot see both at the same time 1 Touch the page menu icon to open the page menu Note The...

Page 67: ...of the labels in a list of names You can do the same by touching the Type Name Genre Artist Key Number Tempo or Meter label Each time you touch the same label again the order changes between ascending and descending Choose one of the sorting options to change the list view order The selected option will be shown in red over the list of file Choose whether the list must be seen in ascending or desc...

Page 68: ...to the search criteria even more than one you want to enter For example you may want to find all songs containing the word love in the title in any posi tion in the string If so select the Name criterion and enter the word love Capitals are not relevant for the search 3 Touch OK in the display and close the Text Edit dialog box The entered text is now the search criteria Available search criteria ...

Page 69: ...ge Once the Filter dialog box has been closed by touching OK the Filtered check box is automati cally checked and the filter is activated Only entries matching the entered criterion are seen in the Main List 5 To see the whole SongBook database again touch the Filtered check box again to make the check mark disappear ...

Page 70: ...e artist name and name of the associated STS Select a Tempo matching the song s tempo and select the Meter time signature and Key of the song You can also specify a Master Transpose value to be automatically selected when selecting the entry Entry s name Name of the Style SMF or KAR or MP3 file memo rized with the entry provided Write Current Resource is selected when saving it When checked curren...

Page 71: ...o the Voice Harmony Touch New Song to create a new entry Text file linked to the entry This text will be seen as Lyrics in the display or in the exter nal monitor with the VIF4 option installed See Lyrics as text files associated to a Song Book entry on page 191 Entry s parameters Entry s number for numeric selection Entry s name By default it is the same name of the associated Stan dard MIDI File...

Page 72: ...h the List Edit tab to open the List Edit page and touch the New List button to create a new blank list 3 Touch the Book tab to open the Book page and see the full database Use the various sorting searching and filtering options seen above to find the entries you are looking for Touch the Add to List button when the desired entry has been selected After you check the Enable List Edit item the List...

Page 73: ...Touch New List to create a new Custom List Touch Del List to delete the current Custom List Warning Del List will delete the cur rent Custom List Touch Write to save the current Custom List Select an entry on the list to edit List name Scrollbar Touch the T symbol to open the Text Edit dialog box Use alphabetic characters to enter text Use the and buttons to move the cursor Use the SHIFT but ton t...

Page 74: ...it is based on a Style a Standard MIDI File or an MP3 file 1 Touch the Lyrics STS tab to open the Lyrics STS page and see the four STSs associated to the current SongBook entry 2 Select the desired STS by pressing the corresponding SINGLE TOUCH SET TING button on the control panel As an alternative touch its name in the display The STS is selected Keyboard tracks and Voice Processor settings may c...

Page 75: ...om power is available to condenser microphones 1 Lower the Mic In track volume by using the dedicated slider on the con trol panel Note Lowering the Mic In track volume helps avoiding feedback Feedback is caused by audio generated by the Pa2X returning to the audio circuitry via the microphone 2 Connect a microphone Singing with a connected microphone Microphone input Microphone input volume contr...

Page 76: ...r Song Play mode 5 Press the HARMONY and EFFECT buttons to turn their LED off and deacti vate the Voice Processor Be sure the ON LED Mic input remains turned on You can check the status of these buttons and the Talk function also in the Mic panel Press the EXIT button to go to the main page of the Style Play or Song Play mode then select the Mic tab Touch this checkbox to turn phantom power on on ...

Page 77: ...y while you use the MIC SET TING buttons o the control panel 9 Touch the Volume tab to select the Volume panel While in this panel you can use the Play Mute button of the MIC IN track in the display to mute unmute the microphone section 10 If you like start a Style or Song Adjust the microphone final volume using the dedicated slider i Adjust the input level by using the GAIN knob next to the MIC ...

Page 78: ...ffects Harmony By selecting a Preset all processing parameters may change A Voice Processor Preset is assigned to each Performance or STS When selecting a different Per formance or STS the Voice Processor Preset may change depending on the Mic panel lock sta tus changing the type of processing applied to your voice Note By default the first Performance and STS have the harmony effect turned off to...

Page 79: ...oud The effects have probably changed too 4 To turn the TalkBack function off touch the Talk button again making it appear relieved The background music returns to the original volume Locking Voice Processor settings If you like the selected Voice Processor Preset and other settings you have made in the Microphone panel you can lock them to prevent them from changing each time you select a Perform...

Page 80: ... accompani ment tracks Entering Backing Sequence Quick Record mode 1 Press the SEQUENCER button to switch to the Sequencer mode 2 Press the RECORD button to open the Song Record Mode Select dialog box Recording a new Song Style Select section Style Controls Style Elements Player 1 controls SEQUENCER button After pressing the SEQUENCER button the main page of the Sequencer mode appears Press the RE...

Page 81: ... the Style parameter or one the STYLE buttons to open the Style Select window and select a different Style as seen on page 46 Track s status Rec means they are ready to record Play means they are recorded and you can hear them Mute means they cannot be heard Measure counter Neg ative numbers 2 1 are the precount after which you can start recording Style s Tempo Change it if you like Grouped tracks...

Page 82: ...hat while recording in Backing Sequence Record mode you cannot use the SYNCHRO TAP TEMPO RESET BALANCE controls 4 When finished recording your Song press the PLAY STOP button in the PLAYER 1 section to exit recording and return to the main page of the Sequencer mode 5 While in the main page of the Sequencer mode press the PLAY STOP button in the PLAYER 1 section to listen to the recorded Song The ...

Page 83: ... If you are recording just one of the grouped tracks set the track to be preserved to the Play mode 3 Repeat the recording process and press the PLAY STOP button in the PLAYER 1 section to stop recording and to return to the main page of the Sequencer mode 4 While in the main page of the Sequencer mode press the PLAY STOP button in the PLAYER 1 section to listen to the recorded Song Again the Back...

Page 84: ... Song file will be created on the target device To deselect a selected Song touch anywhere else in the Song list or select the same storage device again Use the scroll bar to see all Songs in the list Keep SHIFT pressed and touch the Up Down arrow to scroll to the next previous alphabetic sec tion As an alternative you can use the DIAL Use the Open and Close buttons to browse through the folders U...

Page 85: ...Reference ...

Page 86: ...ot be seen in the display Sounds Touch one of these buttons in the display to select a Sound Unless the DISPLAY HOLD LED is turned on the window auto matically closes short after you select a Sound Program Change Program Change number Shown only when the Show Program Change number parameter is turned on in Global mode See page 225 Performance Select window Touch the Performance area whereas it app...

Page 87: ...e same STYLE SELECT button on the con trol panel the next page in the same bank is selected This way you do not need to touch one of the corresponding tabs in the display in order to select a different page Styles Touch one of these buttons in the display to select a Style Unless the DISPLAY HOLD LED is turned on the window automati cally closes short after you select a Style After selecting a Sty...

Page 88: ...e Play and Song Play mode In SongBook mode Song Select window This page appears when you touch one of the Song areas in the display or one of the SELECT buttons in one of the PLAYER sec tions on the control panel Press EXIT to exit from this page and go back to the main page of the Song Play operating mode without selecting a Song While in this page select a Standard MIDI File Karaoke or MP3 file ...

Page 89: ...are shown in the display You can use this Jukebox list as any other list of this type i e start the playback with SEQ1 PLAY STOP jump to the next Song in the list with SHIFT edit it in the Jukebox page Note A Jukebox list can include up to 127 Songs If your folder con tains more items only the first 127 will be considered Hint If you don t want to lose the list when turning the instrument off go t...

Page 90: ...ot txt file The list will include the progressive number assigned to each Song file names the total number of files in the list For the correct display and printing of the list on a personal com puter use a fixed size i e non proportional character in your text editor Show Song Number Check this option to make the Song s progressive ID number appear in the list next to each Song Show Song Extensio...

Page 91: ...ormance settings are overridden When the STYLE CHANGE LED is on selecting a Performance also selects a Style the one memorized with the Performance Current track settings can be saved either in a Performance an STS or a Style Performance depending on the page menu com mand you select Master Volume and Balance While the MASTER VOLUME slider controls the general volume of the instrument you can use ...

Page 92: ...using the CHORD SCANNING buttons see page 11 Page menu icon Touch the page menu icon to open the menu See Page menu on page 111 for more information Style area This is where the Style name is shown together with its tempo and meter time signature parameters Style name Currently selected Style Touch the Style name to open the Style Select window As an alternative use the STYLE SELECT section on the...

Page 93: ...board tracks area This is where Keyboard tracks are shown Sound name Name of the Sound assigned to the corresponding Keyboard track If the track is already selected white background touch the Sound name to open the Sound Select window If the track is not selected dark background first select it then touch the Sound name to open the Sound Select window For more information about the Sound Select wi...

Page 94: ...ecorded in each Style Element If you assign a different Sound to a Style track this parameter is automatically set to Off Off You can assign different Sounds to each Style track and save them in a Performance or Style Performance The selected Sounds are the same for all Style Elements there are no different Sounds for each Style element Selected Track Info area This line lets you see the Sound ass...

Page 95: ...y touching a track and drag ging it in the display Hint You can change the volume of all Keyboard or Style tracks at once by using the Assignable Sliders Select a track of the same type of the tracks whose volume you want to change e g the Upper 1 track to modify all Keyboard tracks Then keep the SHIFT button pressed and move one of the Assignable Sliders See ASSIGNABLE SLIDER on page 6 Use the TR...

Page 96: ... then touch this area to change its status Play status The track can be heard Mute status The track cannot be heard Saving the track s status The status of Keyboard tracks can be saved to a Performance or STS and can be changed when choosing a different Performance or STS see Write Performance on page 111 and Write Single Touch Setting on page 111 The status of the separate Style tracks can be sav...

Page 97: ...for the Lyrics page are the same as in Song Play mode The Options pane preferences are saved into the Song Play Setup not in the Style Setup See Write Global Song Play Setup on page 180 for more information On the fly TXT loading When a SongBook entry does not contain a link to a TXT file the No lyrics Press SHIFT and touch here to load a TXT file message appears in the display when you go to the ...

Page 98: ...ve parame ters as well as other Voice Processor parameters Presets can be freely edited see Voice Processor Preset Preset on page 241 VP lock icon This lock avoids changing the Voice Processor Preset when selecting a different Performance STS or SongBook entry This is useful if you want to use the same Preset while selecting differ ent Performances STSs or SongBook entries This lock is reset when ...

Page 99: ...ano keyboard is shown in the display divided at the selected split point Upper tracks play on the right of this point while the Lower track plays on the left Keyboard diagram Touch anywhere on the keyboard diagram A message will appear asking you to press the new split point on the keyboard of your Pa2X or to press the EXIT button to close the message with no changes Chord Recognition Mode This pa...

Page 100: ...menu on page 111 Parameters area Each page contains various parameters Use the tabs to select one of the available pages For detailed information on the vari ous types of parameters see sections starting from page 96 Tabs Use tabs to select one of the edit pages of the current edit section Mixer Tuning Volume Pan This page lets you set the volume and pan for each of the Key board or Style tracks V...

Page 101: ...oosing a different Style Performance or STS 0 127 MIDI value of the track s volume Play Mute icon Track s play mute status Play status The track can be heard Mute status The track cannot be heard Mixer Tuning FX Send This page lets you set the level of the track s direct uneffected signal going to the Internal FX processors The effect processors included in Pa2X are connected in parallel so you ca...

Page 102: ...mmed in the previous page Use the TRACK SELECT button to switch from the Keyboard to the Style tracks and vice versa Track Reset buttons Use these buttons to reset i e flatten equalization for the corresponding track Reset All Tracks button Touch this button to reset i e flatten equalization for all tracks both Realtime and Style tracks Bypass Check any of these checkboxes to bypass equalization f...

Page 103: ... Mode parameter see page 109 The remaining tracks if any use the basic scale set in Global mode see Main Scale on page 222 With the Quarter Tone box non checked With the Quarter Tone box checked Note A different Scale can be associated to each Performance or STS Note Quarter Tone selection can be received by MIDI i e by an external sequencer or controller Conversely selection of Quarter Tone setti...

Page 104: ...r scale When the User scale is selected the keyboard diagram becomes active You can then change each note tuning in cents of a semi tone within a range of 99 cents referred to Equal tuning This way you can create a custom scale you can save to a Perfor mance or STS After selecting the User scale touch a note in the keyboard dia gram and use TEMPO VALUE controls to adjust the selected note tuning i...

Page 105: ... can assign the Quarter Tone function While still in Global mode select the Write Global Global Setup command from the page menu to save these settings to the Global see Write Global Global Setup dialog box on page 237 2 Lower some note pitches Keep the Quarter Tone pedal pressed The keyboard will not play at this time Press the notes you want to lower a quarter tone Release the pedal 3 Play with ...

Page 106: ...al sound gen erator and to external MIDI devices This is very useful to let a Style track drive an external expander or play a digital piano with one of Pa2X s Keyboard tracks In addition here you can set the polyphony mode for each track Int Ext Internal External Internal The track plays the sounds generated by the internal sound engine It does not play an exter nal instrument connected to the MI...

Page 107: ... to the rightmost highest note Mono Left A Mono track but with priority assigned to the leftmost lowest note Play Mute icon Track s play mute status Play status The track can be heard Mute status The track cannot be heard Track Controls Drum Volume In this page you can adjust the volume for each family of Drum and Percussion instrument for the selected track A list of fami lies is shown below Thes...

Page 108: ...ton to reset all changes to Sound parameters in the selected track Reset All Tracks Touch this button to reset all changes to Sound parameters in all tracks Play Mute icon Track s play mute status Play status The track can be heard Mute status The track cannot be heard How to adjust sound parameters for a sin gle Sound Here is a quick example of the use of the Easy Sound Edit func tion 1 If needed...

Page 109: ...r Con trollers Assignable Sliders on page 227 You can only assign this function to a volume type pedal not to a switch type one Assign the KB Expression option to the pedal or Assignable Slider then select Write Global Global Setup from the page menu to save the setting to the Global Play Mute icon Track s play mute status Play status The track can be heard Mute status The track cannot be heard Ke...

Page 110: ...are trilled You can set the trill speed by using the Tempo parameter see below Repeat The played note is repeated in sync with the Tempo parameter see below When playing a chord only the last note is repeated Echo As the Repeat option but with the repeated notes fading away after the time set with the Feedback parameter see below AutoSplit1 If more than a single Upper track is in play the Upper 1 ...

Page 111: ...cted after the end of the Fill Var Up Var Down The next higher lower numbered Variation is selected in cycle After Variation 4 an Up com mand will select Variation 1 After Variation 1 a Down command will select Variation 4 Var Inc Var Dec The next higher lower numbered Variation is selected When Variation 4 is reached an Inc command will select Variation 4 again When Variation 1 is reached a Dec c...

Page 112: ...e Hit or Sequence assigned to each Pad Touch the box to make the Pad Select window appear see Pad Select win dow on page 83 Volume Volume for each of the four Pad tracks 0 127 Volume level Pan Pan for each of the four Pad tracks 64 1 Left stereo channel 0 Center 1 63 Right stereo channel A Send Send level to the A Internal FX processor usually reverb for each of the four Pad tracks 0 127 Level of ...

Page 113: ...de is an extension of the Fingered 2 add ing rootless and slashed chord recognition often used in jazz fusion modern pop and light music This type of chord recognition is very useful to play piano chords typical of jazz piano players You don t always need to play the root note dou bling the note already played by the bass track Velocity Control Set this parameter to trigger one of the following fu...

Page 114: ...e page menu All MIDI Setup can be freely customized and overwritten Hint To restore the original MIDI Setups load the original Fac tory data again available in the supplied Accessory CD or down loadable from www korgpa com Performance Sound Default Performance banks and Sound banks share the same buttons on the control panel Use this parameter to define whether the PER FORMANCE SELECT or the SOUND...

Page 115: ...acks is unaffected Style track The selected track is the only Style track you can hear All other Style tracks are muted The status of the Keyboard tracks is unaffected Grouped Style tracks The Solo function does not work on these special tracks Keep the SHIFT button pressed and touch one of the tracks to solo it Do the same on a soloed track to deactivate the Solo function Copy Paste FX You can co...

Page 116: ...MPO VALUE controls to select a different location Select button Touch this button to open the Performance Select window and select a target location Write Single Touch Setting dialog box Open this window by selecting the Write Single Touch Setting item from the page menu Here you can save Keyboard track settings and the selected Voice Processor Preset to one of the four single Touch Settings STS b...

Page 117: ...ry Styles When both LEDs of the leftmost STYLE button are lit the FAVORITE banks are selected No loading is required Each bank can include up to 32 Styles browse them using the PAGE but tons The Favorite Styles are contained in ten files automatically cre ated by the Pa2X inside the Style folder in the SSD Even if differ ent bank names can appear in the display these files have fixed names Hint Ne...

Page 118: ...uld be played for the scanned chord Which Chord Variation corre sponds to each scanned chord is a setting of the Style the Chord Variation Table Each Style Element contains a Chord Variation Table whose prototype is the following After deciding what CV to play the arranger triggers the right sequence for each track Since each sequence is written in a par ticular key for example CMajor GMajor or Em...

Page 119: ...formance command from the page menu of the Style Play mode see Write Style Performance dialog box on page 113 Sounds There are two ways of assigning Sounds to the Style tracks While in Style Record mode you can assign different Sounds to each Style Element see Sounds area on page 120 While in Style Play mode you can assign a single Sound to the Style Performance together with the other track param...

Page 120: ...on Press START STOP to check how it works Press START STOP again to stop the playback When you are in the Sounds Expression Keyboard Range Chord Table Trigger Tension Delete All Copy Style Ele ment Controls or Style Control pages you can listen to the whole Style Press START STOP and play some chords to do your tests Select any Style Element using the control panel buttons VARIATION 1 4 INTRO 1 3 ...

Page 121: ...empty when it is in capitals CV1 CV6 it is already recorded If Style Element is Var1 Var2 Var 3 or Var4 you can select one of 6 Chord Variations to edit If Style Element is Intro1 Intro2 Intro3 Fill1 Fill2 Fill3 Ending1 Ending2 or Ending3 you can select one of 2 Chord Variations to edit Resolution Use this parameter to set the quantization during record ing Quantization is a way of correcting timi...

Page 122: ...hange the Tempo when other parameters are selected by keeping the SHIFT button pressed and rotating the DIAL Note When recording tempo old data is always replaced by the new data Note The actual tempo of the Style will be the one shown when saving the Style Performance in Style Play mode see Current tempo on page 88 Meter This is the meter time signature of the Style Element You can edit this para...

Page 123: ...ro 1 and Ending 1 Parallel Root The root note in CMaj C is transposed to the missing notes Parallel Fifth The 5th note in CMaj G is transposed to the missing notes Parallel i Series All original patterns must be programmed on the Maj7 or min7 chords When loading old Korg i Series Styles this option is automatically selected Parallel No Transpose The chord is not modified and is moved to the new ke...

Page 124: ... Play status The track can be heard Mute status The track cannot be heard Record status After starting recording the track will receive notes from the keyboard and the MIDI IN connector Track names Under the sliders a label for each track is shown Drum Acc5 Shown Style tracks Main page Record 2 Cue While in the main page touch the Record 2 Cue tab to see this page Most parameters in this page are ...

Page 125: ... see Track Type on page 137 Otherwise the Guitar Mode tab will remain grey not selectable Note When programming a Guitar track from an external sequencer you must be sure the Guitar tracks is associated to the right channel Go to the Global MIDI MIDI IN Channels page and assign the corresponding Style track usually Acc1 Acc5 to the same channel of the Guitar track on the external sequencer Then go...

Page 126: ...ameters However this parameter is only considered during playback of the Intro 1 and Ending 1 Style Elements With Intro 1 and Ending 1 both Chord Variation 1 and 2 you can also enter a chord progression This is done with the lowest MIDI octave C 1 B 1 Chord types are inserted by using velocity as shown in the following table Playing back the pattern When in Stye Play mode the recorded Guitar patte...

Page 127: ...s or chords in each track This is very useful when transcribing an existing score or needing a higher grade of detail and is particularly suitable to create drum and percussion tracks In addition you can program a Style on a personal computer and then import it via the Import function see Import Import SMF on page 138 Preparing to record 1 If you like to edit an existing Style select that Style 2 ...

Page 128: ...nu or press the RECORD button Step Record procedure 1 While in the main page of the Style Record mode select the Overdub Step Recording command from the page menu to enter the Overdub Step Record mode 2 The Pos parameter shows the current position If you do not want to insert a note or chord at the current position insert a rest instead as shown in step 4 To jump to the next measure filling the re...

Page 129: ... velocity values You can make the upper or lower note of a chord for example louder than the remaining ones to let the most important stand out from the chord Here is how to insert a three note chord 1 Edit the first note s Velocity value 2 Press the first note and keep it pressed 3 Edit the second note s Velocity value 4 Press the second note and keep it pressed 5 Edit the third note s Velocity v...

Page 130: ...Most edit pages share some basic elements Other pages have a slightly different structure Operating mode This indicates that the instrument is in Style Record mode Edit section This identifies the current edit section corresponding to one of the items of the edit menu see Edit menu on page 126 Selected Style Element In Style Record mode edits always happen on the selected Style Element Page menu i...

Page 131: ...ameter then touch it again the numeric key pad will appear Enter the new position by dialing in the three parts of the number separated by a dot Zeroes at the beginning can be omitted as well as the least important parts of the number For example to enter position 002 02 193 dial 2 2 193 to enter position 002 04 000 dial 2 4 to enter position 002 01 000 simply dial 2 Type Value 1 Value 2 Type and ...

Page 132: ...ect an event to be edited by touching it in the display This is usually a note that you can edit For more information on the event types and their val ues see Event Edit Event Edit on page 127 11 Edit the event Select the M parameter Use TEMPO VALUE controls to change the event s position Select the Type parameter You may use TEMPO VALUE controls to change the event type as well as its Value 1 and...

Page 133: ...ution This parameter sets the quantization after recording For exam ple when you select 1 8 all notes are moved to the nearest 1 8 division When you select 1 4 all notes are moved to the nearest 1 4 division 1 32 1 4 Grid resolution in musical values A b f char acter added after the value means swing quanti zation A 3 means triplet Start End Tick Use these parameters to set the starting and ending...

Page 134: ... top of the keyboard range to be transposed If you select the same note as the Bottom and Top parameters you can select a single percussive instru ment in a Drum or Percussion track Since in a Drum Kit each instrument is assigned to a different note of the scale transpos ing a percussive instrument means assigning the part to a differ ent instrument Execute Touch this button to execute the operati...

Page 135: ...y change at the start ing and ending ticks of the selected range 0 100 Velocity change in percentage Execute Touch this button to execute the operation set in this page Track status icon Status of tracks Touch this icon to change the status Play status The track can be heard Mute status The track cannot be heard Track names Under the buttons a label for each track is shown Style Edit Cut This func...

Page 136: ...lect Modulation Damper Soft Pedal CC00 32 CC127 Single Control Change events Double Control Change numbers like 00 32 are MSB LSB bun dles Note Some CC data are automatically removed during recording See the table on page 116 for more information on the allowed data Start End Tick Use these parameters to set the starting and ending points of the range to delete If a Chord Variation is four measure...

Page 137: ... Style From To E CV Style Element Chord Variation Use these parameters to select the source and target Style Ele ments or Chord Variations Note You can t copy from a Variation to a different Style Element or vice versa because of their different structure All All Style Elements i e the whole Style You can t change the target that is automatically set to All Var1 End2 Single Style Element V1 CV1 E2...

Page 138: ...iginal Sounds unchanged for that Chord Variation From Pad Choose this option to select the source Pad to copy the Chord Variation from Touch the Select button to open the Pad Select window and select the source Pad From CV Chord Variation Use this parameter to select the source Chord Variation All All Chord Variations i e the whole Pad You can t change the target that is automatically set to All C...

Page 139: ...nt Edit page This monitor should help you keeping track of them and let you access Event Edit only on the tracks containing the messages Press the START STOP button to start playback and look at the indicators When one of them lights up you can enter Event Edit on the corresponding track and edit or remove the Expression messages Expression Use these knobs to set the Expression CC 11 value for the...

Page 140: ...Top Bottom Use these parameters to set the bottom and top of the keyboard range for the corresponding track of the current Style Element Volume area Use these controls to set the volume and status of each track See page 120 for more information Style Element Track Controls Noise Guitar The Noise Guitar page is where you can set the RX Noise level and the human feel of Guitar tracks RX Noise Use th...

Page 141: ...otes already playing There will be no break in the sound This is very useful on Guitar and Bass tracks Tension Tension adds notes a 9th 11th and or 13th that have actually been played to the accompaniment even if they haven t been written in the Style pattern This parameter specifies whether or not the Tension included in the recognized chord will be added to the Acc type tracks On The Tension wil...

Page 142: ...the relevant Style Record pages The starting Tempo and each track s Volume must be pro grammed as Style Performance data and then saved in the Style Performance Meter time signature Change is not allowed therefore not recognized The Chord Variation length is the same as the imported SMF You can change length by changing the value of the CV Length parameter on the main page of the Style Record mode...

Page 143: ...ogram Change Control Change 11 Expression Control Change 00 Control Change 32 and Program Change messages must be placed at the very beginning of each Chord Variation tick 0 Whenever they are not saved in the SMF Program Change Con trol Change 00 11 and 32 can be still programmed in Style Record mode by using the edit features available Warning Pa800 can only handle SMF format 0 Zero If you are in...

Page 144: ... an alternative to exporting single Chord Variations to indi vidual Standard MIDI Files you can export a whole Style as an SMF separated by Markers i e a single SMF containing all the Chord Variations Variation 1 Variation 2 etc each one sepa rated by a Marker the same events used in Song Play mode 1 While in this page keep the SHIFT button pressed 2 Without releasing the SHIFT button touch the Ex...

Page 145: ...ly available in some edit pages While the Style Element Track Control edit section is selected use this command to open the Copy Keyboard Range dialog box and copy all Keyboard Range values for the current Style Element tracks to a different Style Element See Copy Key Range dialog box on page 143 for more infor mation Copy Chord Table Only available while in the Style Element Chord Table page Sele...

Page 146: ...ord Variation Current Chord Variation Tracks The Key Chord of the current track will be cop ied to all tracks of the current Chord Variation All Style Tracks The Key Chord of the current track will be cop ied to all tracks of the Style i e all Chord Varia tions Copy Sounds dialog box Open this window by choosing the Copy Sounds item from the page menu Here you can copy all Sounds assigned to the c...

Page 147: ...ords to each track by playing them on the key board one at a time with no need to play on time This is very useful when transcribing an existing score or needing a higher grade of detail and is particularly suitable to create drum and percussion tracks To access this page select the Overdub Step Recording com mand from the page menu Track Selected track Name of the selected track in record DRUM AC...

Page 148: ...corded 1 127 Velocity value The event will be inserted with this velocity value and the actual playing strength of the note played on the keyboard will be ignored Rest Touch this button to insert a rest Tie Touch this button to tie the note to be inserted to the previous note Back Goes to the previous step erasing the inserted event Next M Next Measure Goes to the next measure and fills the remain...

Page 149: ...r the Pad track parameters like Volume Pan FX settings have to be edited in Style Play mode After creating or editing music patterns in Pad Record mode save them by selecting the Write Pad command from the page menu of the Pad Record mode see Write Pad dialog box on page 158 After editing Pad Track parameters in Style Play mode save them to the Style Performance by selecting the Write Cur rent Sty...

Page 150: ...Pad Record mode the Fingered 3 Chord Recogni tion mode is automatically selected Main page Record 1 The Main Record page of the Pad Record mode looks like a simplified version of the Main page of the Style Record mode with just a single track to be recorded and no Style Elements to be chosen The only addition is the Pad Sync parameter Please look at the User s Manual for more information on the va...

Page 151: ...not be recorded and will only be used for test ing the pattern at various speeds while editing or recording Hint You can always change the Tempo when other parameters are selected by keeping the SHIFT button pressed and rotating the DIAL Meter This is the meter time signature of the sequence You can edit this parameter only when the sequence is empty i e before you begin recording anything Pad Tra...

Page 152: ...lected Parallel No Transpose The chord is not modified and is moved to the new key unchanged The pattern plays exactly the recorded notes and is moved to the new key as is This is the standard setting of Intro 1 and Ending 1 in Korg s original Styles where a chord pro gression is usually recorded and should remain unchanged in any key Fixed Chord This table moves as few notes as possible making le...

Page 153: ...osing a written pattern Recording overview Recording a Guitar track is unlike the other tracks where you play the exact notes of a melody line With Guitar tracks you play the keys corresponding to the strumming modes or play an arpeggio by using the keys corresponding to the six strings and the special keys corresponding to the root and fifth notes The following sections describe the various contr...

Page 154: ...you are recording a Chord Variation contained in an Intro or Ending Style Element or a different Chord Variation With most Chord Variations this chord will be used only for listening during recording During playback in Style Play mode the chord will follow chord recognition With Intro and Ending Chord Variations 1 and 2 this chord will be used as the reference key for the chord pro gression Capo 0...

Page 155: ... corresponding to one of the items of the edit menu see Edit menu on page 151 Page menu icon Touch this icon to open the page menu see Page menu on page 158 Parameters area Each page contains various parameters Use the tabs to select one of the available pages For detailed information on the vari ous types of parameters see sections starting from page 151 Tabs Use tabs to select one of the edit pa...

Page 156: ...his parameter sets the quantization after recording Start End Tick Use these parameters to set the starting and ending points of the range to quantize Bottom Top Note Use these parameters to set the bottom and top of the keyboard range to quantize Execute Touch this button to execute the operation set in this page Pad Edit Transpose In this page you can transpose the selected track s Note After tr...

Page 157: ...rt ing and ending ticks of the selected range Start End Tick Use these parameters to set the starting and ending points of the range to be modified Bottom Top Note Use these parameters to set the bottom and top of the keyboard range to be modified Advanced When this checkbox is checked the Intensity Curve Start Velocity Value and End Velocity Value parameters can be edited Execute Touch this butto...

Page 158: ...t Pedal CC00 32 CC127 Single Control Change events Double Control Change numbers like 00 32 are MSB LSB bun dles Note Some CC data are automatically removed during recording See the table on page 116 for more information on the allowed data Start End Tick Use these parameters to set the starting and ending points of the range to delete Bottom Top Note Use these parameters to set the bottom and top...

Page 159: ... Chord Variation Program Change data is not copied to leave the original Sounds unchanged for that Chord Variation From Pad Choose this option to select the source Pad to copy the Chord Variation from Touch the Select button to open the Pad Select window and select the source Pad From CV Chord Variation Use this parameter to select the source Chord Variation All All Chord Variations i e the whole ...

Page 160: ... a different chord Bass Bass track This type of track always plays the root when changing chord Acc Accompaniment track This type of track can be used freely for melodic or harmonic accompani ment patterns Tension Tension adds notes a 9th 11th and or 13th that have actually been played even if they haven t been written in the Pad pattern This parameter specifies whether or not the Tension included...

Page 161: ...lect button to open the file selector and select an SMF file Select Touch this button to open the file selector and load the SMF Initialize Check this parameter if you want all Pad settings i e Key Chord Chord Table Sound are reset when loading the SMF Hint It is a good idea to check this parameter when importing the first Chord Variation of the Pad and uncheck it when importing the following Chor...

Page 162: ...ain page of the Pad Record mode Select this command to open the Overdub Step recording window see the Style Record chapter in the User s Manual for more informa tion Exit from Record Select this command to exit from Record without saving changes to the Pad Write Pad dialog box Open this window by selecting the Write Pad item from the page menu Here you can save the recorded or edited Pad to memory...

Page 163: ...is turned on you can still manually change the Tempo with the DIAL When the Tempo Lock is activated the Link Mode is also acti vated see Link Mode on page 179 This makes both Players use the same Tempo Master Volume Balance X Fader While the MASTER VOLUME slider controls the general volume of the instrument you can use the BALANCE slider to balance the Song and Pad tracks against the Keyboard trac...

Page 164: ...Play to Song Play the Song Setup is automatically selected and various track parameters and settings may change To return to this page from one of the Song Play edit pages press the EXIT or SONG PLAY button To switch between Keyboard tracks Normal view and Song tracks Song Tracks views use the TRACK SELECT button Pressed a first time you will see tracks 1 8 a second press will show tracks 9 16 pre...

Page 165: ...s name is not shown in this area The JBX icon appears together with the name of the currently selected Song in the Jukebox list Note To create or edit a Jukebox file go to the Juke box Edit page see page 176 Song name Displays the name of the Song assigned to the corresponding player If the player is already selected white background touch the Song name to open the Song Select window If the player...

Page 166: ... PERF or Single Touch Setting STS Touch the name to open the Performance Select window As an alternative use the PERFORMANCE SOUND SELECT section to select a different Performance To select a different STS from the latest selected Style use the four SINGLE TOUCH SETTING buttons under the display Keyboard tracks area This is where Keyboard tracks are shown Sound name Name of the Sound assigned to t...

Page 167: ... track Sound name Sound assigned to the selected track Touch anywhere in this area to open the Sound Select window and select a different Sound Sound bank Bank the selected Sound belongs to Program Change Program Change number sequence Bank Select MSB Bank Select LSB Program Change Sounds area This area lets you see the octave transposition and Sound bank icon for the eight tracks currently displa...

Page 168: ...the SLIDER MODE button is lit The Assignable Sliders correspond to the virtual sliders in the display These are a graphical representation of each track s vol ume You can change the volume also by touching a track and using the TEMPO VALUE controls or by touching a track and drag ging it in the display Use the TRACK SELECT button to switch between the Normal Keyboard and Mic In tracks Song Tracks ...

Page 169: ...can be assigned to Player 1 only Note This panel is only available after loading a Jukebox file Hint To create or edit a Jukebox file go to the Jukebox Edit page see page 176 A quick way to create a Jukebox list is to touch the Play All button in the Song Select window see page 85 Warning If you delete a Song included in the Jukebox list currently in play the player will stop and the No Song messa...

Page 170: ...I File or MP3 file flow in the display Chord abbreviations if any will appear above the lyrics in time with the music depending on the Show chords parameter status under the Options side tab Lyrics at the current position are highlighted If the text has been loaded as a TXT file it will not scroll auto matically while the Song is playing back You must scroll it with the DIAL or the vertical scroll...

Page 171: ...nction to search a TXT file in the various media See Searching files on page 250 for more information Markers side tabs Standard Song Markers contained in a midifile can be read with the Pa2X to quickly jump to a given position in the Song Addi tionally you can set your own marker points on the fly Touch one of these side tabs to access the Marker panel corre sponding to one of the two players Not...

Page 172: ...h one of them to select it Score side tabs These tabs give access to the Score View pages You can access them from the Lyrics Score pane of the Song Play mode After having chosen either Song 1 or Song 2 the Score View page appears To exit from this page press the EXIT button Note Master or Track Transpose do not affect the Score display Selected Player Song This is the name of the currently select...

Page 173: ... button to let the selected track play or to mute it If the track is muted the score is still shown so that you can play or sing it Hint The Melody Mute function that can be assigned to an assignable switch footswitch or EC5 pedal allows for muting the melody track of a Song default Track 4 see Song Play Prefer ences Track Setting Melody If your song has the melody part assigned to the same track ...

Page 174: ...ry as the MYSONG MID or MYSONG MP3 file it is loaded together with the matching MID or MP3 file However unlike ordinary Lyrics the text will not scroll automat ically while the Song is playing back You must scroll it with the DIAL As an alternative you can use an assignable switch or footswitch with the Text Page Up or Text Page Down functions assigned to scroll respectively to the previous or nex...

Page 175: ...y mode Selected player Before entering edit select one of the two players by using the Song area of the main page see Switching between players dur ing editing below Edit section This identifies the current edit section corresponding to one of the items of the edit menu see Edit menu on page 171 Page menu icon Touch this icon to open the page menu see Page menu on page 180 Parameters area Each pag...

Page 176: ...he FXs Off When unchecked the direct dry signal is removed from the audio output and only sent to the FXs The effected signal will still be panned in stereo FXs only according to the Pan value Pan Track position in the stereo field 64 1 Left stereo channel 0 Center 1 63 Right stereo channel Volume Track s volume 0 127 MIDI value of the track s volume Play Mute icon Track s play mute status See Key...

Page 177: ...k can be heard Mute status The track cannot be heard Mixer Tuning EQ Gain In this page you can set the three band equalization EQ for each individual track Use the TRACK SELECT button to switch from the Keyboard to the Song tracks and vice versa Note The EQ is different for Player 1 and Player 2 Hint Track EQ can be memorized in the general preferences for the Song Play mode they are named Song Pl...

Page 178: ...t on the track but all parameters are preserved When the box is unchecked equalization is activated again with the original set tings On The bypass function is engaged so no equaliza tion is active on the corresponding track Off The bypass function is not engaged so the equal ization is active on the corresponding track Input Trim This knob allows you to limit the level of the signal passing throu...

Page 179: ...er each effect pair could be reserved to a different Player see page 179 You can also create Songs that make use of all four effects in Sequencer mode A Song created on the Pa2X in Sequencer mode can use up to 4 effects usually 2 reverbs 2 modulating effects each track may use the A B or C D pair A Standard MIDI File or Karaoke file will only use 2 effects usually 1 reverb 1 modulating effect This...

Page 180: ...le Key Velocity Range These parameters let you select a note and velocity range for the Keyboard tracks See Keyboard Ensemble Key Velocity Range on page 105 Parameters Keyboard Ensemble Ensemble See Keyboard Ensemble Ensemble on page 106 Parameters Pad Switch Pad See Pad Switch Pad on page 108 Parameters Pad Switch Assignable Switch See Pad Switch Assignable Switch on page 108 Parameters Jukebox E...

Page 181: ...file will be created on disk If you are saving a new list the NEWNAME JBX name is auto matically assigned and you can edit it Note You can save your JBX file only in the same folder as the Song files included in the list Groove Quantize You can apply a realtime groove quantization to Player 1 Groove quantization is a way of changing the music groove dur ing the playback moving notes to the nearest...

Page 182: ...t the Write Global Song Play Setup command from the page menu to save them to the Global Melody This parameter selects the Song s Melody track This track can be muted using the Melody Mute function assignable to an Assignable Switch Footswitch or EC5 pedal Drum This parameter selects the Song s Drum track This track is left set to play together with the Bass track when selecting the Drum Bass func...

Page 183: ...om www korgpa com Performance recalls FX CD This parameter selects the effects mode for the Performance Off When selecting a Performance no effect is selected On The Performance selects the C D effect pair Note When both this parameter and the Ply 2 FX Mode parameter are set to select the C D effect pair Player 2 shares its effects with Keyboard tracks Therefore these effects can be changed either...

Page 184: ...ause a delay to the Song s start Therefore we suggest to turn this function off when Pa2X is hooked to other instruments Get Hard Disk Path Touch this button to see the current file path of the Song assigned to each of the players This lets you know where cur rently selected Songs are located in the disk If you save these paths to the Global by selecting the Write Glo bal Song Play Setup command f...

Page 185: ...opy a single or all four effects between Styles Perfor mances STSs and Songs To do this choose the Copy FX and Paste FX commands from the page menu of the Style Play Song Play or Sequencer modes To copy a single effect 1 Select the source Song Performance Style or STS then go to the page of the single effect you want to copy FX A FX B FX C or FX D or go to the Effects FX Select page to copy all fo...

Page 186: ...ile by reading the Free space parameter Note The default device is automatically selected as the recording unit use the Device pop up menu to choose a different one You can record on the internal SSD U flash memory the hard disk or a device connected to one of the USB ports When done touch the Rec button in the display to start record ing The Rec button changes to Stop and can be touched again to ...

Page 187: ...our whole performance However you cannot record other MP3 files Devices It is not advisable to fill the target device too much during record ing Filling it may cause troubles with the recorded file Regular care is recommended with your target device Defrag menting and repairing internal devices can be made with any PC utility while the Pa2X is connected via USB ...

Page 188: ... File or MP3 file is automatically recalled Also STSs and Pads may be recalled if present List Header The List Header may change depending on the type of data associated with the selected entry When a Style is associated to the entry the currently selected entry s name is shown on the left N and the associated Style is shown on the right Style When a Standard MIDI File or MP3 file is associated to...

Page 189: ...ns of an unique number Numbers associated with each entry can be programmed in the Book Edit 2 page see Book Edit 2 on page 188 To see the numbers while in the Book page select the Show Song Numbers now Key command from the page menu After you select this command the Num column appears To see the Key column again select the Show Key now Song Numbers command from the page menu To select a SongBook ...

Page 190: ... menu Selecting SongBook entries via MIDI When you are ready to remotely select SongBook entries switch to the Style Play or Song Play mode At this point Pa2X must receive on the special Control channel the NRPN Control Change messages 99 MSB with value 2 and 98 LSB with value 64 in fast succession as an initializa tion string This string must be sent only once unless another NRPN control is sent ...

Page 191: ...is may change if a Meter Change event is included with the associated resource M Transp Master Transpose Master Transpose When the entry is selected the Master Trans pose for the whole instrument is automatically changed unless the Master Transpose is locked Note The Master Transpose value saved with the SongBook entry overrides any Master Transpose setting contained in the referenced Song Resourc...

Page 192: ... a SongBook file is 3 000 entries To assign a different name to the entry touch the Text Edit button to open the Text Edit window Select an option to add the new entry to the SongBook Select Rename Overwrite to overwrite an existing entry optionally changing its name Warning The older entry will be deleted Select New Song to save a new entry to the SongBook data base Book Edit 2 The Book Edit 2 pa...

Page 193: ...ns you are only allowed to select numbers that are still free and try to save the entry again Harmony Track When selecting a SongBook entry pointing to a Standard MIDI File or MP3 file the Harmony Track can be automatically selected Note If the entry is based on a Style this parameter is greyed out non selectable Unchanged The previously selected track is left unchanged Track Number The chosen tra...

Page 194: ... Del List Touch this button to delete the current list Write Touch this button to save changes to the selected Custom List To assign a different name to the selected list touch the Text Edit button to open the Text Edit window Select an option to save the edited Custom List Select Rename Overwrite to overwrite an existing list optionally changing its name Warning The older list will be deleted Sel...

Page 195: ...ile selector appears you can use the Search function to search a TXT file in the various media See Searching files on page 250 for more information Markers side tabs See Markers side tabs on page 167 for more information Score side tabs See Score side tabs on page 168 for more information Options side tabs See Options side tab on page 169 for more information Info Use the Info page to see the name...

Page 196: ...top of the list Sort by Type Name Genre Artist Number Key Tempo Meter Select one of these command to select the sorting order The selected option is shown in red above the entry list Enable List Edit Select this command and make the checkmark appear to make the List Edit page available Export as text file Only available when a SongBook list or Custom list is selected Select this command to open th...

Page 197: ...oice Processor while in Sequencer mode For this just two settings are needed Select the Song track where you are recording chords for the Voice Processor see Harmony Track on page 215 Select the desired Voice Processor Preset in the Voice Pro cessor Preset section of the Global mode see page 241 Sequencer Play Main page Press SEQUENCER to access this page from another operating mode In this page y...

Page 198: ...the REWIND button to go back to the beginning the Song returns to this point Metro Check this box to turn the metronome on during playback Tempo Tempo mode Use this menu to select the Tempo change mode Manual In this mode you can change the Tempo using TEMPO VALUE section controls The Song will be played back using the manually selected tempo Auto The Tempo recorded to the Song will be used Select...

Page 199: ... 8 view shows Song tracks 1 8 The Song Tracks 9 16 view shows Song tracks 9 16 Slider Mode button status Usually the function assigned to the Assignable Sliders depends on the status of the SLIDER MODE button While in Sequencer mode you cannot save the SLIDER MODE status to a Perfor mance or STS since Performances and STSs are disabled while in this mode For details about the various Slider Modes ...

Page 200: ...cer page While in Sequencer mode press the RECORD button and select the Multitrack Sequencer option The Multitrack Sequencer page appears See Multitrack recording procedure on page 198 for informa tion on the record procedure Page header See Page header on page 193 Page menu icon See Page menu icon on page 194 Page sub header This area shows some performing info on the Song Song name Name of the S...

Page 201: ... bar precount before starting recording On2 Metronome on with a two bar precount before starting recording Tempo Select this parameter and use the TEMPO VALUE controls to set the tempo Note You can always change the Tempo when other parameters are selected by keeping the SHIFT button pressed and rotating the DIAL Meter This is the basic meter or time signature of the Song You can edit this paramet...

Page 202: ... empty Song At least one track must already be recorded 9 When finished recording press PLAY STOP to stop the sequencer Select a different track and go on recording the whole Song 10 When finished recording the new Song either press the RECORD button or select the Exit from Record com mand from the page menu see page 216 Warning Save the Song to a storage device to avoid it is lost when turning th...

Page 203: ...pace with rests Done Exits the Step Record mode Step Record procedure Here is the general procedure to follow for the Step Recording 1 Press SEQUENCER to enter Sequencer mode 2 Press the RECORD button and select the Multitrack Sequencer option to enter the Multitrack Record mode From the page menu select the Overdub Step Recording or Overwrite Step Recording mode At this point the Step Record wind...

Page 204: ...ly record your live performance with the Styles To make things easier just two grouped tracks are provided Kbd Pad Keyboard and Pads to record keyboard and pads and Ch Acc Chords Accompaniment to record Style commands and chords played on the keyboard While in Sequencer mode press the RECORD button and select the Backing Sequence Quick Record option The Backing Sequence Quick Record page appears S...

Page 205: ...following table Metro Metronome This parameter sets the metronome mode during recording Off No metronome click will be heard during record ing A one bar precount will be played before starting recording On1 Metronome on with a one bar precount before starting recording On2 Metronome on with a two bar precount before starting recording Tempo Metronome tempo Select this parameter and use the TEMPO V...

Page 206: ...ccompaniment leave their status to Rec see Track status icons on page 197 Warning Tracks set to REC are automatically overwritten when starting recording Set a track to the PLAY or MUTE status when you don t want to delete it For example if you are recording a keyboard part on an existing Style track set the Ch Acc parameter to PLAY and the Kbd Pad track to REC 6 Start recording by pressing the le...

Page 207: ...s feature a resolution of 384 ticks per quarter Style This is the latest selected Style To insert a Style change at the current position touch the Style name to open the Style Select window or follow the standard selecting procedure using the buttons of the STYLE SELECT section Note Any Style Change inserted after the beginning of the measure i e to a position other than Mxxx 01 000 will be effect...

Page 208: ...ops to the M001 01 010 location These commands are effective even if the Measure parameter is not selected Previous or Next Measure Use these buttons to move to the previous or following measure These commands are effective even if the Measure parameter is not selected Done button Done Touch this button to exit the Step Backing Sequence mode All changes will be saved to memory Hint Save the Song t...

Page 209: ...Exit the Step Backing Sequence recording mode by touch ing the Done button in the display 6 Press PLAY STOP in the PLAYER 1 section to listen to the consequence of your editing If they are fine save the Song to a storage device Edit menu From any page press the MENU button to open the Sequencer edit menu This menu gives access to the various Sequencer edit sections When in the menu select an edit ...

Page 210: ...63 Right stereo channel Volume Track s volume 0 127 MIDI value of the track s volume Play Mute icon Track s play mute status Play status The track can be heard Mute status The track cannot be heard Mixer Tuning FX Send This page lets you set the level of the track s direct uneffected signal going to the Internal FX processors The effect processors included in Pa2X are connected in parallel so you ...

Page 211: ...i High Gain This parameter lets you adjust the high frequencies equalization on each individual track This is a shelving curve filter Values are shown in decibels dB 18 18dB High gain value in decibels Mid Middle Gain This parameter lets you adjust the middle frequencies equaliza tion on each individual track This is a bell curve filter Values are shown in decibels dB 18 18dB Middle gain value in ...

Page 212: ...ation values can overload the audio circuits and lead to distorsion This control lets you set equalization as desired and at the same time avoid overloading 0 99 Limiting value The higher the most effective it is Play Mute icon Track s play mute status Play status The track can be heard Mute status The track cannot be heard Mixer Tuning Tuning Parameters See Mixer Tuning Tuning on page 99 Mixer Tu...

Page 213: ... the A effect or of the D effect going back to the input of the C effect Mod Track Modulating Track Source track for modulating MIDI messages You can modulate an effect parameter with a MIDI message generated by a physical controller Effects FX A D These pages contain the editing parameters for the four effect processors Here is an example of the FX A page with the Reverb Smooth Hall effect assign...

Page 214: ...00 00 000 to a different value you can t go back to the original value This rather uncommon zero length value may be found in the drum and percussion tracks of Songs made in Backing Sequence mode Track Use this pop up menu to select the track to edit Track 1 16 One of the ordinary tracks of the Song These tracks contains musical data like notes and con trollers Master This is a special track conta...

Page 215: ...e event s position 6 Select the Type parameter and use the TEMPO VALUE controls to change the event type Select the Value 1 and 2 parameters and use the TEMPO VALUE controls or touch the parameter again to open the numeric keypad to modify the selected value 7 In the case of a Note event select the Length parameter and use the TEMPO VALUE controls or touch the param eter again to open the numeric ...

Page 216: ...e If you select the same note as the Bot tom and Top parameters you can select a single percussive instrument in a Drum track Note These parameters are available only when a Drum track is selected Song Edit Transpose Here you can transpose the Song a track or a part of a track After setting the various parameters touch Execute to start the operation Track Use this parameter to select a track All A...

Page 217: ...this parameter to select one of the six curves and to specify how the velocity will change over time Start End Vel Value Only available in Advanced mode Velocity change at the start ing and ending ticks of the selected range 0 100 Velocity change in percentage Song Edit Cut Insert Measures In this page you can cut or insert measures from the Song After selecting the Start and Length parameters tou...

Page 218: ...e All or Note options are selected Song Edit Copy Here you can copy tracks or phrases After setting the various parameters touch Execute to start the operation Note If you copy too many events on the same tick the Too many events message appears and the copy operation is aborted Mode Use this parameter to select the Copy mode Merge Copied data are merged with the data at the tar get position Overw...

Page 219: ...d are marked with the abbreviation through the manual After changing these settings select the Write Global Sequencer Setup command from the page menu to save them to the Global Midi Setup MIDI channels for the Sequencer mode can be automatically configured by selecting a MIDI Setup with this parameter See MIDI Setup on page 228 for more information on using MIDI Setups Note To automatically selec...

Page 220: ...ge on page 198 Delete Song Select this command to delete the Song and create a new blank Song Delete Current Track Select this command to delete the track currently selected in the Track area see Track volume status area on page 197 Solo Track Select the track to be soloed and check this item You will hear only the selected track and the Solo warning will flash on the page header Uncheck this item...

Page 221: ...ck to the main page of the Sequencer operating mode without saving the Song Song path This line shows the path of the location where you are saving the Song Directory This is the list of the selected device s content Use the scrollbar to scroll the list items As an alternative you can select one of the items and use the TEMPO VALUE controls to scroll Keep the SHIFT button pressed and press DOWN or...

Page 222: ... Song with a non standard transposition may result in unwanted transposing when loading other Songs that do not contain their own transposition data To transpose a Song it is advisable to use the Transpose function in the Edit section of the Sequencer mode see Song Edit Transpose on page 212 You may also lock the Master Transpose to avoid unwanted trans position See General Controls Lock on page 2...

Page 223: ... Song Play mode not linked to the single Song Sequencer Setup containing global parameters for the Sequencer mode not linked to the single Song Media Preferences containing preferences for the Media mode MIDI Setup containing the available MIDI Setups i e set tings for MIDI communication Voice Processor Setup containing basic microphone set tings for the Voice Processor Voice Processor Presets con...

Page 224: ...you are playing Use negative values when you are in a very reverberant room positive values if the room is too dry By using this global control you are not obliged to change the reverb time in each single Performance STS Style Performance or Song 50 Less reverb 0 Standard reverb 50 More reverb Fade In Out Time These parameters allows you to set the speed for the Fade In Out function Fade In Time T...

Page 225: ...nspose on or off for the two onboard Players Transpose applies to Midi In notes This flag lets you turn the Master Transpose on or off for Note messages received from MIDI IN Position Scale and Transpose position The Scale and Transpose Position allows you to define the rela tion between the Scale and the Master Transpose Post KB Pre Scale When this option is selected notes will be trans posed imm...

Page 226: ...nd on the programming set with the Upper scale diagram or recalled by selecting one of the SC Presets When a note is detuned a black dot appears in the correspond ing note of the diagram General Controls Lock This page split in four panes that can be selected by means of the corresponding side tabs contains all the available locks sometimes grouped under just a single lock Locks prevent parameter ...

Page 227: ... Point on page 95 Pad When locked selecting a Style or SongBook entry will not change the Pad assignment See Pad Switch Pad on page 108 Lower When this lock is closed the Lower track remains unchanged when a different Style Performance or STS is selected This is useful if for example you prefer to always play with the left hand muted and reserved only to playing chords for the arranger Hint If you...

Page 228: ...page 8 Manual Bass When locked selecting a Performance or STS will not change the Manual Bass status See MANUAL BASS on page 8 Fill Mode When locked the selected Fill Mode will not change when selecting a different Performance or Style See Fill Mode 1 3 on page 107 Style Element When locked selecting a different Style does not cause selecting the Style Element memorized in the Style Performance St...

Page 229: ...ge numbers are always shown in Sound Edit mode and in the various Track Info areas Track Activity Show Track Activity Use this parameter to turn on off the Track Activity display When it is turned on you can monitor events coming from the tracks or the MIDI inputs Incoming events are shown by the changing color of each track s label Here is the list of colors and their meaning Red Data coming from...

Page 230: ...n to the Assignable Pedal Foot switch and select the polarity for the Damper and Assignable Pedal Footswitch The following optional pedals are compatible with Pa2X Pedal Footswitch Pedal Footswitch Function assigned to a continuous i e volume expression pedal or to a footswitch connected to the ASSIGNABLE PDL SW connector See page 320 for a list of the assignable functions The first functions are ...

Page 231: ...le Sliders Two sets are available Mic and Assignable Two other modes Vol ume and Drawbars are hard wired to the volume and drawbars control You can assign the preferred set by using the SLIDER MODE button on the control panel cycling between the four available modes The status of the SLIDER MODE button can be saved with the Performance or STS Assignable Mic Slider Functions assigned to the corresp...

Page 232: ...to all MIDI Setups Note In Song Play mode only the Tempo of Player 1 will be sent to the MIDI OUT or USB Device port Off The Pa2X cannot send the MIDI Clock signal You cannot slave another instrument to the Pa2X even when connected to the MIDI OUT or USB Device port On The Pa2X can send the MIDI Clock signal You can slave another instrument to the Pa2X Tempo Start Stop and Play Stop commands Conne...

Page 233: ...t for the Upper tracks For example if you select the 1 value a received C4 will play a C5 on the Pa2X This parameter may be useful to many MIDI accordion players whose MIDI interface may transmit on an unexpected octave 2 2 Octave transpose value Lower Octave Transp Transpose Octave transposition of data received on the MIDI IN or USB Device port for the Lower track For example if you select the 1...

Page 234: ...tely select Styles Performances STS Style Elements and SongBook entries See tables on page 276 and following for more infor mation on the received data MIDI MIDI Out Channels In this page you can assign Pa2X tracks to any of the MIDI channels sent to the MIDI OUT and USB Device ports Channels You can assign to each channel one of the following tracks Off No track assigned Lower Lower track Upper 1...

Page 235: ...arameters to assign an audio output OUTPUT sec tion on the back of the instrument to each track Left Right The selected track is connected to the Left Right outs in stereo The track is also sent to the Internal FX processors A and B for the Style and Pad tracks C and D for the Keyboard tracks You can set the volume using the MASTER VOLUME slider The track is also sent to the S PDIF Digital Out How...

Page 236: ...ation on the available audio outputs Audio Setup Drums This page lets you route Drum Kit Sounds to the audio outputs See Audio Setup Style Kbd on page 231 for more information about the available audio outputs Drum Kit Output This parameter lets you decide if Drum Kit Sounds will be sent to the single output or output pair defined for the track they are assigned to or each drum category will be se...

Page 237: ... plied to the balanced XLR jack only and not to the 1 4 Mic jack When disconnecting a microphone from the XLR jack the phantom power is automatically turned off Phantom power is also automatically turned off each time you turn the Pa2X off Mic On Off The status of this switch depends on the input routing see above On When the switch appears closed i e non inter rupted the Mic input is active and g...

Page 238: ...te This parameter is automatically set to Off each time you turn the instrument off On All tracks set to be sent to the Left Right audio outputs see starting from page 231 are sent to the S PDIF output Together with the audio sig nal the Word Clock sync signal is also output with a frequency of 48kHz When in this mode the Pa2X becomes the Word Clock master No other master device can be con nected ...

Page 239: ...standard PAL or NTSC PAL Used in most European South American Asian and African Countries This setting can be used also with SECAM TV sets used in France Russia and some Countries of Africa in this latter case however the picture is shown in black white NTSC Used in North America Central America and part of South America It is also used in Japan Korea Taiwan Philippines and Burma Mode Experiment w...

Page 240: ...obal Setup dia log box and save global settings that are not tied to a single operative mode These settings are programmed in the Global edit mode See Write Global Global Setup dialog box on page 237 for information on the dialog box Write Global Midi Setup Select this command to open the Write Global Midi Setup dia log box and save the current MIDI settings to a MIDI Setup See Write Global Midi S...

Page 241: ...p area of the Global are marked with the symbol through the user s manual Name Name of the MIDI Setup to be saved Touch the Text Edit button next to the name to open the Text Edit window and mod ify the name Midi Setup One of the 8 available MIDI Setup locations where to save cur rent MIDI settings Write Global Talk Configuration dialog box Only available when the Talk function is activated Open t...

Page 242: ...eset area of the Global are marked with the symbol through the user s manual Name Name of the VP Preset to be saved Touch the Text Edit button next to the name to open the Text Edit window and mod ify the name Voice Preset One of the 128 available Voice Preset locations where to save current VP Preset settings Write Quarter Tone SC Preset dialog box Open this dialog box by selecting the Write Quar...

Page 243: ...rrent Setup Setup Voice Processor Setup Use this parameter to select a Voice Processor Setup Setup parameters are global and do not change when a different preset is recalled Setup parameters are all the parameters found in the Voice Processor Setup edit section including Lead voice input level and pan Compression Gate and EQ parameters among many others They are parameters that would typically be...

Page 244: ...remely flexible 3 band EQ with frequency and gain adjustable high and low shelving bands as well as a fully parametric band with Q control Low Gain knob Low Shelving Frequency cut boost Range 12 dB Low Frequency knob Low Shelving Frequency center frequency Range 80Hz 16kHz Mid Gain knob Mid Band Frequency cut boost Range 12 dB Mid Frequency knob Mid Band Frequency center frequency Range 80Hz 16kHz...

Page 245: ... reverb to be automatically selected when turning the Talk function on These reverbs can not be edited Voice Processor Preset Preset This page allows you to select a Voice Processor Preset as well as turning on or off the various Voice processor modules Preset Voice Processor Preset Use this parameter to select a Voice Processor Preset A Preset is the programming of all Voice Processor s harmony a...

Page 246: ...esets this sets the scale type If the selected type is Custom a Custom Map can be used see Custom Voice Map ping on page 244 PB Assign Pitch Bend control assignment Allows assignment of the pitch bend to Pitch applicable in Notes and Chord harmony modes Note For this to work a value other than zero must be assigned to the Pitch Bend Range in the Voice Processor Setup Setup page see page 240 Portam...

Page 247: ...e This parameter means different things depending on the har mony mode of the preset Scalic Mode Presets In this mode the Voicing parameter specifies the interval of the harmony note with respect to the input note in the scale The range of values goes from 8 which is 2 octaves below the input note to 8 which is two octaves above the input note For example a setting of 3 will result in a harmony vo...

Page 248: ...llows For a given harmony voice select the scale root type and interval that most closely matches the desired voicing Go to the Note In parameter and select the input note that requires a different harmony note Go to the Note Out parameter and change the harmony note as desired Select various other input notes and remap as desired Repeat the above steps for each harmony voice You can also copy a m...

Page 249: ...I Tempo is received from MIDI Manual The delay time is set using the Delay parameter R Ratio Sets the ratio between the tempo and the resulting delay For example 1 2 means that for each quarter note at the current tempo the delay plays two notes A value of 1 4 means that for each quarter note at the current tempo the delay plays four notes and so on Hi Freq Damp High Frequency Damping High Frequen...

Page 250: ...Shift Mode Black Lead Grey Harmony Chord Chordal Mode Chordal harmonies take your chord information to create intel ligent diatonic harmonies based on your voice To make Chordal harmonies you need to input in real time the chords of the song This may be done either by playing on the keyboard via MIDI or through a programmed sequence of chords included in the Harmony Track of a Song In Chordal mode...

Page 251: ...the first chord but the harmonies actually work best in the key of G try running the song through Voice Processor to hear for yourself Setting the scale can also take a bit of practice for songs centered around the third or root of the scale it might not sound like there s any noticeable differences between the three major or three minor scales This is because your song doesn t hit any of the scal...

Page 252: ...se notes within specified scale or chord so a third above harmony voice actually varies between three and four semitones above the lead note where the chromatic harmony would stay exactly four semitones a major 3rd above each note To recap we have three different harmony modes that use chro matic or diatonic scales Shifting which uses the chromatic 12 semitone scale changes the input pitch by a fi...

Page 253: ... drives support the FAT16 and FAT32 formats with long file names NTSF Win dows NT 2000 XP Vista HFS Mac OS 9 and HFS Mac OS X formats are not supported Selecting and deselecting files While a file list is shown in the display you can select any item by touching it The selected item is highlighted You can deselect all items in any of the following ways Touch an empty area in the file list if availa...

Page 254: ...hing file names Search Once you have typed the string to search for touch this button to execute the search The name of this button changes to Stop see below The time needed to complete the search depends on the size of the device s and the number of files Note Only one search a time can be carried on Please wait for the current search to be completed or touch the Stop or Select button in the disp...

Page 255: ...OC Voice Processor Presets PRF Performance PCG Sound Korg Pa Series KMP Multisample PCM Sample AIF AIFF audio files WAV WAVE audio files STY Style PAD Pad SBD SongBook SBL SongBook s Custom List JBX Jukebox MID Midi file Standard MIDI File SMF MP3 MP3 file TXT Plain text file Extension File type KAR Karaoke file PCG Korg Triton Programs KSF Korg Trinity Triton Sample S Akai Sample P Akai Program M...

Page 256: ...y updated to reflect these changes see Ordered by Name and Ordered by Type on page 267 Scrollbar Use the scrollbar to scroll the list Touching the arrows will scroll one step at a time while touching the bar will scroll one page at a time Touching the arrows while SHIFT is kept pressed jumps to the previous or next alphabetical section or file folder type depending on the selected display order De...

Page 257: ...ple the samples are automatically loaded unless they are already in memory This way all needed samples are always loaded together with the Sounds or Drum Kits making use of them See also PCM Autoload and Load PCM button on page page 264 Warning When loading a SET folder containing PCM data all existing PCM data in memory are deleted Save them before loading the folder by selecting the PCM option d...

Page 258: ... the target bank and touch OK to load the source bank Warning After confirming all User data contained in the bank in memory is deleted Note If Sounds or Drum Kits based on external PCM sam ples are deleted choose the Delete command from the page menu of the Sampling mode to delete the unused samples see the Advanced Edit addendum in the Accessory CD Note If you are loading a bank of Sounds and on...

Page 259: ...in the Pa1X Some other parameters are missing in the Voice Processor section At the same time most Pa2X data can be read by any Pa1X pro vided it is fitted with Operating System v 3 0 or higher How ever keep in mind the following Pa2X has a more extensive range of effects that might not exist on the Pa1X Due to the different content and organization the Song Book will point to different Styles Sty...

Page 260: ...Performance to write changes to the Style Perfor mance Touch OK to confirm Save In this page you can save User data from the internal memory to a mass storage device like an hard disk or an USB pen drive You can save single files banks or all the User and Favorite Style files of the internal memory i e the SSD device Note While in this page only data allowed for saving are shown All other files ar...

Page 261: ...m or Cancel to abort Warning After confirming all data of the selected type in the target folder is deleted Saving all data of a specified type In addition to the above you can save all data of a specified type by selecting the corresponding folder 1 If saving to an external device connect the device to one of the USB Host ports 2 The full content All of the internal memory is already shown Select...

Page 262: ...splay 6 At this point you can Touch the New SET button and create a new SET folder see Creating a new SET folder on page 259 or Select an existing SET folder and touch Save to con firm 7 A dialog box appears asking you to select one of the avail able User or Favorite Style locations inside the folder In the above dialog box the previously selected bank of Styles will be saved to the bank User 01 c...

Page 263: ...ll be saved to location 01 inside the bank U01 corresponding to the USER1 button inside the selected folder 9 Touch OK to confirm or Cancel to abort Warning After confirming the same item in the target folder is deleted Creating a new SET folder Pa2X proprietary data must be saved in special folders with the SET extension These special folders can be saved inside ordi nary folders When saving you ...

Page 264: ...alog box will appear see Overwriting existing files or folders on page 261 During Copy a dialog box shows the progress of the opera tion Copying a single file or folder You can copy a single file or folder from a generic folder to a dif ferent one The file or folder must be located in the root the main highest level in the device hierarchy or into a generic folder You can t copy single files or fo...

Page 265: ... folder is not overwritten The source file or folder is not copied The procedure will continue with the other files and folders Yes The file or folder is overwritten The procedure will continue with the other files and folders Yes to All The file or folder is overwritten Any following duplicate file or folders will be overwritten as well without this dialog box appearing again The procedure will c...

Page 266: ...rmatting the hard disk or an external USB device an additional warning appears to avoid accidental data loss Utility This page includes a set of backup and restore utilities Backup OS This command allows you to make a backup of the Operating System on a target device A PKG file will be created Note Should you not do a backup and your internal data becomes damaged you can download the most up to da...

Page 267: ...ce depends on the amount of data to be backed up Note You will not be able to load data from this file using the nor mal Media Load operations This file is used for archiving pur pose only To save data that must remain accessible for example to load User data after updating the Musical Resources use the Media Save operations instead Full Restore Resources This command fully restores the backup of ...

Page 268: ...it Sound mode When Off you can freely save edited Sounds either in the Factory or User Sound area Warning Use this feature with great care Reorganizing the Fac tory Sounds may make both Styles and Standard MIDI Files sound with the wrong Sounds Note This parameter is automatically set to On when turning the instrument off Note If your accidentally delete some Factory Data reload the Backup data fi...

Page 269: ...ed this may take some minutes depending on the hard disk size the icons of the SSD U and the hard disk will appear among the other storage devices connected to the computer Caveat Do not modify SET folders or you will no longer be able to use them on the Pa2X Only use the USB connection for data exchange purpose or to modify ordinary folders Note After starting the USB connection accessing Pa2X da...

Page 270: ...o open the Text Edit window Enter the new name then touch OK to confirm and close the Text Edit window Object s info Select this command to see the size of any selected file or folder Also the number of files and directories folders it contains are shown Note The single file size is always shown to the right of the file name in any file list Device Info Select this command to see various info on t...

Page 271: ...ost of the data contained in memory to the internal hard disk internal SSD U ser memory or to external devices like hard drives or pen drives connected to one of the USB Host ports Here are some precautions when handling these devices Hard disk write protection You can protect your internal hard disk from writing by using the software protection found in Media mode see Hard Disk Protect on page 26...

Page 272: ... on samples you would like to load Touch Load and choose a target User location in memory The Sound or Drum Kit is loaded together with the PCM samples it is based on 3 Do the same with any subsequent Sound or Drum Kit whose samples you would like to load 4 When finished loading save a new SET folder being sure the PCM option is checked in the Save All dialog see Sav ing the full memory content on...

Page 273: ...ten used to say the note has been released In some case a Note On with value 0 is used instead Together with the Note On message a Velocity value is always sent This value tells the instrument how loud the note must play After Touch This message is generated by pressing on the key board after the note has been struck It usually activates vibrato or other sound parameters Pitch Bend PB You can gene...

Page 274: ...s The notes that arrive to a Global channel are used for the chord recognition of the automatic accompaniment If the SPLIT LED is turned on only the notes below the split point will be used These notes will be combined with the ones of the special Chord 1 and Chord 2 channels The Chord 1 and Chord 2 channels You can set two special Chord channels see page 230 to send to the Pa2X notes for the chor...

Page 275: ... the Global Protect function see Global Protect on page 264 5 To save the assigned MIDI Setup for the selected operative mode into the Global select the Write Global Style Setup the Write Global Song Play Setup the Write Global Player Setup or the Write Global Global Setup command from the page menu 6 If needed press one of the buttons in the MODE section to go to the desired operative mode Connec...

Page 276: ...a2X to the USB port of the computer Notes generated by the computer i e a song played by its sequencer are sent through the MIDI OUT of the MIDI interface to the MIDI IN connector of the Pa2X or go from the USB port of the computer to the USB port of the Pa2X The Local Off When the Pa2X is connected to an external sequencer we rec ommend you to set the Pa2X in Local Off mode see Local Control On o...

Page 277: ... expander or sequencer connected Pa2X s MIDI OUT To hear only the expander s sounds you can lower the MASTER VOLUME control on the Pa2X or set the Keyboard tracks to the External status see Track Controls Mode on page 209 The Player Any Player s track can drive a channel on an external instrument To set each track s MIDI output channel see MIDI MIDI Out Channels on page 230 To hear only the expand...

Page 278: ...274 MIDI Playing another instrument with the Pa2X ...

Page 279: ...Appendix ...

Page 280: ...tin Pop 6 Organ Ballad 8 7 Real 16 Beat 7 Pop Ballad 7 Blue Ballad 9 8 Soft 8 Beat 8 Pop 6 8 8 Folk Ballad 1 10 9 Soft 16 Beat 9 Slow Pop 6 8 9 Folk Ballad 2 11 10 Classic Beat 10 Pop 12 8 10 Groove Ballad 12 11 Pop 16 Beat 11 Pop Shuffle 1 11 Blues Ballad 13 12 Analog Beat 1 12 Pop Shuffle 2 12 Analog Ballad 1 14 13 Analog Beat 2 13 Pop Shuffle 3 13 Analog Ballad 2 15 14 8 Beat Analog 1 14 Pop Ch...

Page 281: ...p 25 Blues Shuffle 27 26 Jive 26 26 Light Rock 28 27 Pasodoble 27 27 29 28 Hully Gully 28 28 30 29 29 29 31 30 30 30 32 31 31 31 CC0 CC32 PC Bank Funk Soul CC0 CC32 PC Bank Country CC0 CC32 PC Bank World 1 1 0 6 0 Funk R B 0 7 0 Country Strum 0 8 0 Oberkr Waltz 1 2 1 Kool Funk 1 Country QuikStep 1 Oberkr Waltz 2 3 2 Al Funk 2 Country Beat 1 2 Oberkr Polka 1 4 3 Elektrik Funk 3 Country Beat 2 3 Obe...

Page 282: ... 27 Ciftetelli 27 Guajira 27 29 28 Halay 28 28 30 29 5 8 29 29 31 30 Oryantal 30 30 32 31 Turkish Pop 31 31 CC0 CC32 PC Bank Jazz CC0 CC32 PC Bank Trad itional CC0 CC32 PC Bank Movie Show 1 0 12 0 Bigger Band 0 13 0 German Waltz 1 0 14 0 Hollywood 1 2 1 Medium BigBand1 1 German Waltz 2 1 Hollywood 2 3 2 Medium BigBand2 2 German Waltz 3 2 Broadway 4 3 Fast Big Band 1 3 Vienna Waltz 3 Show Time 5 4 ...

Page 283: ...5 14 Slide Blues 14 Jazzy PopFunk 14 Reggaeton 16 15 Unplugged Rock 15 Pop Funk 15 Pop Ska 17 16 Unplugged Latin 16 Elektro Pop 16 Vocal Latin 18 17 Unplugged Swing 17 Modern Latin 17 Vocal Pop 19 18 Unplugged 3 4 18 Folk Beat 18 Cool Vocal 20 19 Acoustic Bld 3 4 19 Wave Jazz 19 Vocal Jazz 21 20 20 Little Shuffle 20 Orchestral Movie 22 21 21 21 Orchestral Bld 23 22 22 22 Ballad 6 8 24 23 23 23 Mod...

Page 284: ...C 0 Bank Select LSB CC 32 and Program Change messages on the Control channel see MIDI MIDI In Channels on page 230 If a Style is already selected just send the Program Change message Note The above Control Change and Program Change numbers are given according to the 0 127 numbering system PC Style Element PC Style Element PC Style Element PC Style Element PC Style Element 80 Intro 1 81 Intro 2 82 ...

Page 285: ...O 121 11 0 Bank E Piano Tine E Piano RX 121 18 4 Club E Piano 121 11 4 Suit E Piano 1 121 20 4 Vintage EP 121 4 4 Dig E Piano 121 14 5 Classic Tines 121 9 5 Classic Wurly 1 121 17 4 FM Pad E P 121 15 5 Tine E Piano 121 19 4 Studio EP 121 7 4 Suit E Piano 2 121 21 4 Dyno Tine EP 1 121 10 4 Stereo Dig EP 121 6 5 Classic Dig EP 121 7 5 Classic Wurly 2 121 12 4 FM Stack E P 121 16 5 Thin E Piano 121 9...

Page 286: ...121 5 22 Bank Organ Jimmy Organ V 121 10 18 Perc Organ GM 121 0 17 Perc Organ 2 121 2 17 Name CC00 CC32 PC Perc Organ 3 121 10 17 Perc Organ 4 V 121 9 17 Perc Organ 5 V 121 11 17 Classic Click 121 4 18 Perc Short Decay 121 8 18 BX3 Rock 1 V 121 10 16 BX3 Rock 2 V 121 1 18 BX3 Rock 3 V 121 5 18 BX3 Rock 4V 121 12 18 Rock Organ GM 121 0 18 Rock Organ 2 121 11 18 Dirty B 121 3 18 Killer B 121 2 18 BX...

Page 287: ...ian Guitar 121 9 24 Steel Folk Gtr 121 9 25 Steel Slide Pro2 121 14 25 Jazz Guitar GM 121 0 26 Chorus Gtr Pro 121 18 27 Mute Vel Gtr 121 2 28 Overdrive Gtr GM 121 0 29 Name CC00 CC32 PC Guitar Strings 121 7 24 Steel Body 121 3 25 Pop Steel Slide 121 23 25 Finger Key Off 121 7 25 Clean Jazz 2 121 23 27 Tel Middle 121 26 27 Clean Funk 121 8 28 Wet Dist Guitar 121 6 30 Mandolin 121 2 25 Mandolin Key ...

Page 288: ... 121 2 41 Concert Str RX 121 23 48 Movie Strings 1 121 5 49 Analog Strings 1 121 5 50 Strings Ens RX 121 22 48 Wuuh Choir 121 8 52 Scat V Bass1 121 17 52 Name CC00 CC32 PC Violin Expr 2 121 4 40 Viola Expr 121 1 41 Ensemble Solo 121 11 48 Movie Strings 2 121 6 49 Analog Strings 2 121 2 50 i3 Strings 121 5 48 Oh Ah Voices 121 9 52 Femal Male Scat 121 14 52 Slow Violin 121 3 40 Strings Quartet 121 9...

Page 289: ...Trp Pro 121 20 56 Alp Trumpet 121 17 56 Dual Trumpets 121 6 56 Trombone GM 121 0 57 Trombone 2 121 1 57 Name CC00 CC32 PC Bright Trombone 121 2 57 Trombone 3 121 12 57 Trumpet GM 121 0 56 Trumpet 2 121 14 56 BeBop Cornet 121 9 56 Flugel Horn 121 7 56 Trumpet Shake Y 121 18 56 Mono Trumpet 121 3 56 Dark Trumpet 121 1 56 Trumpet Pitch 121 5 56 Tuba GM 121 0 58 Tuba Gold 121 2 58 Oberkr Tuba 121 1 58...

Page 290: ...11 66 Alto Sax DNC 121 12 65 Tenor Sax DNC 121 12 66 Bank Woodwind Flute Switch 121 2 73 Jazz Flute RX 121 10 73 Flute Frullato 121 4 73 Name CC00 CC32 PC Clarinet Pro 1 121 8 71 Oboe GM 121 0 68 Whistle RX1 121 3 78 Pan Flute GM 121 0 75 Nay 121 2 72 Jazz Flute Expr 121 1 73 Flute Dyn 5th 121 3 73 Flute GM 121 0 73 Clarinet Pro 2 121 9 71 Bassoon GM 121 0 70 Whistle RX2 121 4 78 Old Shakuhachi 12...

Page 291: ... 87 Thin Analog Lead 121 4 87 Dance Lead 121 4 80 Wave Lead 121 5 80 Sine Wave 121 6 80 Synchro City 121 2 84 Name CC00 CC32 PC Wild Arp 121 6 55 Express Lead 121 5 87 HipHop Lead 121 6 87 Analog Lead 121 7 80 Seq Lead 121 7 81 Old Analog 121 8 80 Phat Saw Lead 121 8 81 Glide Lead 121 9 81 Gliding Square 121 9 80 Flip Blip 121 7 55 Power Synth 121 3 89 Sine Switch 121 10 80 Reso Sweep 121 1 90 Syn...

Page 292: ...3 Dark R B Bass2 121 5 35 Bass Gtr Double 121 6 34 FingerB Guitar 121 14 33 Bass Guitar 121 4 34 Auto Pilot 2 121 13 39 Name CC00 CC32 PC Bass4 Da Phunk 121 14 39 Syn Bass Warm 121 1 38 Syn Bass Reso 121 2 38 Dark R B Bass1 121 4 35 Attack Bass 121 1 39 Rubber Bass 121 2 39 Dr Octave 121 16 38 Monofilter Bass 121 11 39 Synth Bass 80ish 121 9 39 Reso Bass 121 12 39 Autofilter Bass 121 10 39 Drive B...

Page 293: ...1 0 116 Concert BassDrum 121 1 116 Melodic Tom GM 121 0 117 Melodic Tom 2 121 1 117 Reverse Tom 121 2 117 Synth Drum GM 121 0 118 Rhythm Box Tom 121 1 118 Electric Drum 121 2 118 Reverse Snare 121 3 118 Reverse CymbalGM 121 0 119 Reverse Cymbal 2 121 2 119 Dragon Gong 121 1 119 Name CC00 CC32 PC Bank SFX Goblins GM 121 0 101 Echo Drops GM 121 0 102 Star Theme GM 121 0 103 Gtr FretNoise GM 121 0 12...

Page 294: ... Suit E Piano 1 E Piano 121 21 4 Suit E Piano 2 E Piano 121 22 4 Dyno Tine EP 2 E Piano 121 23 4 Bell E Piano 1 E Piano 121 24 4 Bell E Piano 2 E Piano 121 25 4 EP Damper1 DNC E Piano 121 26 4 EP Damper2 DNC E Piano 121 0 5 E Piano 2 GM E Piano 121 1 5 Detuned EP 2 E Piano 121 2 5 EP2 Veloc sw E Piano 121 3 5 EP Legend E Piano 121 4 5 EP Phase E Piano 121 5 5 Syn Piano X E Piano 121 6 5 Stereo Dig...

Page 295: ...0 CC32 PC Name Bank GM2 121 7 19 Positive Organ Organ 121 8 19 Pipe Tutti 2 Organ 121 9 19 Pipe Tutti 3 Organ 121 10 19 Pipe Tutti 4 Organ 121 0 20 Reed Organ GM Organ 121 1 20 Puff Organ Organ 121 2 20 Small Pipe Organ 121 3 20 Flauto Pipes Organ 121 4 20 Pipe Flute 1 Organ 121 5 20 Pipe Flute 2 Organ 121 0 21 Accordion GM Accordion 121 1 21 Accordion 2 Accordion 121 2 21 Akordeon Accordion 121 3...

Page 296: ... Guitar 121 1 27 Det Clean Gtr Guitar 121 2 27 Mid Tone Gtr Guitar 121 3 27 Chorus Guitar Guitar 121 4 27 Vintage S 2 Guitar CC00 CC32 PC Name Bank GM2 121 5 27 Proces E Guitar Guitar 121 6 27 Single Coil Guitar 121 7 27 New Stra Guitar Guitar 121 8 27 Guitarish Guitar 121 9 27 L R E Guitar 1 Guitar 121 10 27 L R E Guitar 2 Guitar 121 11 27 Country Nu Guitar 121 12 27 Funky Wah RX Guitar 121 13 27...

Page 297: ...121 3 36 FunkSlap Bass RX Bass 121 4 36 SlapFing Bass RX Bass 121 5 36 SlapPick Bass RX Bass CC00 CC32 PC Name Bank GM2 121 6 36 Slap Bass 3 Bass 121 0 37 Slap Bass 2 GM Bass 121 1 37 Thumb Bass Bass 121 2 37 Dyna Bass Bass 121 3 37 Dyna Slap Bass Bass 121 4 37 Chorus Slap Bass Bass 121 5 37 The Other Slap Bass 121 6 37 Slap Bass 4 Bass 121 7 37 Slap Bass 5 Bass 121 0 38 Synth Bass 1 GM Bass 121 1...

Page 298: ...al 121 15 52 Femal Scat Strings Vocal 121 16 52 Male Scat Strings Vocal 121 17 52 Scat V Bass1 Strings Vocal 121 18 52 Scat V Bass2 Strings Vocal 121 19 52 Scat Voices RX Strings Vocal CC00 CC32 PC Name Bank GM2 121 20 52 Scat Voices DNC Strings Vocal 121 0 53 Voice Oohs GM Strings Vocal 121 1 53 Humming Strings Vocal 121 2 53 Doolally Strings Vocal 121 3 53 Airways Strings Vocal 121 0 54 Synth Vo...

Page 299: ...ynth Brass 5 Brass 121 0 63 Synth Brass 2GM Brass 121 1 63 Synth Brass 4 Brass 121 2 63 Analog Brass 2 Brass 121 3 63 Brass Pad Brass CC00 CC32 PC Name Bank GM2 121 4 63 Big Panner Synth 1 121 5 63 Synth Brass 6 Brass 121 0 64 Soprano Sax GM Sax 121 1 64 Sweet Soprano 3 Sax 121 2 64 Soprano Pro Sax 121 3 64 Sweet Soprano 1 Sax 121 4 64 Sweet Soprano 2 Sax 121 0 65 Alto Sax GM Sax 121 1 65 Alto Bre...

Page 300: ...1 5 84 Brian Sync Synth 2 121 6 84 Arp Twins Synth 2 121 7 84 LoFi Ethnic Synth 2 CC00 CC32 PC Name Bank GM2 121 0 85 Voice Lead GM Strings Vocal 121 1 85 Ether Voices Strings Vocal 121 2 85 Cyber Choir Strings Vocal 121 0 86 Fifths Lead GM Synth 2 121 1 86 Crimson 5ths Synth 1 121 0 87 Bass Lead GM Synth 2 121 1 87 Soft Wrl Synth 2 121 2 87 Electro Lead Synth 2 121 3 87 Rich Lead Synth 2 121 4 87...

Page 301: ... Guitar 121 3 105 Jaw Harp SFX 121 4 105 Banjo RX Guitar CC00 CC32 PC Name Bank GM2 121 5 105 Oud 1 Guitar 121 0 106 Shamisen GM Guitar 121 0 107 Koto GM Guitar 121 1 107 Taisho Koto Guitar 121 2 107 Kanoun 2 Guitar 121 3 107 Kanoun Trem 2 Guitar 121 4 107 Kanoun Mix Guitar 121 5 107 Kanoun 1 Guitar 121 6 107 Kanoun Trem 1 Guitar 121 7 107 Ac Baglama 1 Guitar 121 8 107 Ac Baglama 2 Guitar 121 9 10...

Page 302: ... 125 Train SFX 121 7 125 Jet Plane SFX 121 8 125 Starship SFX 121 9 125 Burst Noise SFX 121 0 126 Applause GM SFX 121 1 126 Laughing SFX 121 2 126 Screaming SFX CC00 CC32 PC Name Bank GM2 121 3 126 Punch SFX 121 4 126 Heart Beat SFX 121 5 126 Footsteps SFX 121 6 126 Stadium SFX 121 0 127 Gun Shot GM SFX 121 1 127 Machine Gun SFX 121 2 127 Laser Gun SFX 121 3 127 Explosion SFX 123 7 16 Digital Draw...

Page 303: ...transition between notes Use the Sound Controllers 1 and 2 to enable the Slide Guitar or Harmonics sounds Press on the keys to activate the Vibrato Pull the joystick back to trigger Body Noise A typ ical Note Off sound is heard on Key Off Sometimes the Guitar Fret noise can be heard Steel Gtr DNC Guitar P21 121 35 25 This Sound is very similar to Steel Gtr RX1 where a very complex sound is created...

Page 304: ...ion between notes Sound Controllers 1 and 2 will enable different bend ings Push the joystick forward to play a Clarinet with a crescendo attack Pull the joystick back to slightly filter the sound and hear a richer sound when the joystick is moved totally back An RX Noise is heard on Key On and Key Off Press the Damper pedal down to hear the Breath sound Flute DNC Woodwinds P7 121 11 73 Legato pla...

Page 305: ...azz Kit GM 120 0 33 Jazz Kit RX1 120 0 34 Jazz Kit RX2 120 0 35 Jazz Kit RX3 120 0 36 39 remap to 32 120 0 40 Brush Kit GM 120 0 41 Brush Kit 2 120 0 42 Brush Kit RX1 120 0 43 Brush Kit RX2 120 0 44 Brush Kit RX3 120 0 45 47 remap to 40 120 0 48 Orchestra Kit GM 120 0 49 Orchestra Kit GM 120 0 50 Bdrum Sdrum Kit 120 0 51 Arabian Kit 1 120 0 52 55 remap to 48 120 0 56 SFX Kit GM 120 0 57 SFX Kit 2 ...

Page 306: ... 66 Theater Organ1 67 Theater Org2 68 E Organ CX 3 69 E Organ Perc O1W 70 E Organ Fast Click 71 E Organ Perc 1 72 E Organ Perc 2 73 E Organ Perc 3 74 E Organ Perc 4 75 M1 Organ1 76 M1 Organ2 77 Organ1 78 Organ2 79 Organ2LP 80 Organ3 Jazz 81 BX3 Perc 3rd 82 E Organ Vox 83 E Organ Soft 84 E Organ Full 85 E Organ Dist 86 Rotary Organ 1 87 Rotary Organ 1LP 88 Rotary Organ 2 89 Super BX3 90 Super BX3LP...

Page 307: ...ce 264 Doo VoiceLP 265 Solo Violin Vibrato 266 Violin 267 Viola Expressive mf 268 Viola Expressive ff 269 Viola 270 Cello Contrabass 271 Violin Cello 272 Strings Quartet 273 Strings Quartet Vibrato1 274 Strings Quartet Vibrato2 275 Pizzicato 276 StereoStrings Ensemble_L 277 StereoStrings Ensemble_R 278 Strings Ensemble 279 Strings Ensemble Tremolo 280 Pizzicato Ensemble 281 Harp 282 Steel Guitar1 ...

Page 308: ... RB Saw Bass 439 RB Square Bass 440 Chrom Res 441 Detuned Super 442 Detuned PWM 443 Synth Brass 444 An Strings1 445 An Strings2 446 Analog Vintage 447 White Pad 448 N1 Air Vox 449 Ether Bell 450 Ether BellLP 451 Lore 452 Lore NT 453 Space Lore 454 Wave Sweep1 455 Wave Sweep2 456 Wave Sweep3 457 Syn Ghostly 458 Ghost 459 Syn Air Pad 460 Dream Str 461 Syn AirVortex 462 Syn Palawan 463 Syn Clicker 46...

Page 309: ... Chinese Gong 574 Snare Ghost 575 Rain Stick 576 Congas 577 Quinto Bongos 578 Okonkolo 579 Timbales 580 Cowbell Claves 581 Cabasa 582 Shaker 583 Cabasa Shaker 584 Dumbek Djambe Udu 585 Caxixi 586 Tabla Baya 587 WoodBlock Castanet 588 Mix Latin Perc 589 Kangaroo 590 DJ Eddie Set 591 Stereo Snares1 2_L 592 Stereo Snares1 2_R 593 Stereo Snare1_L 594 Stereo Snare1_R 595 Stereo Snare2_L 596 Stereo Snar...

Page 310: ... 84 SD Piccolo1 p 2 85 SD Piccolo1 mf 2 86 SD Piccolo1 f 2 87 SD Piccolo2 pp 2 88 SD Piccolo2 p 2 89 SD Piccolo2 mf 2 90 SD Piccolo2 f 2 91 SD Solid1 p 2 92 SD Solid1 mf 2 93 SD Solid1 f 2 94 SD Solid2 p 2 95 SD Solid2 mf 2 96 SD Solid2 f 2 97 SD Maple1 pp 2 98 SD Maple1 p 2 99 SD Maple1 mp 2 100 SD Maple1 mf 2 101 SD Maple1 f 2 102 SD Maple1 ff 2 103 SD Maple2 pp 2 104 SD Maple2 p 2 105 SD Maple2...

Page 311: ...or f 4 260 Tom1 Open Floor f flam 4 261 Tom2 Hi p 4 262 Tom2 Hi f 4 263 Tom2 Mid p 4 264 Tom2 Mid f 4 265 Tom2 Low p 4 266 Tom2 Low f 4 267 Tom2 Floor p 4 268 Tom2 Floor f 4 269 Tom3 Hi 4 270 Tom3 Floor 4 271 Tom4 Hi 4 272 Tom4 Low 4 273 Tom4 Floor 4 274 Tom5 Hi 4 275 Tom5 Low 4 276 Tom6 Vintage Hi mp 4 277 Tom6 Vintage Hi mf 4 278 Tom6 Vintage Hi ff 4 279 Tom6 Vintage Mid mp 4 280 Tom6 Vintage Mi...

Page 312: ...mf 6 454 Tumba Open1 f 6 455 Tumba Open2 mf 6 456 Tumba Open2 f 6 457 Tumba Open Flam 6 458 Tumba Glissando 6 459 Tumba Basstone 6 460 Tumba O Slap Flam mf 6 461 Tumba O Slap Flam f 6 462 Tumba Muffled 6 463 Conga1 Lo Basstone 6 464 Conga1 Lo Open mf 6 465 Conga1 Lo Open Slap 6 466 Conga1 Lo Glissando 6 467 Conga1 Lo Muffled 6 468 Conga1 Lo Closed 6 469 Conga1 Lo Closed Slap 6 470 Conga1 Lo Heel 6...

Page 313: ... Open 7 625 Cowbell4 Mute 7 626 Cowbell5 Open a 7 627 Cowbell5 Open b 7 628 Cowbell5 Mute 7 629 Cowbell6 7 630 Agogo Bell 7 631 Chacha Bell 7 632 Mambo Bell 7 633 Triangle Open 7 634 Triangle Mute 7 635 Sleigh Bell 7 636 Rap Sleigh Bell 7 637 Jingle Bell 7 638 Bells Open 7 639 Finger Cymbal 7 640 Marc Tree 7 641 Marc TreeLP 7 642 Flexatone 7 643 Chinese Gong 5 644 Claves1 Lo a 6 645 Claves1 Lo b 6...

Page 314: ...rbuka1 Closed 6 809 M E 1 Darbuka2 6 810 M E 1 Darbuka3 6 811 M E 1 Darbuka4 6 812 M E 1 Darbuka D1 6 813 M E 1 Darbuka D2 6 814 M E 1 Darbuka D3 6 815 M E 1 Darbuka5 D1 6 816 M E 1 Darbuka5 D2 6 817 M E 1 Darbuka5 D3 6 818 M E 1 Darbuka6 Mute 6 819 M E 1 Darbuka6 Open 7 820 M E 1 Darbuka6 Rim 6 821 M E 1 Darbuka6 Dom Ak 6 822 M E 1 Kup1 6 823 M E 1 Kup2 6 824 M E 1 Ramazan Davul1 6 825 M E 1 Rama...

Page 315: ...924 Air Vortex 8 925 Noise White 8 926 Noise FM Mod 8 927 Tubular 7 928 Gamelan 7 929 Tambura 7 930 Gtr Cut Noise1 8 931 Gtr Cut Noise2 8 932 Power Chord 8 933 Fret Noise 8 934 Dist Slide1 8 935 Dist Slide2 8 936 E Gtr Pick1 8 937 E Gtr Pick2 8 938 Gtr Scratch1 8 939 Gtr Scratch2 8 940 Amp Noise 8 941 Space Lore 8 942 Swish Terra 8 943 Hand Drill 8 944 Mouth Harp 8 945 Empty 1 Sample Family ...

Page 316: ... 1 CC 0 CC 32 PC Bank 2 CC 0 CC 32 PC Bank 3 CC 0 CC 32 PC Bank 4 1 1 0 0 1 1 0 1 2 0 1 3 0 2 1 1 1 1 3 2 2 2 2 4 3 3 3 3 5 4 4 4 4 6 5 5 5 5 7 6 6 6 6 8 7 7 7 7 9 8 8 8 8 10 9 9 9 9 11 10 10 10 10 12 11 11 11 11 13 12 12 12 12 14 13 13 13 13 15 14 14 14 14 16 15 15 15 15 CC 0 CC 32 PC Bank 5 CC 0 CC 32 PC Bank 6 CC 0 CC 32 PC Bank 7 CC 0 CC 32 PC Bank 8 1 1 4 0 1 5 0 1 6 0 1 7 0 2 1 1 1 1 3 2 2 2...

Page 317: ...32 PC Bank 14 CC 0 CC 32 PC Bank 15 CC 0 CC 32 PC Bank 16 1 1 12 0 1 13 0 1 14 0 1 15 0 2 1 1 1 1 3 2 2 2 2 4 3 3 3 3 5 4 4 4 4 6 5 5 5 5 7 6 6 6 6 8 7 7 7 7 9 8 8 8 8 10 9 9 9 9 11 10 10 10 10 12 11 11 11 11 13 12 12 12 12 14 13 13 13 13 15 14 14 14 14 16 15 15 15 15 CC 0 CC 32 PC Bank 17 CC 0 CC 32 PC Bank 18 CC 0 CC 32 PC Bank 19 CC 0 CC 32 PC Bank 20 1 1 16 0 1 17 0 1 18 0 1 19 0 2 1 1 1 1 3 2...

Page 318: ...plash 10 Cuica 1 10 Darbuka 7 10 Rik 2 10 Timpani 4 11 Sticks 11 Cuica 2 11 Darbuka 8 11 Rik 3 11 Orchestra Tutti 12 Rim Shot 12 Jingle Bell 12 Davul 12 Sagat 1 12 13 Hi Tom Flam 13 Long Guiro 13 Douf Rim Ak 13 Sagat 2 13 14 Mid Tom Flam 14 Short Guiro 14 Dragon Gong 14 Tef 1 14 15 Low Tom Flam 15 Open Bells 15 Hollo 1 15 Tef 2 15 16 Tom Flam End 16 Rain Stick 16 Hollo 2 16 Tef 3 16 17 Drum Single...

Page 319: ...2 3 Drum 8 Bt Easy 3 Perc Latin 1 3 Grv Brush 3 Bass Pick Busy 3 Piano Accomp 3 4 Drum 8 Bt Medium 4 Perc Latin 2 4 Grv Jazzy 4 Bass Finger Easy 4 Piano Accomp 4 5 Drum Rock 1 5 Perc Latin 3 5 Grv Latin 5 Bass Finger Med 5 Piano Accomp 5 6 Drum Rock 2 6 Perc Mix 6 Grv HipHop 1 6 Bass Finger Walk 6 Piano Accomp 6 7 Drum Brush 1 3 4 7 Perc Soft 7 Grv HipHop 2 7 Bass Latin 7 Piano Accomp 7 8 Drum Bru...

Page 320: ...h Seq 11 11 Nature River 12 Gtr Steel Mute 1 12 French Horns 1 12 Solo Gtr Funk 12 Synth Portam 1 12 Nature Storm 13 Gtr Steel Mute 2 13 French Horns 2 13 Solo Piano 1 13 Synth Portam 2 13 Metronome 3 4 14 Guitar Country 14 Strings 1 14 Solo Piano 2 14 Synth Portam 3 14 PreCount 3 4 15 Gtr Nylon Strum1 15 Strings 2 15 Solo Piano 3 15 Synth Portam 4 15 Metronome 4 4 16 Gtr Nylon Strum2 16 Strings 3...

Page 321: ...eo Chorus 27 St HarmonicChorus 28 St Biphase Mod 29 Multitap Cho Delay 30 Ensemble 31 Polysix Ensemble 32 Stereo Flanger 33 St Random Flanger 34 St Env Flanger 35 Stereo Phaser 36 St Random Phaser 37 St Env Phaser 38 Stereo Vibrato 39 St Auto Fade Mod 40 2Voice Resonator 41 Doppler 42 Scratch 43 Grain Shifter 44 Stereo Tremolo 45 St Env Tremolo 46 Stereo Auto Pan 47 St Phaser Trml 48 St Ring Modul...

Page 322: ...100 OD HG Phaser 101 OD HG Mt Delay 102 Wah Amp Sim 103 Decimator Amp 104 Decimator Comp 105 AmpSim Tremolo 106 Cho Flng Mt Dly 107 Phaser Cho Flng 108 Reverb Gate FX assignable to FX processors B and D only 109 St Mltband Limiter 110 PianoBody Damper 111 OD HyperGain Wah 112 GuitarAmp P4EQ 113 BassTubeAmp Cab 114 St Mic PreAmp 115 Multitap Cho Delay 116 St Pitch Shifter 117 St PitchShift BPM 118 ...

Page 323: ...Upp1 P1_Tr 1 P2_Tr 1 Upp1 P1_Tr 1 P2_Tr 1 Upp 1 2 Upp2 Upp2 P1_Tr 2 P2_Tr 2 Upp2 P1_Tr 2 P2_Tr 2 3 Upp3 Upp3 P1_Tr 3 P2_Tr 3 Upp3 P1_Tr 3 P2_Tr 3 4 Lower Lower P1_Tr 4 P2_Tr 4 Lower P1_Tr 4 P2_Tr 4 5 P1_Tr 5 P2_Tr 5 P1_Tr 5 P2_Tr 5 6 P1_Tr 6 P2_Tr 6 P1_Tr 6 P2_Tr 6 7 P1_Tr 7 P2_Tr 7 P1_Tr 7 P2_Tr 7 8 P1_Tr 8 P2_Tr 8 P1_Tr 8 P2_Tr 8 9 Bass Bass P1_Tr 9 P2_Tr 9 Bass P1_Tr 9 P2_Tr 9 10 Drum Drum P1_T...

Page 324: ...ects the previous Performance Style Change Style number Sound Up Selects the next Sound Sound Down Selects the previous Sound Transpose Down Same functions of the control panel but tons with the same name Transpose Up Upper Octave Up Upper Octave Down Punch In Out Turns Punch Recording on off FX A Mute FX B Mute FX C Mute FX D Mute FX All Mute Style Upper1 Mute Style Upper2 Mute Style Upper3 Mute ...

Page 325: ...age Up SongBook Next Moves to the next SongBook entry in the selected Custom List Pad 1 Same functions of the control panel but tons with the same name Pad 2 Pad 3 Pad 4 Pad Stop Sound Controller 1 To be used as triggers for two DNC parameter transmit CC 80 or CC 81 When these functions are assigned to the selected physical controller this lat ter becomes the corresponding Sound Controller Sound C...

Page 326: ...Mute Style Upper1 Mute Style Upper2 Mute Style Upper3 Mute Style Lower Mute Style Drum Mute Style Percussion Mute Style Bass Mute Style Acc1 Mute Style Acc2 Mute Style Acc3 Mute Style Acc4 Mute Style Acc5 Mute Style Acc1 5 Mute Song Melody Mute Mute of Song track 4 usually the Mel ody track Song Drum Bass Mode Mute of all tracks apart for track 2 usu ally Bass and 10 usually Drum Solo Selected Tra...

Page 327: ...e octave is divided in 7 notes all white keys when Key is C The black keys are tuned as in the Equal tun ing Stretch Simulates the stretched tuning of an acoustic piano Basically an equal tuning the lowest notes are slightly lower while the highest notes are slightly higher than the standard User User scale i e scale programmed by the user for the Style Play Backing Sequence and Song Play modes Th...

Page 328: ...F CutOff Filter cutoff Brilliance 75 Decay T Decay time 76 Lfo1 Sp Vibrato speed 77 Lfo1 Dpt Vibrato depth 78 Lfo1 Dly Vibrato initial delay 79 FilterEg 80 Gen pc 5 81 Gen pc 6 82 Gen pc 7 83 Gen pc 8 84 Port ctl 85 90 Undef ctl 91 Fx A C A C reverb send level 92 Fx 2 ctl 93 Fx B D B D modul send level 94 Fx 4 ctl 95 Fx 5 ctl 96 Data Inc 97 Data Dec 98 NRPN Lsb See table below 99 NRPN Msb See tabl...

Page 329: ... remote Style and Player controls These messages are to be sent on the Control channel see MIDI MIDI In Channels on page 230 If a Style is already selected just send the Program Change message PC Function PC Function PC Function PC Function PC Function Style Elements 80 Intro 1 81 Intro 2 82 Intro 3 Count In 83 Variation 1 84 Variation 2 85 Variation 3 86 Variation 4 87 Fill 1 88 Fill 2 89 Fill 3 ...

Page 330: ...8 O O Vibrato Rate Depth Delay 1 98 99 O O NRPN LSB MSB 1 2 100 101 O O RPN LSB MSB 1 3 120 121 X O All sounds off Reset all controllers 1 Program Change O 0 127 O 0 127 1 True 0 127 System Exclusive O O 4 System Common Song Position X X Song Select X X Tune X X System Real Time Clock O O 5 Commands O O 5 Aux Messages Local On Off X X All Notes Off X O 125 Active Sense O O Reset X X Notes 1 Sent a...

Page 331: ...in Split keyboard mode in Full Upper keyboard mode Fingered 3 or Expert are selected instead Recognized chords 2 note T T T T 3 note T T T T T Major 2 note 4 note T T Major 6th 3 note T 4 note T T Major 7th 2 note T T constituent notes of the chord can be used as tension 3 note T T Sus 4 2 note 3 note Sus 2 3 note T T T T 2 note T T T 4 note T T T T T Dominant 7th 4 note T T Dominant 7th Sus 4 3 n...

Page 332: ... T 4 note T T Minor Major 7th 3 note T 3 note T T Diminished 4 note Diminished 7th 4 note T T Diminished Major 7th 4 note T T T Minor 7th 5 3 note T T Augmented 4 note T T T T Augmented 7th 4 note T T T T Augmented Major 7th No 3rd no 5th No 3rd 1 note 2 note 3 note T T Minor 2 note T 4 note T T Minor 6th ...

Page 333: ...opening it To prevent your body s static electricity from damaging the board s components touch an unpainted metallic component before proceeding with the installation Installation For installation you will need a cross point screwdriver not sup plied 1 Extract the video card a from its package being careful not to touch any component on its surface with your fin gers Remove the four screws b and ...

Page 334: ...ision set you can use a cable of the type RCA to RCA if the television set is equipped with a Video Composite input or RCA to SCART if the television set is equipped with a SCART connector You can buy the needed cables at a store that sells television equipment 2 Turn the instrument on and press the GLOBAL button to gain access to the Global edit mode Go to the Video Inter face Video Out page and ...

Page 335: ...crewdriver not sup plied 1 From the bottom of the instrument remove the two fixing screws b and keep them apart Open the cover a to gain access to the inside of the RAM slot 2 Locate the original RAM module d and remove it by lightly pushing out on the two securing clamps c one on each end 3 Lightly push out on the two securing clamps c one after the other After the last one is pushed out the RAM ...

Page 336: ...ad this license agreement before you install this soft ware Your installation of this software will be taken to indicate your acceptance of this agreement Windows Installing the KORG USB MIDI Driver Please connect the Pa2X to the computer via an USB cable only after having installed the KORG USB MIDI Driver Tools Note You must install a separate driver for each USB port you will use 1 Insert the i...

Page 337: ...e installer Install it according to the instructions appearing on screen Driver s ports After installation the following ports will be shown in you MIDI application e g sequencer among the other MIDI devices Pa2X KEYBOARD This allows for reception of MIDI messages from the Pa2X keyboard and controller s data to the MIDI application running on the Mac Pa2X SOUND This allows for transmission of MIDI...

Page 338: ... the Voice Processor Effects page of the Global mode Style Play mode Style Play Selects the Style Setup page Preferences sec tion Memory Selects the Style Preferences page Prefer ences section Var or Fill Selects the corresponding Style Element in the Drum Fill page Style Controls section Chord Scanning either Selects the Chord Recognition parameter in the Split panel Main Page Split Selects the K...

Page 339: ... or Performances been modified Load the appropriate data Styles or Perfor mances 253 Sound does not stop Make sure that the damper switch calibration parameter is set correctly 227 The selected Style or Song cannot start Make sure that the Clock parameter is set to Internal If you are using the MIDI Clock of another device you must set the MIDI Clock parameter to MIDI or USB depending on the port ...

Page 340: ...the device inserted correctly Is the write protect tab of the disk in the protect position Cannot load data from a device Is the device inserted correctly Does the device contain data compatible with the Pa2X 251 The message Over Current Con dition Detected on USB port please remove the USB media appears in the display The USB device is probably defective due to a short circuit and cannot be used ...

Page 341: ... Style Grooves Using the internal PCM RAM memory PLAYER SEQUENCER XDS Double Player Separate transport controls for each Player X Fader Slider 4 STS saved with the Song In SongBook Mode Tracks 16 16 Sequencer Edit Record Edit functions Backing Sequence Quick Record Real Time Record Step Record Edit Lyrics Chords On Screen compatible with most popular formats Score View On Screen OTHER FEATURES MP3...

Page 342: ...ack connection Pedals 1 Damper 1 Assignable Footswitch Pedal EC5 Power Supply AC Universal Voltage OPTIONS USB Memory Yes CD FD Through USB Host Sampling RAM 256 MB Sampling Memory Board EXB M256 Video Interface Graphic Video Interface VIF4 NTSC PAL board Expression Volume Pedal Korg EXP 2 Korg XVP 10 Multi Switch Pedal Korg EC5 Damper Pedal Korg DS 1H supporting half pedaling Switch Pedal Korg PS...

Page 343: ...obal 219 238 Write Global Setup 237 MIDI Setup 237 238 Sequencer Setup 217 Song Play Setup 181 Style Play Setup 113 Talk Configuration 237 Voice Processor Preset 238 Voice Processor Setup 237 Global channel 270 Groove Quantize 177 H Harmony track Voice Processor 178 215 in SongBook entries 189 MIDI channel 229 Note Input Source 242 I Inputs 12 14 20 233 Intro 9 J Jukebox 165 176 K Keyboard Mode Sp...

Page 344: ...5 Selecting 84 217 Standard MIDI File 270 Song Play mode 159 162 SongBook 184 192 Sound Editing 104 176 209 Selecting 12 82 Selecting Auto 225 Split Keyboard Mode 11 Lock 223 Split Point 95 270 Standard MIDI File 159 193 270 STS See Single Touch Setting Style Ending 9 Fill 9 Intro 9 Recording 114 144 Selecting 8 83 Selecting Auto 225 Style Performance 87 Variation 9 Style Performance Selecting see...

Page 345: ...diting 241 Lock 223 Writing 238 Voice Processor Setup Editing 235 239 Writing 237 Volume Balance 87 159 Balance Keyboard Style or Ply 6 19 Balance Player 19 Individual tracks Sequencer 206 Song Play 171 Style Play 96 Master 6 19 87 159 ...

Page 346: ......

Page 347: ......

Page 348: ... KORGItaly 2008 All rights reserved PA RTN UM BER M A N 0010019 Address KORG ITALY SpA Via Cagiata 85 I 60027 Osimo An Italy Web www korgpa com www korg co jp www korg com www korg co uk ...

Reviews: