


6
Setting Up
This.section.describes.preparation.and.basic.procedure.
for.using.the.MMA130.
Turn on the power
1.
. Set. the. MASTER. VOLUME. knob. on. the. MMA130. to.
minimum.
2.
. Connect. the. included. power. cable. to. the. AC. power.
connector,.and.then.connect.the.cable.to.an.AC.outlet.
For. battery. operation,. please. refer. to. the. “Installing.
batteries”.section.for.information.on.how.to.insert.bat-
teries.
3.
. Connect.one.side.of.a.cable.to.the.output.jack.of.your.
electronic. musical. instrument. and. connect. the. other.
side.to.the.INPUT.jack.
Refer.to.the.“Connecting.other.equipment”.section.for.
information.on.how.to.connect.your.equipment.
4.
. Turn.on.the.power.to.the.connected.device(s).
Note:
. The. device. being. supplied. with. power. from. the.
MMA130’s.DC9V.jack.must.be.powered-on.after.step.5.
5.
. Turn.on.the.STANDBY.switch.
If.you.want.to.use.batteries,.set.the.STANDBY.switch.
to.the.BATTERY.position;.the.MMA130.will.run.on.bat-
tery.power..If.you.want.to.use.AC.power,.turn.on.the.
rear.panel.POWER.switch,.and.then.set.the.STANDBY.
switch.to.the.AC.position.to.turn.on.the.power.
6.
. Use.the.channel.1–4.VOLUME.knobs.and.the.MAS-
TER.VOLUME.knob.to.adjust.the.volume.
To turn off the power
To.turn.off.the.power,.first.minimize.the.MMA130’s.MAS-
TER.VOLUME.knob,.then.set.the.STANDBY.switch.to.the.
STANDBY.position,.and.finally.turn.off.the.POWER.switch.
Connecting other equipment
Here’s.how.to.connect.your.equipment.to.the.input.jacks.
and.adjust.the.volume.
1.
. Connect. the. cables. coming. from. the. output. jacks. of.
your.electronic.musical.instruments.or.other.equipment.
to.the.channel.1–4.input.jacks.
Use. the. channels. that. provide. the. appropriate. input.
level.for.your.device.
Connect.mic-level.devices.to.channels.1.or.2,.and.set.
their.LINE/MIC.select.switch.to.MIC.
Connect.line-level.devices.to.channels.1–4.
If.you.connect.a.line-level.device.to.channel.1.or.2,.set.
its.LINE/MIC.select.switch.to.LINE.
If.you’re.using.a.CD.or.MP3.player,.connect.it.to.the.
AUX.IN.jacks.
2.
. Use.the.channel.1–4.VOLUME.knobs.to.adjust.the.vol-
ume.balance.of.each.device.
Adjust.each.VOLUME.knob.so.that.the.corresponding.
peak.indicator.does.not.light.up.even.when.peaks.oc-
cur.on.the.device.connected.to.each.channel.
To.adjust.the.input.level.of.the.device.connected.to.the.
AUX.IN.jacks,.use.the.volume.control.of.the.connected.
device.to.adjust.its.output.
3.
. Slowly.raise.the.MASTER.VOLUME.knob.to.adjust.the.
overall.volume.
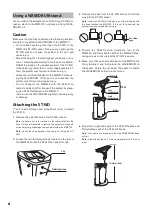
Installing batteries
Remove.the.battery.cover.from.the.cabinet.
Battery cover
Install.six.or.twelve.alkaline.C.batteries,.making.sure.to.
observe.the.correct.polarity.shown.in.the.illustration.
Note:
. Make.sure.that.each.battery.is.oriented.in.the.correct.
polarity.
Tip:
. If. you’re. using. twelve. batteries,. install. six. more. in. the.
same.way.
Choose.the.number.of.batteries.according.to.the.operat-
ing.time.that.you.require.
The.following.table.shows.the.available.operating.time.
Number of batteries Power mode
Operating time DC9V OUT in use*
Six.batteries
MAX
8.hours
1.hours
ECO
12.hours
2.5.hours
Twelve.batteries
MAX
16.hours
4.hours
ECO
24.hours
6.hours
*.With.a.WAVEDRUM.connected
Replacing the batteries
Replace.the.batteries.when.the.power.indicator.becomes.
dim.
Note:
. As.the.batteries.run.low,.you.might.hear.noise.or.inter-
ruptions.in.the.sound.
Note:
. Remove.batteries.immediately.when.they.are.no.longer.
usable..Leaving.depleted.batteries.installed.may.cause.mal-
functions. (such. as. battery. electrolyte. leakage).. You. should.
also.remove.the.batteries.if.you.won’t.be.using.the.MMA130.
for.an.extended.period.of.time.
Note:
. You.must.replace.the.batteries.in.sets.of.six..Do.not.mix.
fresh.and.used.batteries.in.the.same.set.
Summary of Contents for MMA130
Page 1: ...1 ...