Konig SAS-CAM11*0 Manual Download Page 8

ENGLISH

8

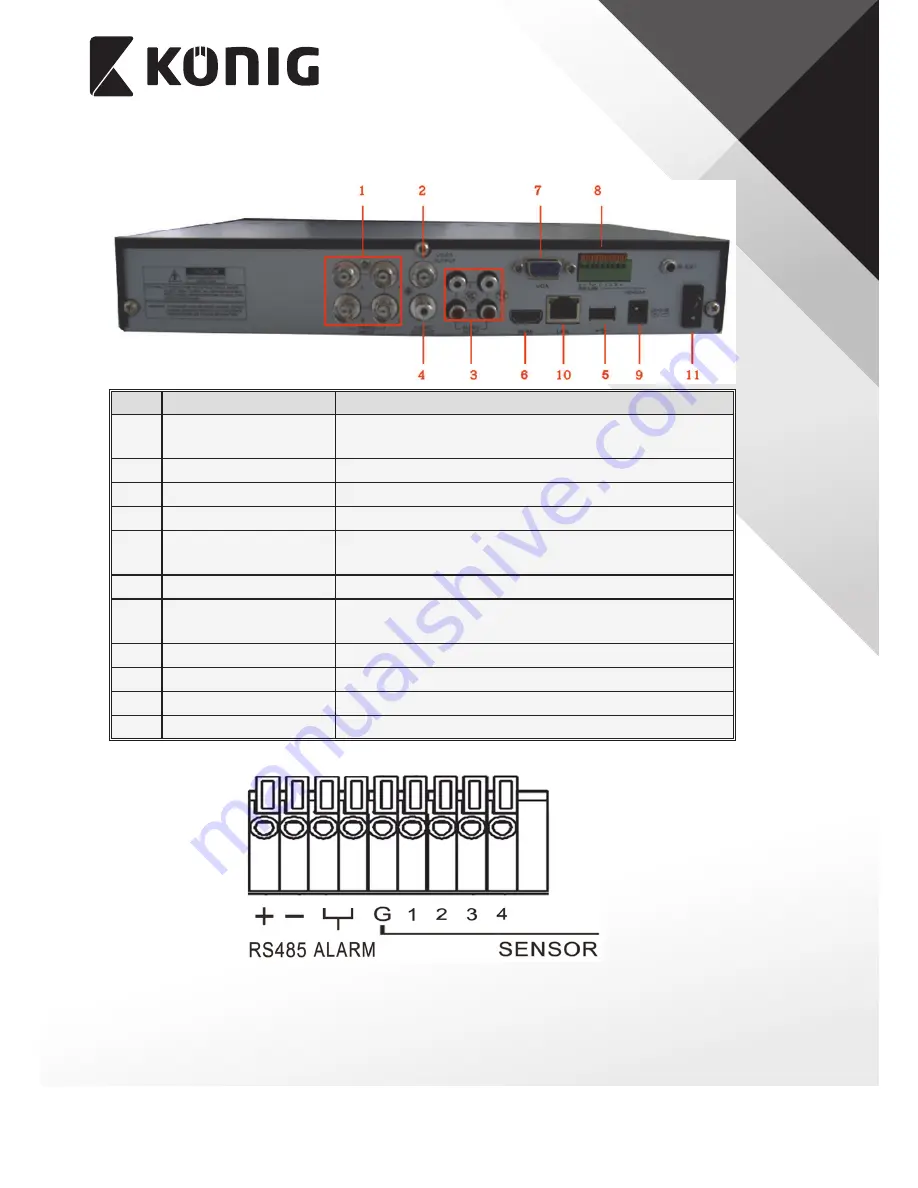
2�2 4CH DVR Rear Panel 

Item

Physical port

Connection method

1

Video input

Connect  video input device (BNC 

interface)

2

Video output

Connect monitor output(BNC interface)

3

Audio Input

4CH audio input (RCA interface)

4

Audio Output

Audio output (RCA interface)

5

USB Port

Connect USB device (Flash Drive, Hard Drive and 

Recorder etc)

6

USB Port

Connect USB mouse 

7

VGA Port

Connect to VGA monitor, such as PC monitor 

(Optional)

8

RS-485/Sensor/Alarm

RS485/Sensor/Alarm interface (see pin outs below)

9

Power Port

Connect power supply - DC 12 V 3 A

10

Ethernet: Port

Connect LAN, Ethernet (RJ45 interface)

11

Power Switch

Turn Power on and off

RS485/Sensor/Alarm port functions:

Alarm input:

 Connect [-] port of your sensor to G (GND) pin, and [+] port to channel input 

according to the alarm device you purchased.

Alarm output:

 Connect to the two ports marked with “out”

PTZ Port:

 Connect your camera to RS-485A and RS485B accordingly.

(other models may vary slightly)

Summary of Contents for SAS-CAM11*0

Page 1: ...SAS DVRSET35 45 SAS DVR1004 1008 1016 SAS CAM11x0 12x0 MANUAL...

Page 2: ...enu Guide 13 5 2 Main Menu 14 5 2 1 Display 14 5 2 1 1 Live mode 14 5 2 1 2 Output mode 15 5 2 1 3 Privacy Zone 16 5 2 2 Record set 17 5 2 2 1 Record parameters 17 5 2 2 2 Schedule 17 5 2 2 3 Main Str...

Page 3: ...ode 36 5 7 Record Search 36 5 8 Mute 36 5 9 Manual Record 36 5 10 Stop Record 36 5 11 Start Sequence 36 5 12 Start Cruise 36 CHAPTER 6 WEB APPLICATION MANAGER 37 6 1 ActiveX control download and insta...

Page 4: ...APPENDIX 51 7 1 Operation Function Table 51 7 2 Record Alarm setting 53 7 3 Mail box server List 53 7 4 Troubleshooting 54 7 5 Usage Maintenance 54 7 6 System Connection Diagram 55 CHAPTER 8 CAMERAS S...

Page 5: ...g this equipment during lightning storm or when unused for long periods of time 9 Accessories Do not place this equipment on an unstable cart stand or table When a cart is used use caution when moving...

Page 6: ...nput alarm management and external alarm signal inputs Network operation Supports remote surveillance by authority users to increase system security Mouse Operation Supports Mouse operation for faster...

Page 7: ...g power normally 3 Menu MENU ESC Enter into main menu Exit 4 PTZ PTZ Enter into PTZ control select Enter Edit operation 5 UP Move up 6 RIGHT Move right FWD 7 DOWN Move down 8 LEFT Move left RWD 9 Manu...

Page 8: ...Port Connect to VGA monitor such as PC monitor Optional 8 RS 485 Sensor Alarm RS485 Sensor Alarm interface see pin outs below 9 Power Port Connect power supply DC 12 V 3 A 10 Ethernet Port Connect LAN...

Page 9: ...t device 4 Menu Enter into Main menu Exit 5 Submenu Enter into Submenu toolbar 6 AV Up arrow key Volume adjust Down arrow key Volume adjust Left Right key Decrease increase parameter value of control...

Page 10: ...p dwell time display when dwell time display is activated By clicking left key you can adjust Color control bar and volume control bar Clicking combo box to access pull down menu By clicking left key...

Page 11: ...you use special hard driver for security and protection 3 2 Camera and Monitor Connection Connect camera cable to video input of DVR and from video output of DVR to Monitor via BNC connector Refer to...

Page 12: ...enu items and clicking any area outside the menu allows you exit the Pop up menu Note When internal HDD is not connected or an error occurs the character H will appear on the first channel of the live...

Page 13: ...nu Live set Privacy zone Backup Clip Set Record Parameters Schedule Main Stream Record Sub stream Network Set Email Set Mobile Set DDNS Set Network Motion Detection Alarm set Alarm Device PTZ set Seri...

Page 14: ...sition of each channel Color Click Setup option to enter into the Color setup interface shown as Picture 5 4 Covert allow you enable Live surveillance screen Show time allow you enable system time app...

Page 15: ...face shown as Picture 5 8 Picture 5 7 Picture 5 8 Picture 5 9 Video output Support CVBS output Live and Spot mode simultaneously and Live is main output and Spot is auxiliary output CH Sequence the op...

Page 16: ...ure 5 10 Picture 5 11 5 2 1 3 Privacy Zone The function Allow you setup privacy zone parameters according to Picture 5 12 Each channel could set up to four privacy zones and please follow below steps...

Page 17: ...e shown as Picture 5 15 Channel option allows you select one channel you desired To setup weekly schedules tick select the box of the record status you want Alarm General or No Record and then click o...

Page 18: ...5f s NTSC 1 30f s Bit rate it is used for saving in DVR user can select best better good three type Audio after tick selecting the option audio would be recorded simultaneously by system and come out...

Page 19: ...st Forward X2 X4 and X8 Slow play 1 2 1 4 and 1 8 speed Play Pause Frame Rewind X2 X4 and X8 When ending playback DVR will return back to previous menu shown as Picture 5 20 Play control Bar the play...

Page 20: ...ted to 24hours and allow user select 2hours 1hour 30minutes or user defined Detailed operation is as follows 1 Fixed time axis If you select option that means the processing control bar cover two hour...

Page 21: ...the desired record for playback And you also can filter the records you want to view based on date time and channel and record mode search Picture 5 20 First Page go to the first page on the list When...

Page 22: ...kup finished please click OK button shown as Picture 5 24 Note File will be saved as 264 format You could playback the record files via Dvr Client player When installing Dvrclient system will auto ins...

Page 23: ...backup record at x2 x4 x8 and or x16 speed Open click the icon to open one record file Click the icon to place the playing record to top Snapshot button click the icon to capture the live image and sa...

Page 24: ...E or static allocation and setting up web ports you can visit DVR remotely through a network or internet UPnP Universal Plug and Play function If router supports UPnP function and set UPnP to Enable s...

Page 25: ...such as 19009 and the port need to be forwarded to a router 3 Input HTTP port number such as 19010 and the port need to be forwarded to a router 4 Input a specified IP address to IP address column 5 T...

Page 26: ...4 1 2 Configure mobile port no such as 19011 and the port need forward to router Details please refer to section 5 2 4 3 3 Save the parameters and exit Main Menu 4 System auto restart 5 User name and...

Page 27: ...you set net transmittal frame rate User could select the relative value by pull down menu Bit rate allow you set net transmittal bit rate User could select the relative value by pull down menu Audio...

Page 28: ...egistered before applying for a domain name Password Input a password you set when registering a user name Click Apply button and restart the DVR and then enter the domain name such as http superdvr 3...

Page 29: ...click OK to save it 5 2 5 2 Alarm Set Click Main Menu Alarm Alarm to enter into the below window shown as Picture 5 44 Now you can perform alarm set based on different status Details please refer to L...

Page 30: ...ard Drive is not detected HDD damage power supply malfunction or HDD auto overwrite is off and free space is not enough an alarm will be triggered List 5 1 5 2 6 Device 5 2 6 1 HDD Set Click Main menu...

Page 31: ...first step when configuring your DVR to make sure that the hard drive HDD options are correctly set So strongly suggest that you do format the HDD before start the first record 5 2 6 2 PTZ Set Click M...

Page 32: ...50 and you are allow to configure DST status and mode Click NTP setup to enter into the interface shown as Picture 5 51 and now allow you enable disable the NTP function Picture 5 50 Picture 5 51 Not...

Page 33: ...live screens for all the channels Manual record allow you manually start stop record Backup Tick select the option the user is allowed to backup the record of all the channels Live Tick select the opt...

Page 34: ...the update 2 When the update is done system will be automatically restarted 3 Please manually recovery ex factory default after system rebooting 4 It will be available only when DVR return back to Pr...

Page 35: ...cus button to focus the image Click Iris button adjust iris to open or close How to set pre set point Total set up pre set point quantity Cur Point indicates starting point cruised System default poin...

Page 36: ...ord You can start manual record function or you also can click button on the Front panel or Remote controller to activate manual record Please stop record manually once you activate manual record 5 10...

Page 37: ...puter system is Vista you may need to setup the user authority Details please refer to the below picture Start Setup Control panel Tick use UAC to help protect your computer and confirm OK Vista Syste...

Page 38: ...DvrOcx ocx then login again 6 2 Web Application Manager Log in After ActiveX controls installation please input user name password and client port and select Main stream or Sub stream and then allow y...

Page 39: ...d will be saved to a specified position after starting record Snapshot function allow you capture the live images and save it to a specified position The image should be saved as bmp format Clicking t...

Page 40: ...ruise button PTZ speed control bar Iris Focus and Zoom control Preset setting clear Start cruise stop cruise 6 3 1 3 Video control Picture 6 6 Adjust video Hue Adjust video brightness Adjust video Con...

Page 41: ...rd yellow stand for normal record and original part stand for no record during this period Picture 6 9 If you tick select option that means the selected channel will playback synchronously otherwise y...

Page 42: ...l proportions and Adaptive Screen Resolution Stop all the channels Record file clip After opening playback click icon to clip the selected file and click again to stop the clip function Record clip fi...

Page 43: ...d Privacy zone Picture 6 13 1 Live Allow you modify channel name Position Show time and Record time If show time is set to disable current system time will not appear on the screen on Live mode and if...

Page 44: ...fer to DVR local setting shown as Picture 6 17 Herein allow user modifies the resolution frame rate Bit rate and audio of the record channel 6 3 3 3 Network Parameters Unfold Network option to enter i...

Page 45: ...guration parameters shown as Picture 6 22 Detailed parameters should be consistent with DVR local setting Picture 6 22 4 DDNS Setting Picture 6 23 After user applies for DDNS service shown as Picture...

Page 46: ...configure its Sensitivity Alarm out Alarm record and Alarm Capture etc Details setting should be consistent with DVR local setting Shown as Picture 6 25 Picture 6 25 2 I O Alarm allow you configure I...

Page 47: ...ture 6 27 2 PTZ Configuration shown as Picture 6 28 Details setting should be consistent with DVR local setting Picture 6 28 6 3 3 6 System Click System option to unfold its sub options General Users...

Page 48: ...3 Information Allow you check out device name number type MAC address software version IE version and hardware version shown as Picture 6 31 Picture 6 31 6 3 3 7 Advanced 1 Click Advance to unfold its...

Page 49: ...that the format of upgrade file is sw Picture 6 33 b Click Start update now processing bar will display current upgrade status shown as Picture 6 34 Picture 6 34 2 Load Default allow you recover defau...

Page 50: ...system maintain for DVR remotely shown as Picture 6 37 Detail setting should be consistent with DVR local setting Picture 6 37 6 3 4 Local setting Under Local setting option user could set record pat...

Page 51: ...corder backup and network download HDD Manage Check HDD status usage space setting HDD auto overwrite VID AUD Setting Adjust VGA resolution select system and volume control set interval and channel di...

Page 52: ...re Parenthesis generally indicate optional parameter value of previous menu Menu button Enter Clicking the button will save current parameter Default Recovery Clicking the button will recover current...

Page 53: ...netease com yeah net smtp yeah net pop netease com www qq com qq com smtp qq com pop qq com 163 net smtp 163vip net popx 163vip net www sina com sina com cn smtp sina com cn pop3 sina com cn www yaho...

Page 54: ...function 7 Q Why the Remote Controller can t work normally A Check if the battery is power off or check if the Remote Controller is broken 8 Q Can we records whilst playing back A Yeah you can do it T...

Page 55: ...iagram To camera input To DC 12 V input Connect divider cable to power supply Max 4 camera inputs for 1004 8 for 1008 16 for 1016 To AC 220 V power outlet Connection cable AC DC power supply Divider c...

Page 56: ...100 000 sec S N ratio 48 dB Gain auto Gamma correction 0 45 Protection IP66 Working temperature 20 C 55 C Video out 1 0 V p p 75 Voltage DC 12 V Dimensions 145x60x55mm Weight with bracket 350 g Produ...

Page 57: ...4 BNC connector for video 5 DC connector for 12 V Chapter 9 Mobile device support This DVR supports live feed from the cameras to your mobile device such as smart phone and or tablet So that you can h...

Page 58: ...information contact the retailer or the local authority responsible for waste management This product has been manufactured and supplied in compliance with all relevant regulations and directives vali...

Reviews: